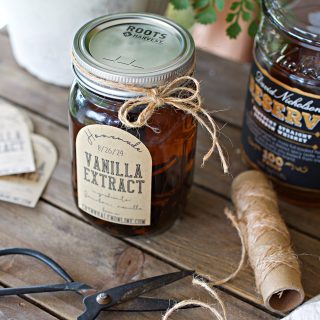
Homemade Two Ingredients Vanilla Extract Recipe
If you've ever thought about making your own homemade vanilla extract, you're in for a treat. Not only is it one of the easiest things you can do in the kitchen, but the end result is far superior to any store-bought vanilla extracts you'll find. Plus, it's a thoughtful and useful great gift during the holiday season or for any baker in your life. This easy vanilla extract recipe is going to be your new go-to kitchen favorite.
This post is part of my Harvest Jar Gift series in partnership with Roots and Harvest, where I'm sharing a new homemade gift idea once a week for 6 weeks that can be given in glass pint and mason jars. Last week, we made a drool-worthy homemade caramel sauce as the first project. This week, I'm excited to show you how to make homemade vanilla extract! It's a simple process that delivers rich, pure flavor-better than anything you'll find at the grocery store. Let's dive in!
I love sharing simple, homemade staples that are not only healthier but often more cost-effective than store-bought versions. Take this mayonnaise, for example. My goal is to show you that making everyday basics, like this ranch dressing, at home is easier than you might think. To see all the recipes and homestead happenings in real time make sure you're following over on Instagram. And now on to the vanilla!
Why I Use Bourbon Instead of Vodka
For this batch, I prefer using bourbon as the alcohol base. Bourbon adds a rich, caramel-like flavor to the vanilla extract, which brings depth to desserts like cakes, cookies, and ice cream. This extra layer of flavor can make all the difference when you want to elevate your baked goods.
But bourbon isn't the only option. If you prefer a more neutral flavor, vodka is a classic choice. Vodka allows the vanilla to truly shine without adding any other notes, making it a perfect option for most baking.
Other great alcohols to consider are:
- Rum: Adds a bit of sweetness and depth, ideal for recipes with tropical or rich flavors.
- Brandy: Brings fruity and oaky notes, offering a slightly different flavor profile perfect for custards and frostings.
Each type of alcohol contributes its own unique flavor to the final extract, so feel free to experiment with what works best for you. Personally, I love the depth bourbon brings to this recipe!
For the alcohol make sure you're using anything from 70 proof to 100 proof. This will get you the best results.
What You'll Need:
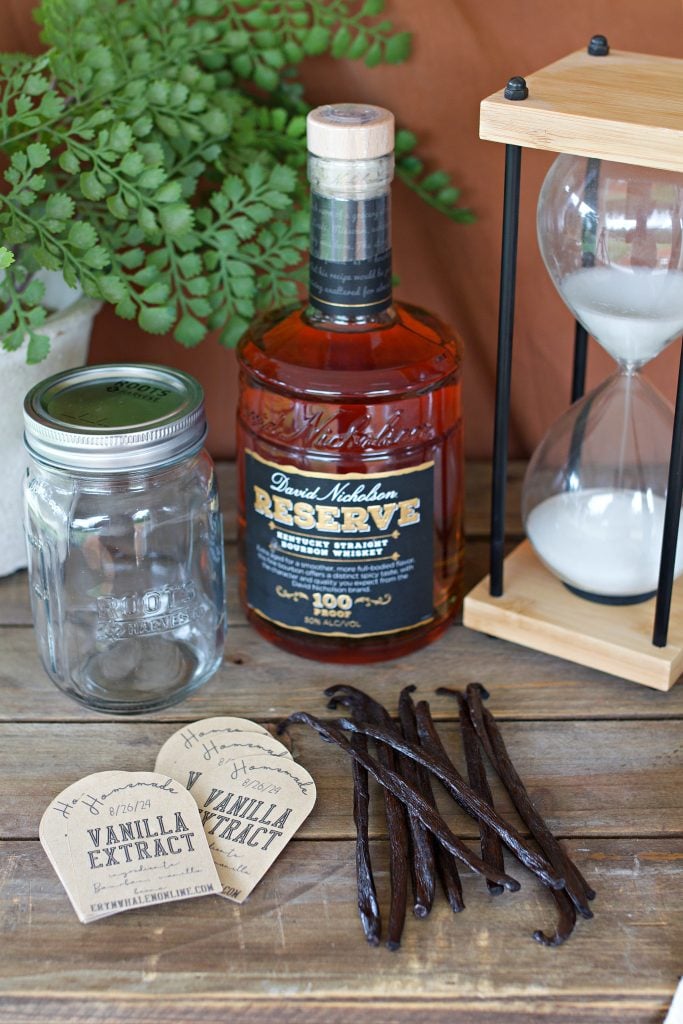
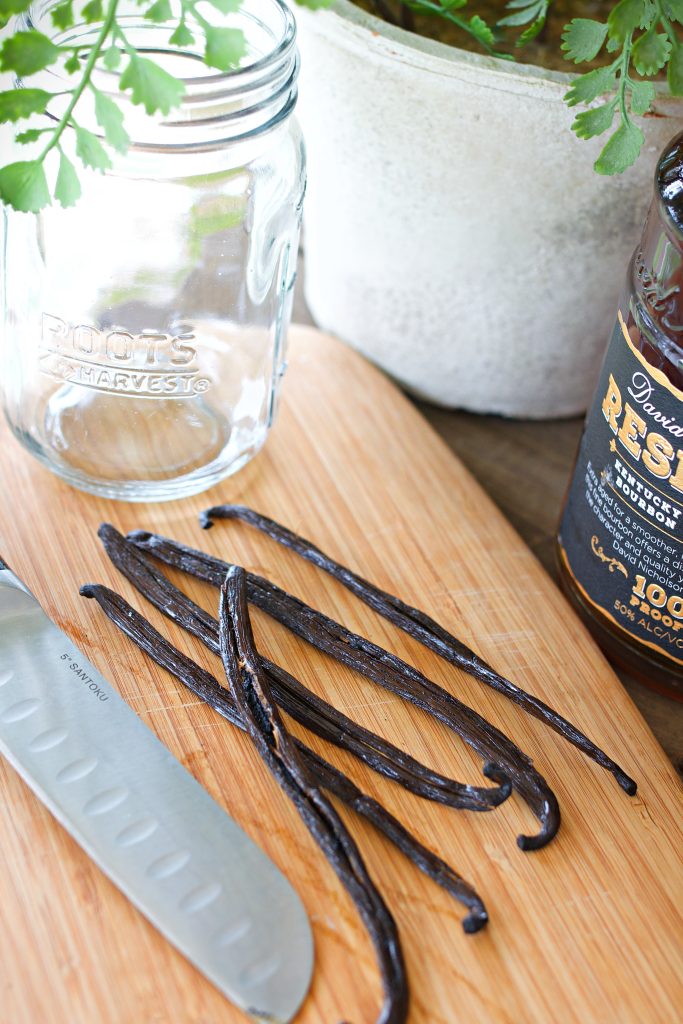
- Vanilla pods (Once ounce per pint) (preferably Madagascar vanilla beans or Mexican vanilla beans)
- A bottle of bourbon (or vodka, rum, or brandy, if you want to try different flavors)
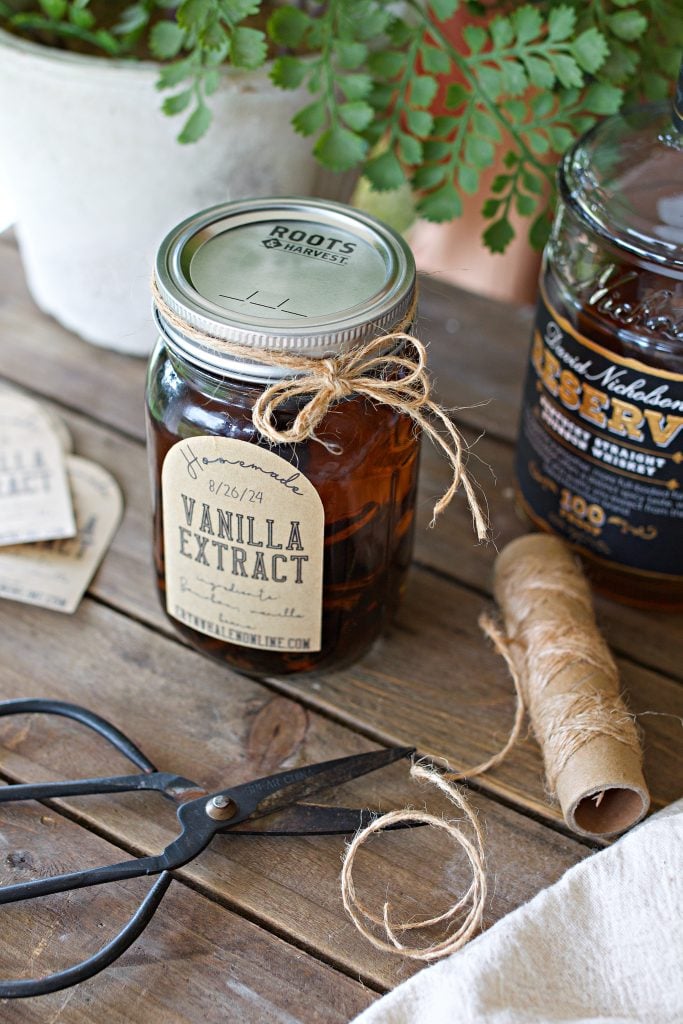
- Pint Jars (like these from Roots & Harvest)
- Grade A vanilla beans are perfect for this recipe, but Grade B works too
- Baker's twine and free labels for a personal touch if you're gifting!
Why Homemade Vanilla Extract Is Better
Using high quality alcohol and Grade A vanilla beans results in a rich, intense flavor that enhances any recipe, from baked goods to ice cream.
And don't worry if you think you'll be using a lot of vanilla beans. The great thing is that you can reuse them for future batches or even make vanilla sugar by placing them in a jar of sugar to flavor it over time.
Vanilla Beans: The Star Ingredient
When it comes to vanilla beans, Grade A beans are typically preferred for extracts because they are plumper and fuller, which leads to a more concentrated flavor. Madagascar vanilla beans are famous for their rich, creamy flavor, while Mexican vanilla beans bring a subtle spiciness that's great for complex recipes.
The price of vanilla has been increasing, which is another reason making your own extract is a good idea. By buying beans in bulk and stretching them across multiple recipes, you save money over time. Plus, with homemade, you avoid the cheap stuff and imitation vanilla that's full of artificial flavors.
Great for Gifting
Not only is this a fun project for your own use, but it also makes the best thing to give as a great gift. The holiday season is the perfect time to gift a jar. Include a printed version of this simple vanilla extract recipe along with the bottle and pass along to the recipient.
Pour the extract into bottles, pint off the recipe, tie it into the baker's twine, and attach the free label for a polished look. Your gift recipient will love the personal touch and the high quality flavor that they can use in their kitchen for months.
If you have a Cricut machine, you can use my exact label patter here. I made it sharable!
Tips for Success
- Store your bottles in a cool, dark place at room temperature to avoid exposure to direct sunlight.
- You don't need expensive alcohol; a mid-range bottle of bourbon or vodka works best, but avoid the cheap stuff for the best flavor.
- If your extract looks light after a few months, add a little extra bourbon and a few extra vanilla beans for a boost in flavor.
FAQs
How much alcohol should I use?
Generally, you need to use an ounce, which comes out to 6-8 beans per pint of alcohol. (I do weigh my beans with my kitchen scale for accuracy and to make sure it's potent enough.) This works well for a strong, flavorful extract. A standard bottle of bourbon will need around 25-30 beans for a full batch.
Can I reuse the beans?
Absolutely! After your first use, you can add more bourbon to the bottle and create a new batch. Just be sure to use fresh beans if you want to maintain strength.
Where's the best place to buy vanilla beans?
The best place is usually online from specialty spice shops, or Amazon, where I got mine. Look for fresh vanilla beans for the highest quality extract.
Final Thoughts on this Vanilla Extract Recipe
Making your own homemade vanilla extract is a rewarding and super simple process that yields an extract far better than anything you'll buy at the store. Whether it's for your own use or giving it as a perfect gift, you'll love the end result. Plus, it's a fun, affordable way to avoid the artificial flavors of store-bought extracts. (Look for the best prices on alcohol at Costco or Sam's Club!)
Don't forget to check back next week for the next recipe in my Harvest Jar Gift series-we've got plenty of delicious and thoughtful holiday gifts coming up! And if you missed last week, be sure to check out my homemade caramel sauce recipe.
Ways to use the Vanilla Beans after the extract is gone, or if straining
Use in Hot Drinks (Like Fall Cider)
- Add the used vanilla beans to your favorite fall and winter drinks:
- Apple Cider: Toss the beans into a pot of simmering apple cider to infuse it with a hint of vanilla.
- Hot Chocolate: Stir a used bean into your hot cocoa for a rich, warming flavor.
- Mulled Wine: Add the beans to mulled wine for a cozy, spiced drink.
- The beans can be left whole or split to release more flavor.
Infuse Maple Syrup or Honey
- Place the used vanilla beans in a jar of maple syrup or honey and let them infuse for a few weeks. The result is a luxurious vanilla-infused syrup or honey that's perfect for drizzling on pancakes, waffles, yogurt, or oatmeal.
Add to Homemade Jam or Preserves
- Simmer the beans with fruit when making homemade jams, jellies, or fruit preserves. The beans will enhance the natural sweetness of the fruit and add a subtle vanilla essence.

Flavor Homemade Candles or Potpourri
- Place the dried vanilla beans into your homemade candles for a light, natural vanilla scent. Alternatively, add the beans to your fall potpourri mix to bring a cozy, aromatic touch to your home.
Homemade Vanilla Extract Recipe
Homemade Two Ingredients Vanilla Extract Recipe
Equipment
- 16 oz Glass Jar Pint Jar
Ingredients
- 6 -8 vanilla beans Grade A 1 ounce (or Grade B if preferred)
- 1 pint of bourbon or rum, vodka, etc.
Instructions
- Slice vanilla bean pods lengthwise to expose the seeds. I recommend using a kitchen scale to weight out one ounce of beans to make sure you have the correct amount. Place the beans in a clean 16 oz bottle.
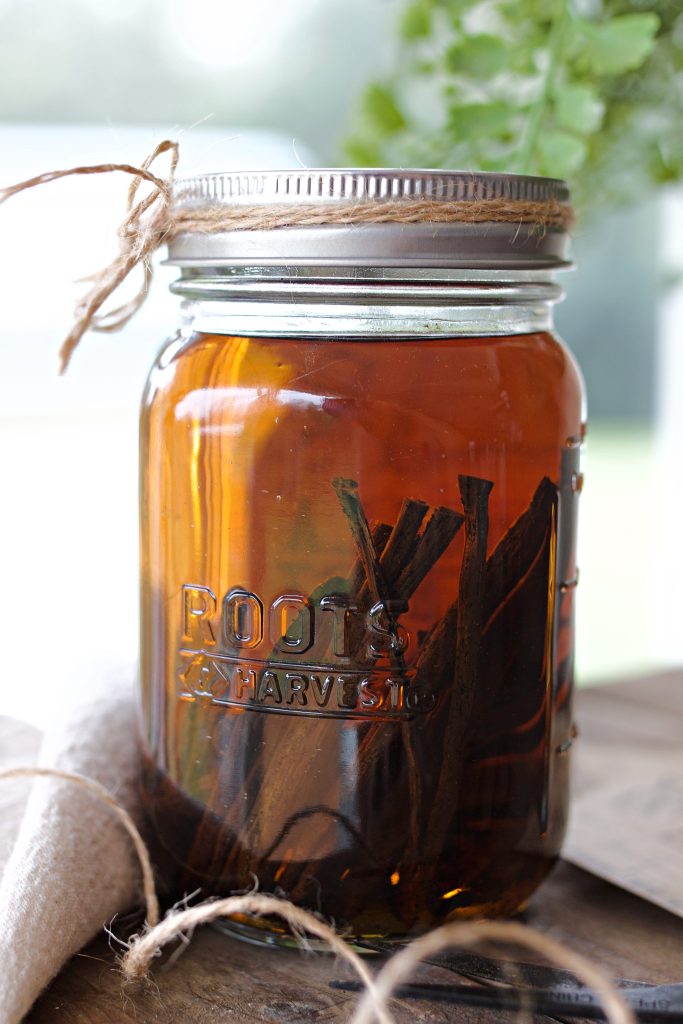
- Pour bourbon over the beans, making sure they are completely submerged. Seal the bottle tightly and give it a good shake.
- Store the bottle in a cool, dark place away from direct sunlight for at least 6 months, but a year is even better. Shake occasionally when you visit your pantry. The extract will get better with time, so feel free to let it sit longer if possible.
- After 6 months, your homemade vanilla extract is ready for use or gifting. If desired, strain the extract before use, but you can also leave the beans in the bottle to continue infusing.
Video
Notes
Nutrition
You May Also Enjoy:


This is one of those recipes I can’t imagine not having in my pantry anymore. Once I started making my own vanilla extract, store-bought versions just couldn’t compare. The depth bourbon gives this extract adds the most beautiful warmth to my baked goods, especially cookies and cakes. It’s such an easy project, but it feels special every time I pull out a jar to use or gift. If you’ve never tried making your own, I promise it’s worth the wait!