How to make an extended outdoor faucet to your garden
I have a story to tell you today about how an extended outdoor faucet saved a marriage.

Okay well maybe that's a bit of an exaggeration, but let's say that extended outdoor faucet at least prevented a whole lot of arguing this summer.
You see, we live on a half-acre in the city, and my garden is placed in the farthest northern corner of the yard. This means a lot of hose pulling to water my precious garden. And friends, logically to me, it just seems easier to leave the hose across the yard waiting for the next time I water.
My husband thinks differently.
He sees the hose across the yard as an evil plastic tube that the sun uses to burn lines in his yard and kill his precious grass. And I get it, I really do. He loves his grass and I love my garden. What's a couple to do? Enter in the extended outdoor faucet from our spigot in the backyard.
When I first talked about somehow adding a water faucet to my garden area Travis was against it. That meant digging a trench through his lawn and possibly messing with his sprinkler system.
However, once he realized what was going to be his future with the plastic hose across the yard . . . he changed his tune. The trench being dug was but a small hiccup in an otherwise green and happy lawn.
Add a water spigot anywhere in your yard
What you'll need:
- ¾ in. 100 ft. 160 PSI Polyethylene Pipe
- ¾ in. x 18 in. Galvanized Steel Pipe x 2
- ¾ in. x 41/2 in. galvanized steel connector x 2
- ¾ in. Galvanized Malleable Iron 90 FPT X FPT Elbow x 2
- ¾" Galvanized Iron FPT Coupling x 2
- ¾ in. brass PEX-A Barb x ¾ in. MNPT male adapter x 2
- Heavy Duty Coiled Spring Hose Kink Protector Faucet Extension
- Garden Hose Adapter
- Hose clamp x 2
- Thread Seal Tape
- Garden Valve
- Metal hose splitter
- Bag of concrete
- 4 in. x 4 in. x 10 ft. pressure treated timber
Shop Faucet Needs:

How To
*These plans will vary for you based on the distance from your new faucet to the main one, and your house and yard variations. Please use your discretion when using these plans for your garden hose faucet extender needs.

1. Measure where you want your new water source to the source you'll be connecting it from so you know how much pipping you'll need. Think about how deep you'll want to trench your line and if you have any obstacles in the way.

*NOTE: This outdoor spigot extension is not a winter-proof setup. The line will need to be blown out before frost each year to prevent the pipe from bursting, just like a typical sprinkler system in colder climates.
2. Trench line using the trench shovel. We trenched eight inches down. Trenching anywhere from 6 to 8 inches will work. The deeper you go the longer you can use it into the fall before having to blow it out. We also used galvanized piping because it's more weatherproof.

3. From the watersource at the house, place the Y spliter on the end of the faucet sticking out of the house. On one side of the Y, connect the primary hose you'll be using around the house. On the other side of the Y connector, that you'll be extending out to the garden, attatch the Heavy Duty Coiled Spring Kink Protecter Faucet Extension.
4. Now assemble the galvanised pipe you'll be half buring. Take the 18" galvanized pipe and at one end attatch the galvanized elbow, making sure to use thread tape at all connections. This helps create a tight seal. Connect the elbow to the Glavanized steel nipple, (side note, how is anything called that? Steel nipple?!?) the connect the coupling. To the couppling attatch the brass male adapter.
5. Once you have this L pipe assembled, go ahead and attach it to the faucet extender.

6. Connect the plastic pipe to the base of the galvanized elbow pipe using a hose clamp. Carefully run the plastic pipe from there out to your new faucet.


Preparing your new extended faucet:
7. This is very similar to how you built the previous connector, except you're placing a faucet on the end and have to think about how you want to secure the pipe into the ground.

4. We secured the pipe into the ground using a 4x4 post in concrete.

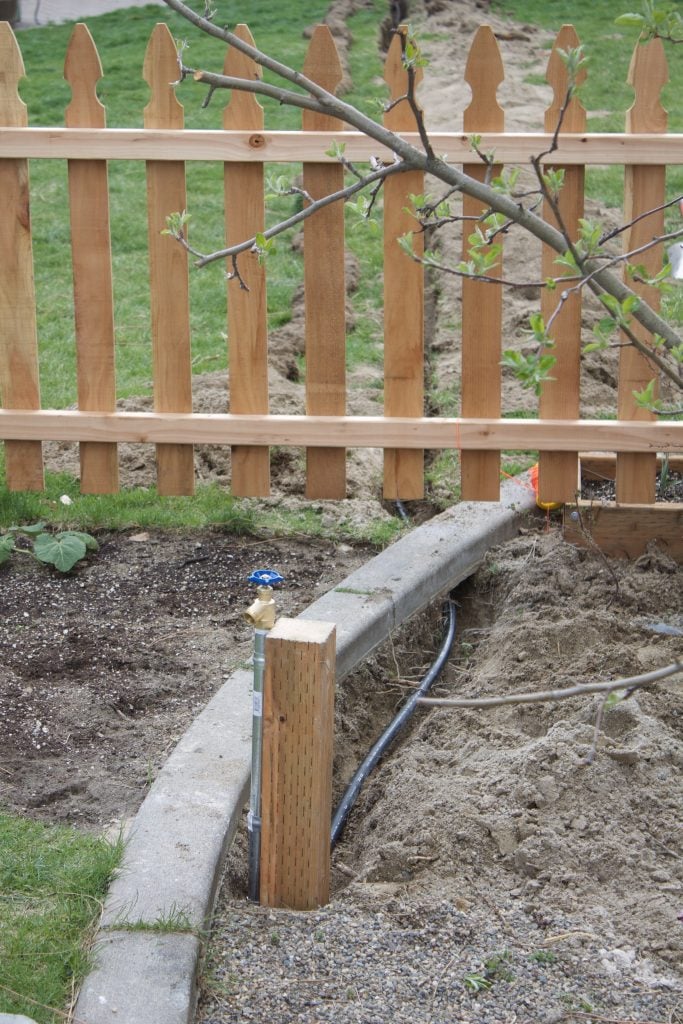
Secure the faucet to the post, let concrete set for a couple days, and you're ready to go!


extended outdoor faucet how-to
Equipment
- Trench shovel
- Knife to cut pipe
- Wrenches
Ingredients
- ¾ in. 100 ft. 160 PSI Polyethylene Pipe
- ¾ in. x 18 in. Galvanized Steel Pipe x 2
- ¾ in. x 41/2 in. galvanized steel connector x 2
- ¾ in. Galvanized Malleable Iron 90 FPT X FPT Elbow x 2
- ¾ " Galvanized Iron FPT Coupling x 2
- ¾ in. brass PEX-A Barb x ¾ in. MNPT male adapter x 2
- Heavy Duty Coiled Spring Hose Kink Protector Faucet Extension
- Garden Hose Adapter
- Hose clamp x 2
- Thread Seal Tape
- Garden Valve
- Metal hose splitter
- Bag of concrete
- 4 in. x 4 in. x 10 ft. pressure treated timber
All these before and afters make my heart go pitter patter. And that friends, is how to add a wager spigot anywhere in your yard!

Make sure you're following all my gardening in real-time over on Instagram! It's my favorite way to share!


Bad before photo I pulled from Instagram because I didn't get a real photo!


And if you want help with making some of the most sturdy garden beds that will last for years, check out our raised garden bed plans that went viral on Pinterest. They're holding up great one year later!

Do you have questions? Something we said doesn't make sense? Let me know in the comments and we'll try to correct it!


Hi!
I assume due to the frost issue this can’t be used in winter?
Trying to find a good solution for when I need water for the odd project here and there in the colder months.
We blow the line out before winter just like the sprinklers and do not use it.
Looking at doing something similar. Great idea. Has there been any signs of corrosion on the connection between brass and steel?
Not at all. Going on two years without issues!
Hi! Good job! It makes me feel like I could do this. We don’t have a water spigot on the back of our house and it’s a pain to have to drag the hose from the side when my little wants some water play! I did have a question - do you have to turn on the spigot at the side of the house and then turn on the spigot in your garden area? Maybe it seems like a dumb question but just wanting to make sure. I like this option as I don’t have to attach it to an actual water line. Thank you!
Yes! You do have to have the spigot at the house turned on for it to work in the garden. That's one of the reasons we purchased a double spigot at the house, so we can turn off the water to the hose we use at the house so it's not running in two spots at one time. We could turn both on and have someone watering at the house and someone at the garden, or switch either one off at any point in time. I hope that helps! 🙂
when both spigots are on, is there a big drop in water pressure at either hose?
No, but we always had great pressure at that house. It could vary depending on your water.
Can you leave the spigot for the garden hose (at the house) on all the time? I want to do something similar but I don't want to have to turn on two spigots every time I want to water the garden...
I'd leave it on all day at the house so I could go out and turn the garden one on and off whenever I needed, but for prolonged times of no use I'd turn it off at the house. 🙂
what do you do for freezing in the winter?
We spray it out like we do for our sprinklers every fall. Then just hook it up again next spring 🙂
wow that was quite an undertaking ! nice job..