Halloween Man on the Moon Wood Round DIY (Free PDF Template)
There's something magical about the moon, especially during the fall season. Last year, I noticed a trend popping up across the United States: the vintage man on the moon halloween decor DIY was showing up in homes as a charming, slightly spooky fall decor piece. After seeing him styled in white Halloween vignettes, on porches, and in living rooms, I knew I needed my own version.
But when I started looking for a ready-made moon man wood sign, I couldn't believe the price tags! Some were over $120 on Etsy for a 24-inch size. That felt like an additional cost I didn't want to take on.
So, like any determined DIYer, I decided to make my own Man on the Moon Halloween Decor DIY, and today I'm sharing exactly how you can too-along with a free printable moon stencil you can download and use at home.
Supplies You'll Need for Your DIY Halloween Decorations
Here's what you'll need to get started:
- Wood rounds (I used a 24" size, but you can choose different sizes depending on your space)
- White paint (spray paint works great for quick coverage)
- Black paint pen, small brush, or paint brush for details
- Pencil
- Printable moon stencil (scroll down for the download link)
- Optional: Sandpaper for an aged look
If you don't have scrap wood lying around from many other projects like we do, you can find wood rounds at Hobby Lobby, Home Depot, or even craft stores like Michael's. Some people have even used large wood trays from Dollar Tree or serving boards from the dollar store for a smaller, budget-friendly version.
Download Man on the Moon below

Here's the link to download your moon stencil:
How to Size and Print Your Moon Stencil
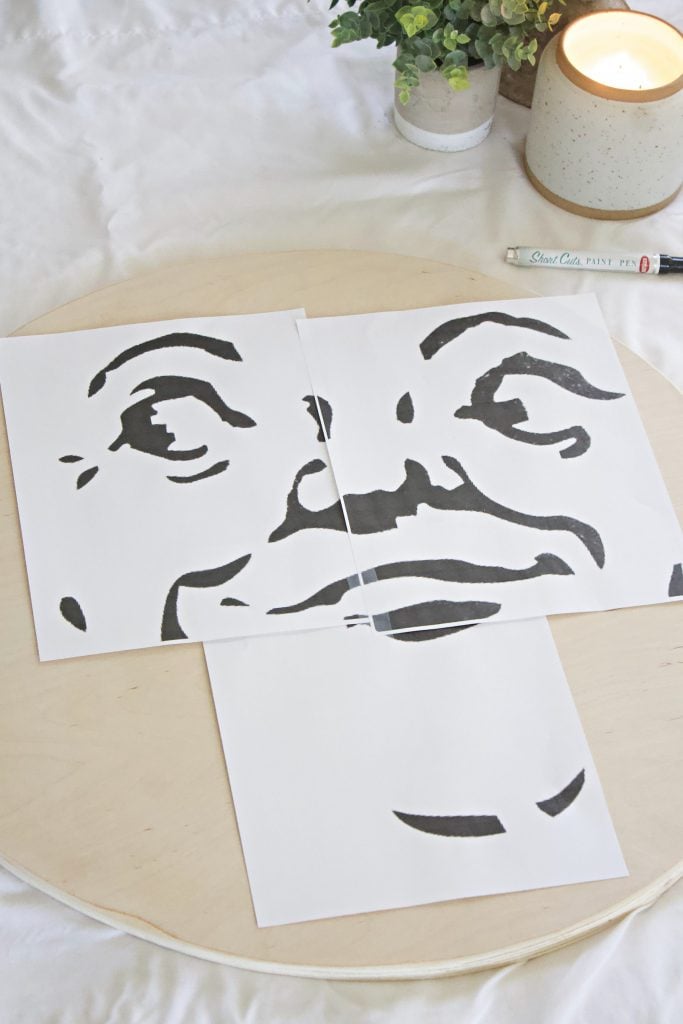
The free moon stencil I'm providing prints on a standard 8.5x11 inch sheet, making it perfect for a 12-inch round if left as-is. For larger sizes like my 24-inch version, I simply enlarged the moon image to 300% and printed it across three sheets of paper.
If you have a Silhouette machine, you could also upload the file and let the machine cut the stencil for a clean, professional edge.
Step-by-Step Tutorial: Creating Your Vintage Man in the Moon Wood Sign
1. Cut or Purchase Your Wood Round
We cut our own from leftover wood using a simple string and pencil method to get the circle even. If that's not your thing, grab a pre-cut one at Home Depot, Hobby Lobby, or your local craft stores.

2. Paint Your Background
Give your round a coat of white paint. I used a paint brush, but for speed, spray paint works too. One coat gives a nice aged look, but you can add more for a solid white background.
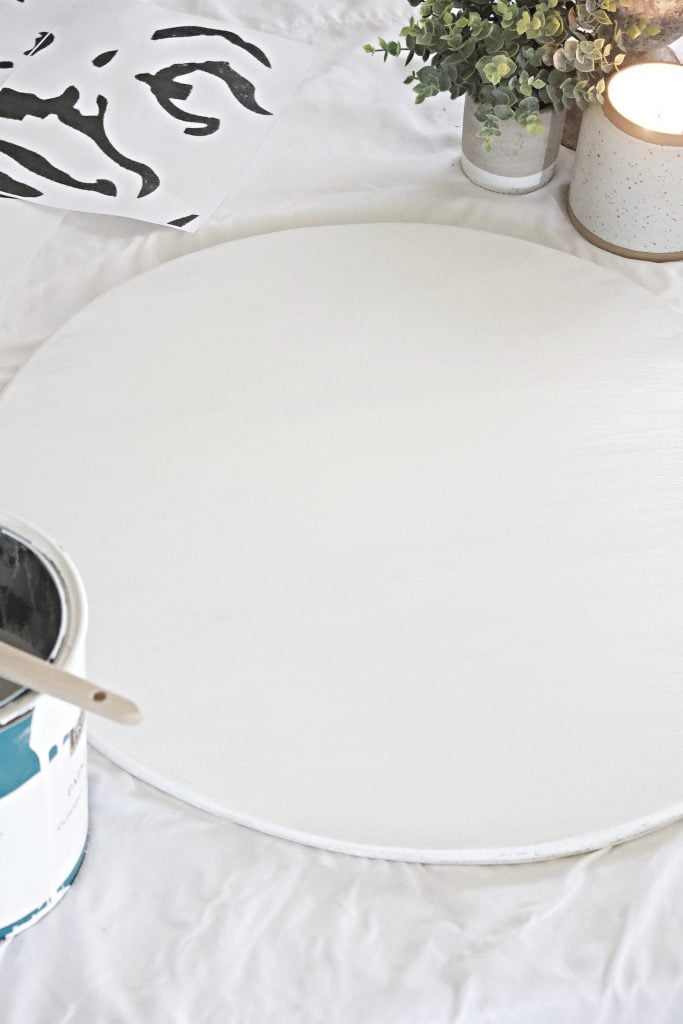
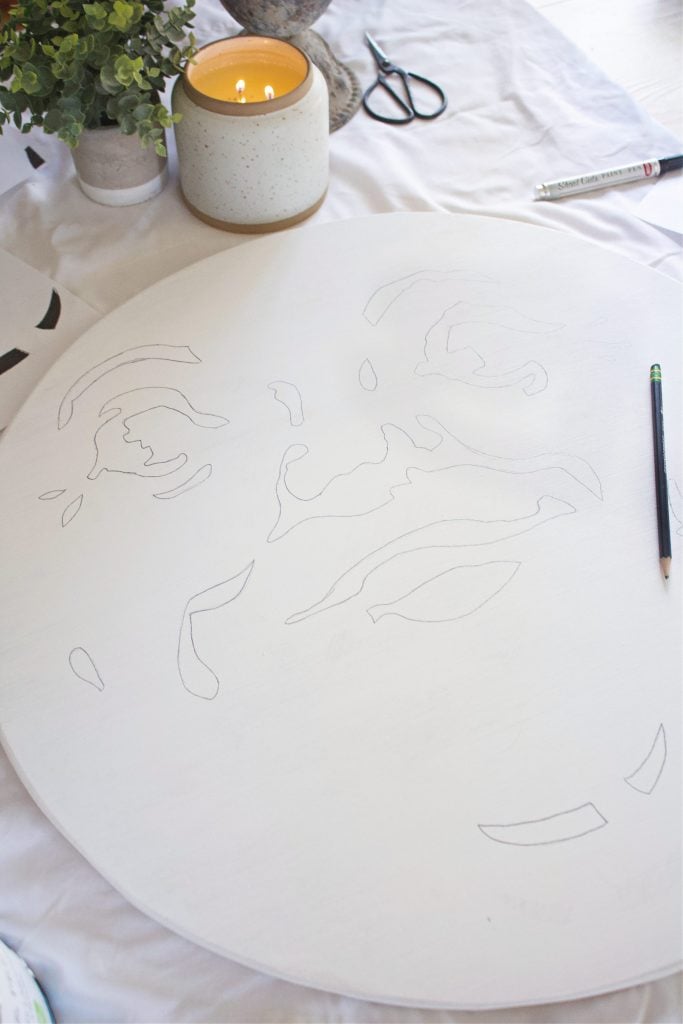
3. Transfer the Moon Face Design
Once your paint dries, flip the printed moon stencil over and shade the back of the design with a pencil, focusing on the parts where the moon face details are.

Then, flip the stencil back over, center it on your wood round, and trace over the printed lines with firm pressure. The pencil will transfer, leaving you with a perfect outline of the moon man features.
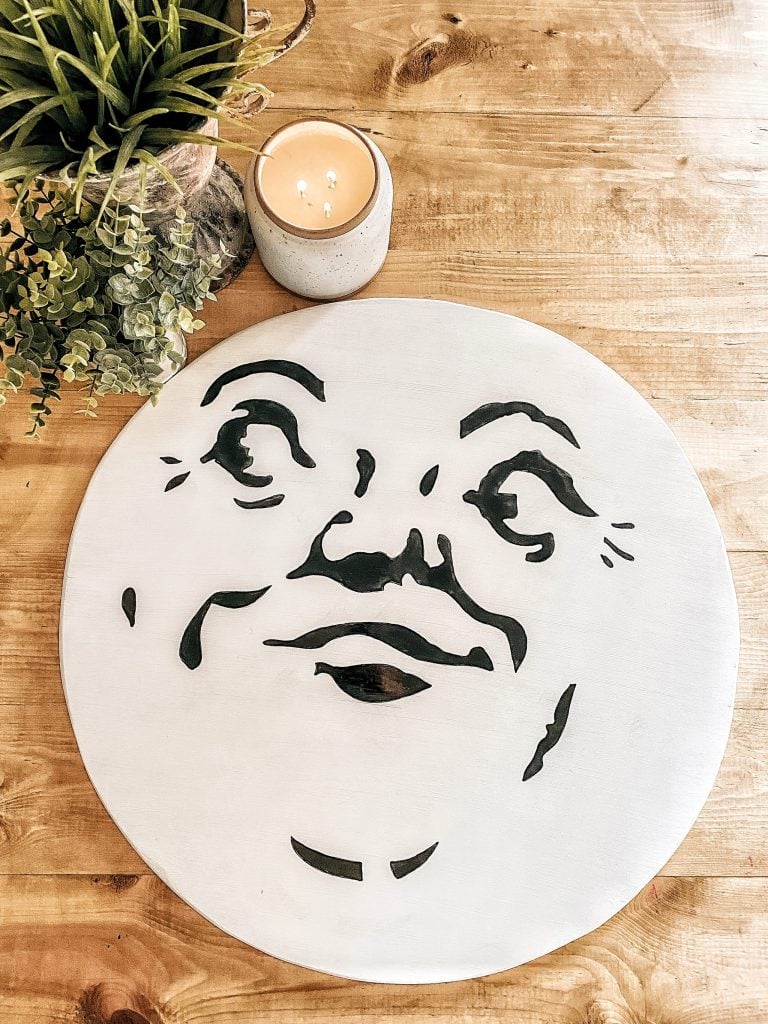
4. Add Your Detail Work
Use a small brush, paint pen, or even a Sharpie to fill in the outline with black paint.

For crisp lines, I recommend working slowly and doing two coats, letting it dry between layers. This is where the moon image really comes to life and starts looking like a piece of art.
If you're going for more fun projects with different effects, you could experiment with gold accents or even glow-in-the-dark paint for nighttime porch displays.
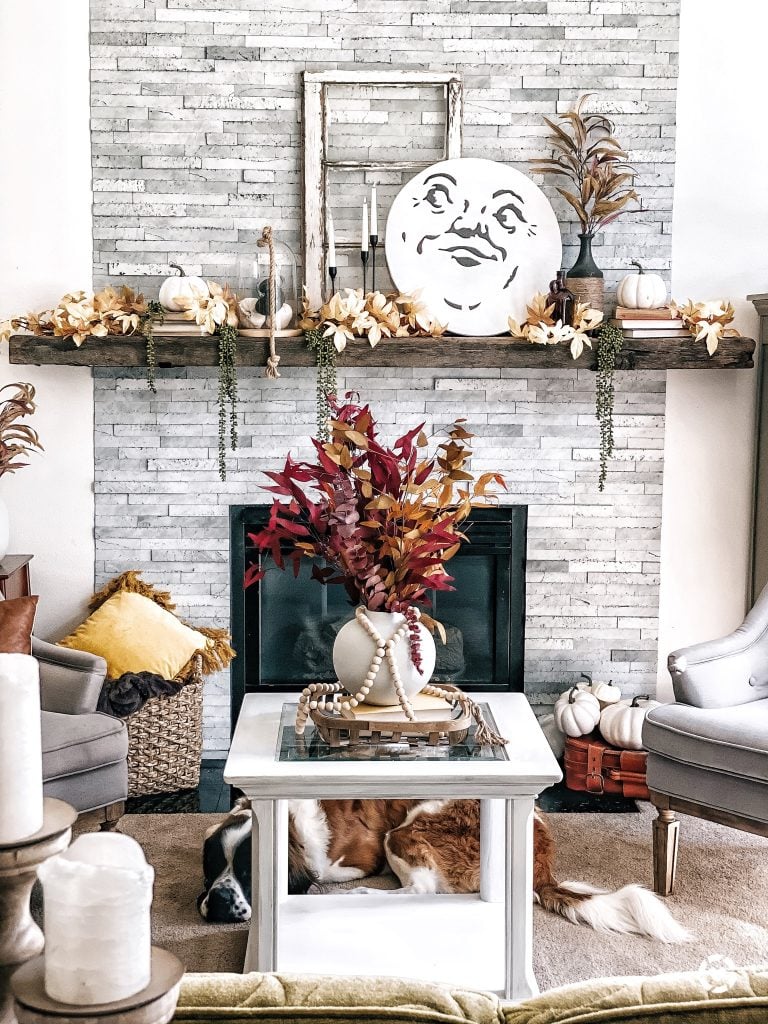
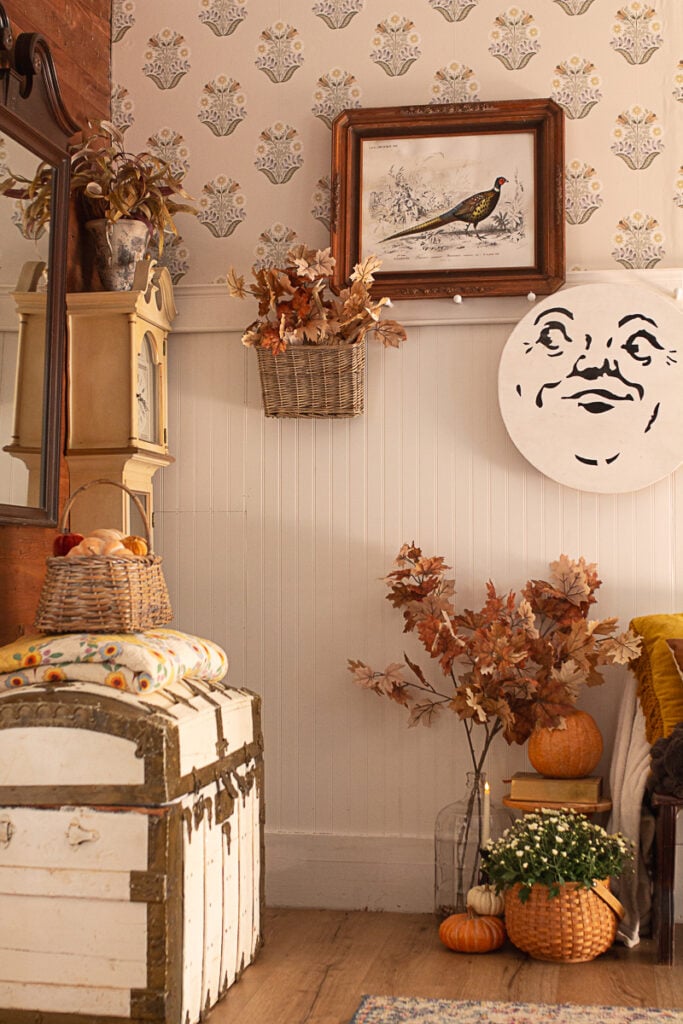
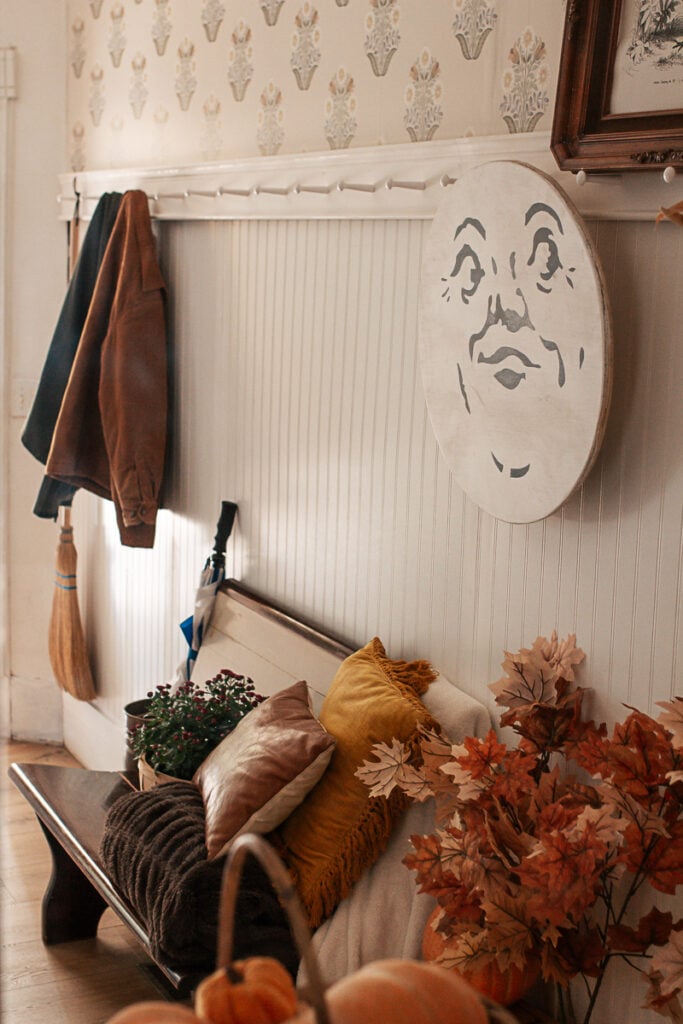
Styling Ideas: Where to Display Your Moon Man Decor
This project is a great way to add vintage charm to your fall decor. Here are some creative ideas for how to use your finished moon man:
- Lean it on your living room mantel surrounded by candles and fall garlands.
- Add it to your front porch with pumpkins for a bold Halloween idea.
- Include it in a gallery wall featuring other DIY Halloween decorations.
- Use smaller different sizes for a layered happy Halloween entryway look.
The neutral color makes it easy to blend into both spooky Halloween settings and cozy fall decor without being overly theme-y.
FAQs About This Man on the Moon Halloween Decor DIY
Can I resize the stencil for smaller wood rounds?
Yes! The printable is super easy to scale up or down. Use different sizes to create a collection for shelves or white Halloween vignettes.
What's the best way to seal the wood sign for outdoor use?
If you're using it outdoors, apply a clear spray sealer after the paint dries to protect it from weather.
Can I use Dollar Tree materials for this?
Absolutely! Small trays or boards from Dollar Tree or the dollar store work well for mini versions of this project.
Can I use a Silhouette machine to cut the stencil?
Yes, uploading the moon stencil into your Silhouette machine software makes the cutting fast and precise.
Final Thoughts
This blog post was so much fun to revisit. The Man on the Moon Halloween Decor DIY still makes me smile every time I pull it out for fall. It's a project that looks like it took a long time, but really comes together quickly and on a budget.
If you try this project, tag me on Instagram or leave a comment below. I'd love to see how your moon face turns out!
Happy Halloween and happy crafting!
Looking for more fun fall content?
How To Easily Decorate A Fall Front Porch\
Meet Eryn
Eryn Whalen is a homestead blogger and recipe developer with a lifetime of hands-on experience in gardening, home canning, animal husbandry, and traditional kitchen skills. From preserving homegrown harvests to baking sourdough from scratch, she shares her family's journey of intentional living on their 100-acre Tennessee farmstead. Recently, Eryn has expanded her homesteading life to include caring for a family milk cow, sharing the learning process and daily joys of small-scale dairying. Read more about Eryn here


Thank you for the man in the moon!
You're welcome! Enjoy! 🙂
I made it! I love it! I mirrored the image since I wanted the eyes looking at the bats I have on the wall next to it. I also added craters in shades of grey for a more moonish look. I used a 12" wood round I bought at Walmart. Worked perfectly! Thank you for a great post!
I'm so glad you personalized it and made it work for you and your home! xoxo 🙂
I'm so grateful that you shared this. I've been looking for one myself. I'm thinking of adding some dimension with paper clay like a paper mache pulp look to make him look very vintage. Thank you again.
That sounds like an amazing idea! Enjoy!
Can't wait to try this!! Im having a hard time understanding how you traced the face onto the wood though...I've read and reread the post and still can't quite figure it out. Does the shading transfer onto the wood when you flip it over?
Exactly. Basically, you're creating your own transfer paper. Or, you could also purchase transfer paper at your local craft store and use that instead. 🙂
Hello, I was just curious how you got the face on the wood? Like how did u trace it on there?
I explain it all in the post if you read it. 🙂
Oh my goodness, so excited to have found this cutie!! I am trying to get him print right now, lol. My printer keeps only printing the left side of his face though, lol. No clue what I am doing wrong. Thank you for sharing him!
Weird! I've had other people print him out and not have any issues. Are you downloading the PDF, then opening it up and selecting print? I hope that works!
This project is so cute! I love it for fall and can’t wait to make one- Thank. You for sharing
I'm so glad you liked it! So easy to make. Can't wait for you to add it to your fall decor!