How To Deep Clean A Backyard Pond
Oh friends . . . I was knee-deep in pond sludge this week. Yum right? It wasn't fun, but gosh was it worth it. I shared the whole process on Instagram, and several people messaged me with more questions. So, I decided this was the best way to share how I maintain and clean a backyard pond.

When we first looked into purchasing our house we were elated to find out there was a pond in the back! I mean, how cool! The sound of running water, the little rivers connecting the ponds, the fish. It all felt so fun! And it is. But I had no idea the amount of work involved in the upkeep. To make matters worse, it was very neglected when we moved in. I had to learn right away how to clean a backyard pond.
How our ponds and streams are situated
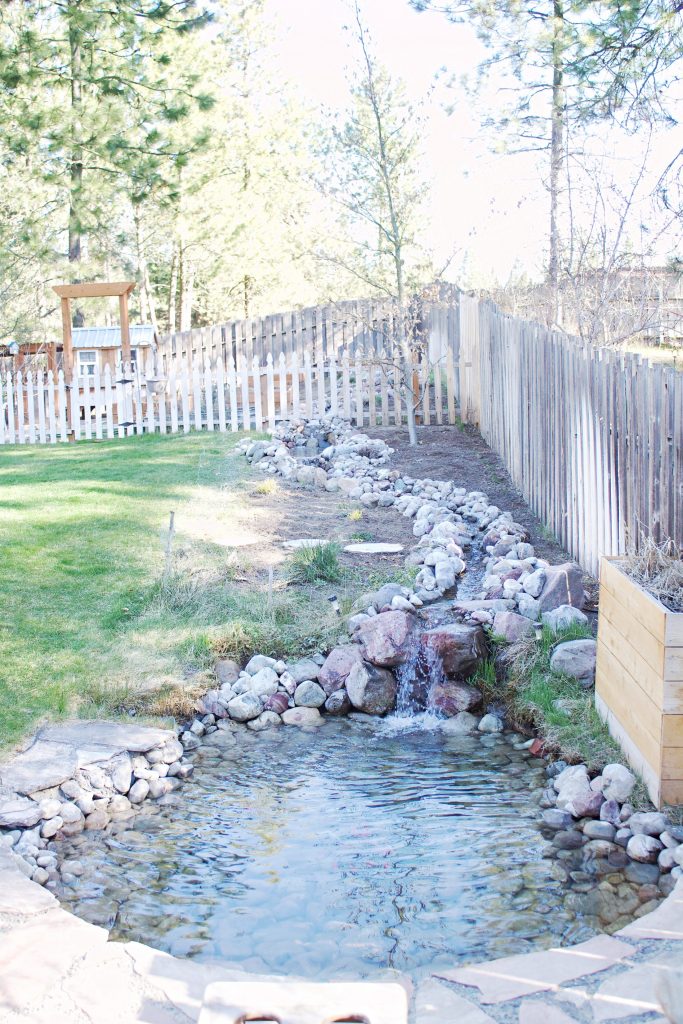
Our water feature is what I like to call our three-tiered pond extravaganza. It starts at the back of our yard, which is on a rolling hill and slightly higher than the yard closest to our house. It runs along the fence line and begins with a small pond, that is connected to the middle pond by about a 15-foot stream.
After the middle pond, which is a little larger than a bathtub, there's another 20-foot stream connecting to the bottom pond, which is a few hundred gallons. The pump on the side of the bottom pond filters the water back to the top pond, and that's our water feature!
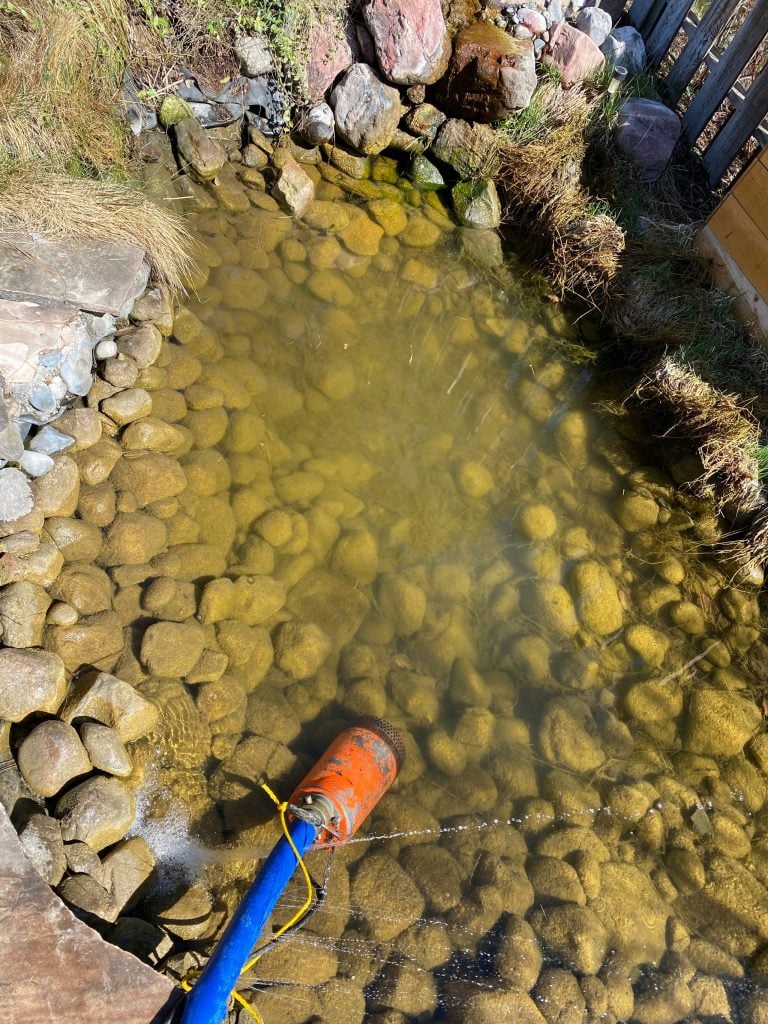
The previous owners who made this apparently had a very deep love of water. This pond pictured below is the bottom and largest pond. The one our goldfish are in.
And this is the pond again after two days of cleaning, and as I like to call it, "weeding". Because friends, it's truly like a wet garden.

When we first moved in and learned how much it would be to hire someone to clean and maintenance it, I about fainted. My little DIY heart wasn't about to pay thousands of dollars for someone else to clean this beast of a pond!
Nope.
We'd just moved in, we were financially stretched and frankly, I didn't want to shell out thousands on a pond!
So I put on my galoshes and got to work. Since it was my first attempt, I did an okay job, but it could have been better.
This time, however, I went for it. I had learned a lot about our pond over the past three years and was confident I could do a better job.
How often do You have to deep clean a backyard pond?
The truthful answer? It depends.
Since our pond is more ornate than most, it requires more upkeep. Our backyard is also filled with pine and regular leafed trees. Whenever the wind blows we get needles and leaves in the ponds and streams. If I don't pull them out quick, they sink. There is also a lot of grass around the bottom pond, which gets heavy, falls in, and breaks off.
(bottom pond again)

As you can see, it all depends on your area, and what naturally falls into your pond. It also depends on the fish and plants, if you have any, as well as any additives you use. (I'll share our favorite at the end!) Goldfish are messy, and we have 25 of them. We've never purchased any. They were here when we bought our home, and they just keep reproducing.

We have a Crain that comes by and tries to keep our population in check, and we lose a few of them through some of the harder winters. But overall, they just keep multiplying.
For us, every three to four years seems to be the sweet spot for deep cleaning.
On the years that I skip the deep clean, I go through, pull out the dirt and debris where I can, rearrange the rocks, check and clean the stream, and call it good.
What you'll need to clean your pond
We rented a pump and borrowed my parents' gas-powered pressure washer. You'll also need several pairs of waterproof gloves (the rocks put holes in them) a tall pair of waterproof boots, as well as a 5-gallon bucket, and a small scoop for the sludge. Ick, I know.

Step 1: Empty the pond
Remove the fish, if you have any. Take some of the pond water, place in a kiddy pool, and then add fish. You want to use some of the old pond water because that's what they're use to and you don't want to shock them.

Throw the pump in and start the process of removing all water. Depending on how much sediment and dirt are at the bottom, you might have to lug out the last few gallons in your five-gallon bucket.
Or if you're up for it, I bend over and just kept wiping my hand over the intake area of the pump trying to remove the debris as they suck to the pump, helping the sludge to get pumped out as well. It's a dirty job, there's no way around it.
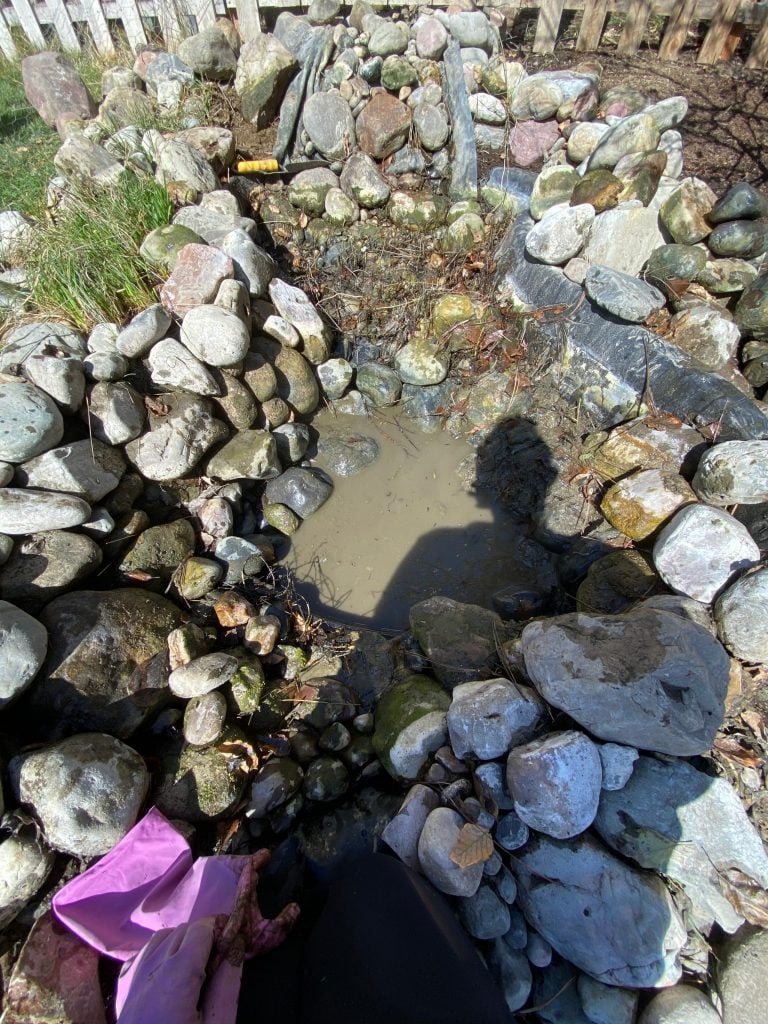
The center pond in our three tiered pond feature is the one in the photo below. This one was the worst of all of them as far as dirty goes.
Step 2: Weed and remove debris. If needed, remove all rocks and deep clean
We have a weed local to the Pacific Northwest called Horsetail, and it loves ponds. Its roots are also extremely invasive and took over this center pond. I had to completely remove all the rocks, wash them off, take out the sheets of roots that had molded to the bottom of the pond, cut them back from the soil at the top of the pond as far as I could, and then re-stack the rocks.

Thankfully the two top ponds we have are hard plastic. Rubber sheeting connects them to the upper and lower ponds with a pond foam sealer. (the orangish goop you see in the photo is sealer) This makes them easier to deep clean than the bottom pond which is also made with rubber sheeting because of its size.
Step 4: Re-arrange rocks
Some ponds might have the rocks cemented into place. This is an option. However, I like my rocks free, because it's easier to weed around them. The roots of the horsetail are so strong they can go behind the sealer, and then I can't get them out completely.
Arranging rocks is like an advanced puzzle. You can't just stack them. You have to make them fit together, to hold up against kids walking along the edges, the water current pulling at them, and gravity over the years. It's kind of an art form, and took me several hours of work to make them solid enough for my liking.
Isn't it crazy how much different it looks with the liner completely covered? Blows me away every time.

I started with the larger rocks at the bottom, then worked my way up the sides. I then used the smaller rocks to fill holes, support larger rocks and scatter across the bottom a bit giving a more natural look.

Step 5: Power wash from top to bottom
Now if you went crazy like I did, you don't need to power wash the rocks if you removed them, cleaned them, and placed them back in like I did the center pond.
However, for my bottom, larger pond. This is exactly what I did.
First I drained it.
I then cleaned out the debris I could like leaves and needles.
After that I weeded along the banks, removing the glasses and horsetail that had rooted through the rocks on the inside of the top of the pond liner.
From there, I re-stacked the rocks that had fallen over the past two years, and once they were all in place, I power sprayed them thoroughly. I did this for two reasons. One, to make sure they were stacked tightly and wouldn't fall down under the pressure of the water sprayer. And two, I wanted to remove the algae from them and bring back the pretty colors of the rocks in the areas that were going to be visible once the pond was refilled.

Step 6: Re-fill
Once you've got your pond as clean as possible. It's time to refill!
Just so you don't beat yourself up about it, your pond will never be bathtub clean.
It's an outdoor water feature. There will be dirt in it, and that's okay. Pond maintenance will help with that. And when you refill your pond, it will appear cloudy. That's also natural. It will take about two days for everything to settle after refilling.

When you initially refill your pond, it will appear cloudy. That's also very normal. It will take about two days for everything to settle after refilling.

Then sit back, grab a cup of coffee or wine depending on the day, and enjoy your beautiful water feature!

Pond chemicals and a more natural option
I'm a pretty natural person. I'm on the crunchy side and own it. That extends to cleaning my home, maintaining my yard, garden, and ponds.
So many of the products I saw for ponds had a large number of chemicals in them, and that didn't work for me. I have chickens, cats, our huge Saint Bernard, and wild animals and birds that all come and drink from the ponds. Yes, they have water dishes. They just like the pond better.
And you better believe my kids are playing on the sides of it all summer long. It's a given. So, I'm super picky with what I place in the water.
The Real Clear products have been what I like to use most. They use probiotics and bacteria to maintain the water, which doesn't harm my pets or kids. It's not cheap, and you use it once a week, but for me, it's worth the splurge.
I get mine from our local pond store, but you can also find it The Pond Outlet online.

Does this help and give you actionable tips when cleaning your pond? I'd love to hear any other questions you have, and can add on and address them in this post!
Looking for more ways to spruce up the exterior of your home? Check out these 5 ways to update the exterior of your home!


I AM REPLAING MY P0ND LINER TODAY AND WILL USE YOUR PROCEDURE.'
THANK YOU ; IT GOT ME MOTIVATED..
SO NOW I'M EMPTYING THE POND AND PUTTING 5 KOI IN A BABY POOL I HAVE.
PUTTING THE NEW LINER IN WILL BE TRICKY THOUG
Thank you, your pond repair blog, the deep cleaning section was helpful. I’d like to recommend Pond Pro 2000, it’s a butyl liquid rubber sealer that is durable in fact it’ll last three times longer than other pond sealers. Its coverage on a smooth surface is 50 sq. ft. per gallon. Avoid rain in the first three hours of application. Any leftover material can be stored for up to 2 years. It's available in black and white colors and in quarts and gallons. It's the only pond sealer in the market that has more than 30 years of history of success and offers a 5-year warranty to its valued customers.