How To Make Homemade Milk Kefir And How To Use It
There's something almost magical about watching milk transform into a thick, tangy drink teeming with probiotics. All thanks to a few tiny grains doing their quiet work on your countertop. Making milk kefir has become one of my easiest kitchen routines. No timers, no fuss, just a daily check-in with one of the most beginner-friendly ferments out there.
Once I saw how simple milk kefir was to care for, it joined the ranks of my other fermentation staples like homemade sauerkraut, apple cider vinegar from apple scraps, fire cider, and of course, my beginner's guide to kombucha. If you've been wanting to dip your toes into the world of ferments, this is the one to start with.

Quick Look: Homemade Milk Kefir
- What Is Kefir? A fermented milk drink made using live kefir grains, rich in probiotics and similar to drinkable yogurt, but with more gut-friendly bacteria (source)
- Time: 5 min prep, 24-48 hours ferment
- Cost: Low-just grains and milk
- Temp: Room temp (68-85°F)
- Texture: Thick, creamy, pourable
- Skill Level: Beginner
- Best For: smoothies, dressings, gut health (source)
- Pro Tip: Raw or organic milk makes the best kefir
SUMMARIZE & SAVE THIS CONTENT ON
Why You'll Love This Milk Kefir Recipe
Milk kefir is one of the easiest ferments to keep alive, and it rewards you daily with a creamy, tangy drink packed with benefits.
- Naturally high in protein, calcium, and B vitamins (source)
- Helps use up milk before it spoils
- Easy to make with minimal equipment
- Adaptable to many types of milk-cow, goat, raw, whole, or even coconut
- A great first step into fermenting if you're just getting started
Kefir quickly becomes part of your kitchen rhythm-it's that easy to keep going.
Ingredient Notes + Substitutions
To get started with milk kefir, you'll need just a few key items:
- Milk kefir grains - These are living colonies of bacteria and yeast. You cannot make them from scratch. I bought mine Kefir on Amazon and they've been going strong for over a year.
- Milk - I use raw milk when I can, but organic store-bought works too. Avoid ultra-high temp pasteurized milk if possible, there's less for the kefir grains to work with in ultra processed.
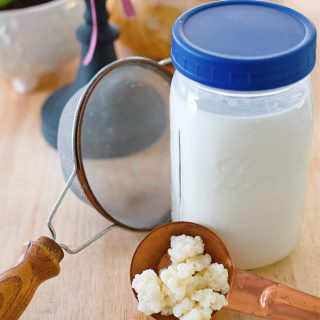
- Glass jar - A quart-size mason jar works great.
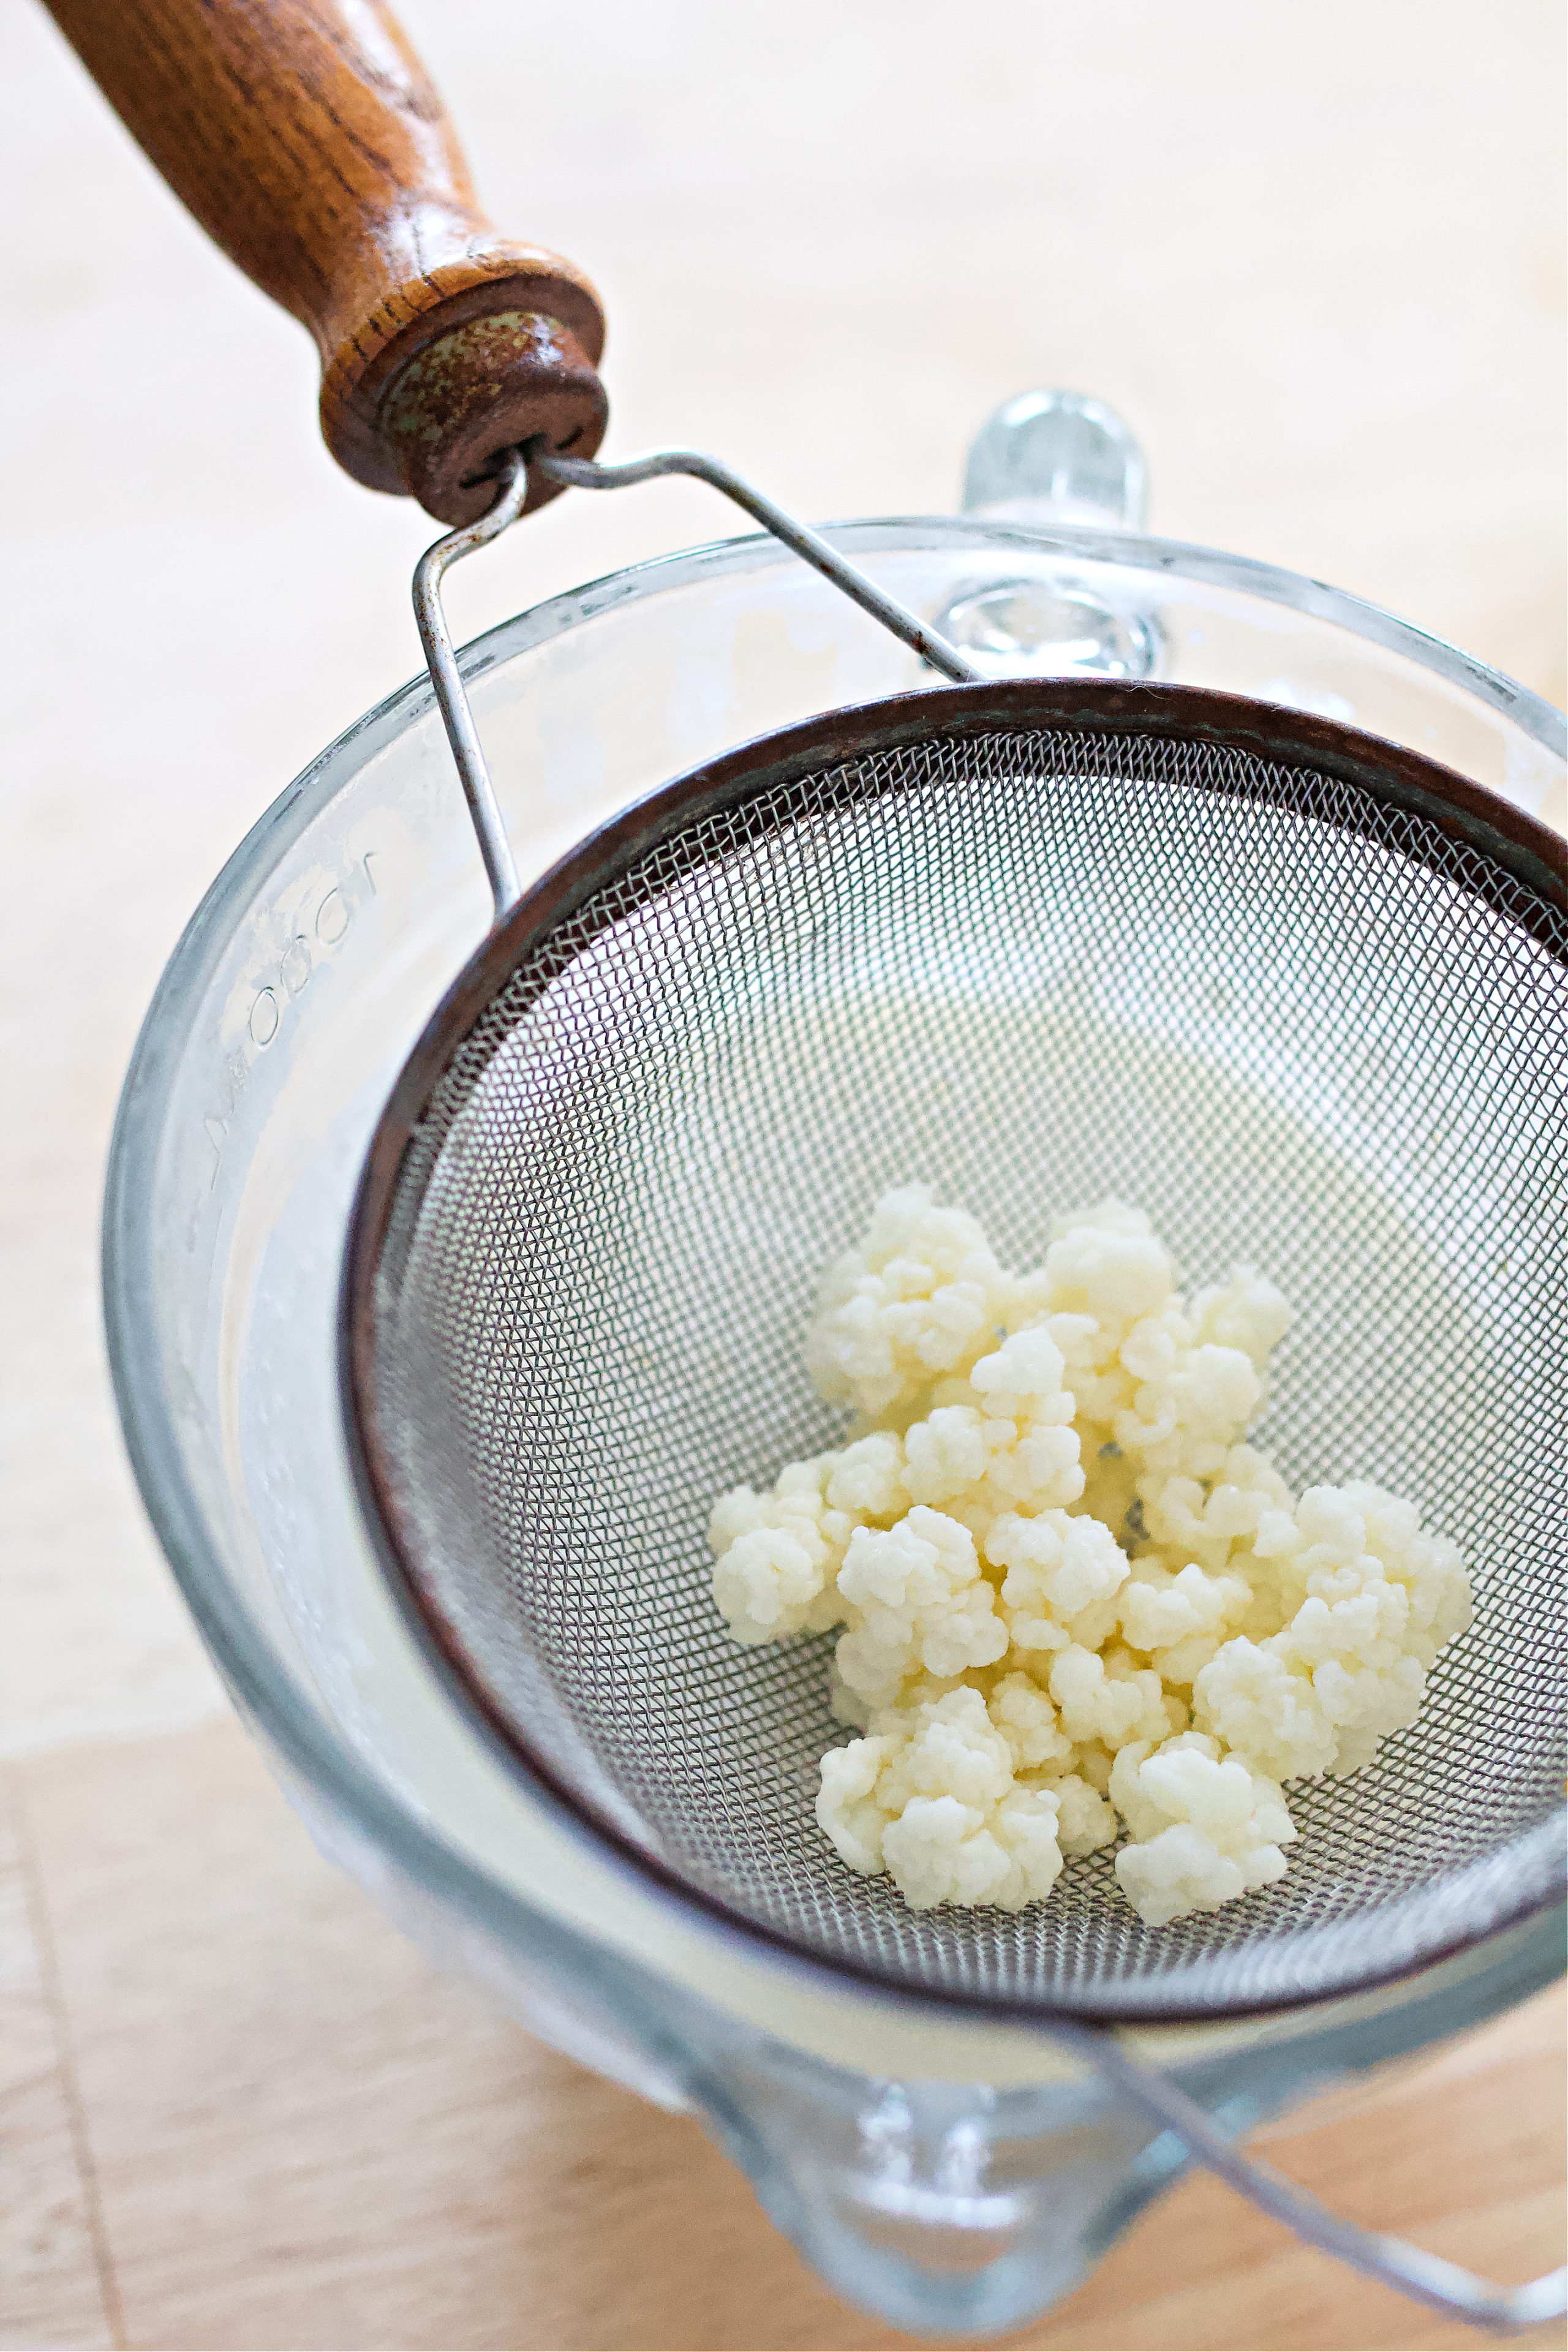
- Strainer + wooden spoon
- Plastic cover - Metal will react against the kefir and it will also corrode easily.
💡 Tip: Non-dairy milks (like coconut or almond) can be used occasionally, but your grains will thrive best with dairy milk long-term.
Step-by-Step: How to Make Milk Kefir
Milk kefir is one of the most forgiving ferments to keep going once you find your rhythm. Here's exactly how I start a fresh batch in my own kitchen:
Add about 1 to 2 teaspoons of active kefir grains to a pint-size glass jar. Then pour in 1 to 1½ cups of fresh milk-I use raw whole milk when I have it on hand, but organic whole milk from the store works well too. If you're just getting started, it's better to use less milk so you can watch how active your grains are.
Cover the jar with a coffee filter or clean cloth and secure with a rubber band. Let it sit at room temperature (between 68-85°F) for 24 hours, away from direct sunlight.
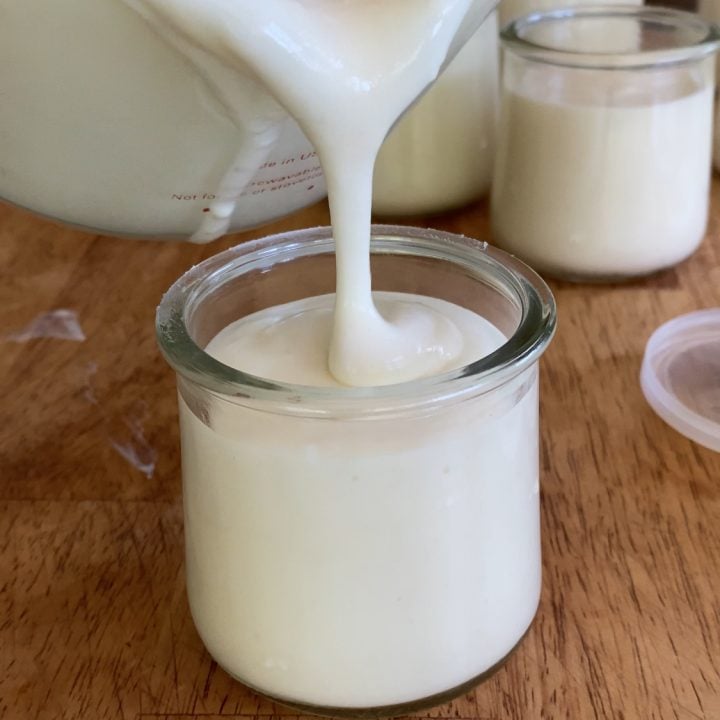
After the ferment time, the milk should have thickened slightly and smell tangy. Strain the grains out using a plastic mesh strainer, and you've got your first batch of kefir. You can drink it right away, or move on to a second ferment for more depth of flavor and added benefits.
For a second ferment, pour the strained kefir (without the grains) into a clean jar. Cover loosely with a lid and let it sit out for another 12 to 24 hours. This is when I like to toss in a lemon peel, vanilla bean, or cinnamon stick to naturally flavor the kefir. Then pop it into the fridge and enjoy it chilled.
Troubleshooting Tip: If the kefir smells too yeasty or separates into clear whey and thick curds, it may be over-fermented or your ratio of grains to milk is off. Try shortening the ferment time or using more milk next time.
Variations or Different Ways to Use Kefir
Kefir is more than a drink-it's a kitchen staple once you get used to it. Here are a few cozy, nourishing ways we use it around here:
- Smoothies - Blend with berries, bananas, vanilla, or even cocoa powder.
- Overnight oats - Combine kefir, oats, and a drizzle of honey for a ready-to-go breakfast.
- Salad dressing - It would work great with this ranch dressing mix.
- Pancakes and waffles - Sub kefir for buttermilk in any recipe.
- Baking - Works in muffins, quick breads, and cakes.
- Marinades - Use to tenderize and flavor chicken or pork.
- Soup base - Add to creamy soups for richness and a probiotic punch (off heat to avoid killing the good bacteria).
FAQ Section
No. Kefir grains are a symbiotic culture that must be sourced from existing grains. They grow and multiply over time, but they can't be created from just milk.
Start with ½ cup per day and slowly work up to 1 cup daily, depending on your body.
Yes! For most people, daily kefir helps support digestion, gut health, and nutrient absorption. Just listen to your body.
Storage Tips For Kefir
Storing active grains: If you need a break, place your kefir grains in a small jar of milk in the fridge. They'll keep for up to 3 weeks, just make sure to swap in fresh milk every week or so to keep them fed.
Finished kefir: After fermenting, your kefir can be stored in the fridge for 1 to 2 weeks. Some separation is normal, just give it a shake before using.
Closing Thoughts from the Homestead
If you've never tried making it before, I hope this post gives you the confidence to get started. Let it become part of your kitchen rhythm, it's more forgiving than you think.
You May Also Want To Try:


How to Rehydrate and Keep Kefir Grains Healthy
Ingredients
- 1 teaspoon dehydrated milk kefir grains
- 1 cup organic milk
Instructions
- To rehydrate your kefir grains: place 1 teaspoon of dehydrated grains into a clean glass jar and add 1 cup of room temperature organic milk. Cover the jar with a breathable cloth or coffee filter, secured with a rubber band.
- Let the grains sit at room temperature (68-85°F) for 24 hours: After that, strain out the grains using a plastic mesh strainer and discard the liquid-it likely won't be fermented enough to drink during this stage. Add fresh milk to the strained grains and repeat the process daily for 3 to 7 days. The grains will gradually plump up and become fully active.
- You'll know your grains are ready when the milk starts to thicken and develops a pleasantly tangy aroma and flavor.
- Once fully rehydrated: Place the grains in fresh milk and allow them to ferment for 24 to 48 hours, depending on your taste preferences. Strain the finished kefir and enjoy.
- To maintain healthy grains: Keep them in regular use by repeating the fermentation process every 24 to 48 hours with fresh milk. If you need to pause, store the grains in the fridge in a small jar of milk for up to 3 weeks. Be sure to "feed" them with fresh milk weekly to keep them alive and thriving.
Notes
The better the milk quality, the better your kefir will be!
Nutrition
Other Posts You May Enjoy:


Milk kefir has become a steady part of our routine here on the homestead. I love how simple it is to make once you get into the rhythm, it practically takes care of itself! The flavor gets better with each batch, and it’s such a satisfying feeling knowing you’re adding something so nourishing to your family’s diet. I use it in everything from smoothies to dressings, and even for soaking oats overnight. Once you start, it’s hard to stop!