How to Rehydrate and Keep Kefir Grains Healthy
This recipe card guides you through the process of rehydrating and maintaining healthy milk kefir grains. Whether you're new to fermenting or looking to revive dehydrated grains, this simple step-by-step method ensures your kefir grains thrive and continue producing tangy, probiotic-rich kefir. With just a few ingredients and easy-to-follow instructions, you'll have active, healthy grains that keep delivering delicious kefir for your homestead kitchen. Keep this recipe handy as a quick reference for making kefir and caring for your grains!
Servings: 1 quart
Calories: 149kcal
Cost: $12
Ingredients
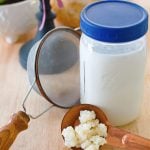
- 1 teaspoon dehydrated milk kefir grains
- 1 cup organic milk
Instructions
- To rehydrate your kefir grains: place 1 teaspoon of dehydrated grains into a clean glass jar and add 1 cup of room temperature organic milk. Cover the jar with a breathable cloth or coffee filter, secured with a rubber band.
- Let the grains sit at room temperature (68–85°F) for 24 hours: After that, strain out the grains using a plastic mesh strainer and discard the liquid—it likely won’t be fermented enough to drink during this stage. Add fresh milk to the strained grains and repeat the process daily for 3 to 7 days. The grains will gradually plump up and become fully active.
- You’ll know your grains are ready when the milk starts to thicken and develops a pleasantly tangy aroma and flavor.
- Once fully rehydrated: Place the grains in fresh milk and allow them to ferment for 24 to 48 hours, depending on your taste preferences. Strain the finished kefir and enjoy.
- To maintain healthy grains: Keep them in regular use by repeating the fermentation process every 24 to 48 hours with fresh milk. If you need to pause, store the grains in the fridge in a small jar of milk for up to 3 weeks. Be sure to "feed" them with fresh milk weekly to keep them alive and thriving.
Notes
Always use non-metal utensils and jars to avoid harming the kefir grains.
The better the milk quality, the better your kefir will be!
The better the milk quality, the better your kefir will be!
Nutrition
Calories: 149kcal | Carbohydrates: 12g | Protein: 8g | Fat: 8g | Saturated Fat: 5g | Polyunsaturated Fat: 0.3g | Monounsaturated Fat: 2g | Cholesterol: 30mg | Sodium: 95mg | Potassium: 366mg | Sugar: 12g | Vitamin A: 405IU | Calcium: 306mg
