Wrap Around Porch Transformation
This porch transformation I get to share with you today is absolutely drool-worthy. Night and day difference. Unbelievable. Except it's entirely true!


This porch post is in partnership with Wagner & Retique It. All opinions are my own.
It's amazing what a little elbow grease, quality paint and stain, and a nice spray painter can do. In a few days, you can have a completely transformed porch. Including doors!
We recently moved into a 92-year-old farmhouse. It's been my and my husband's dream for years to purchase an old home and restore it to its former glory. And this year, we jumped! One of the many decisions you have to make when purchasing a fixer-upper is where to start. But truthfully, that didn't take us long to figure out. The front porch was one of the reasons we fell in love with this home. My last two houses had tiny porches. We made a patio addition on our last house, but it just wasn't the same as a beautiful wrap-around dream porch like this one.
Except it wasn't a dream. Yet.
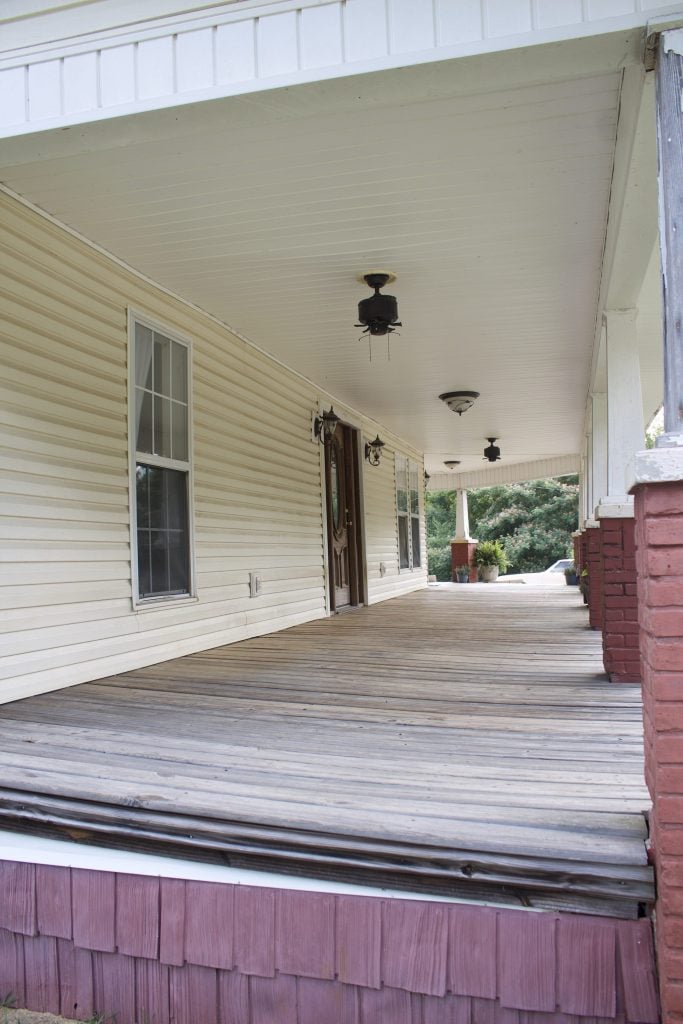
It was a mess. Dirty, soooo dirty. Chipped paint, stained gross concrete, and cruddy wood floors. The two entryway doors were also bleached from years of no care, patchy, and dirty. Did I mention it was all dirty? This house was a rental whose tenants didn't take the best care, and the owner didn't seem to mind.
We had to fix that.
Prepping the deck for paint and stain
This porch needed a thorough cleaning to remove debris and get it prepped for paint. I started by using a power washer and completely spraying down the ceilings, then the walls of the house, floors, and finishing up with the pillars. It was a gross job and I was covered in . . . well I don't even want to think about what I was covered in, so we'll just move on. (Think bugs and anything that goes with them.)

It takes a few days for the boards to fully dry, and you don't want to attempt to apply stain early. Give it a full two to three, depending on the weather. Too soon and the paint or stain you applied will raise and bubble as the water in the wood gets expelled and is trapped under the paint. That's a pricy, and messy mistake. Don't do it.
Once the deck was dry, I took my indoor vacuum, a shop vac would work too, and thoroughly vacuumed the porch floor. This might seem silly and your neighbors will side-eye you as they roll by, (or think you're a genius) but trust me. It removes any dust, bugs, or other debris that have landed or blown through in the days it took the porch to dry.
You can also use denatured alcohol to wipe and prep the space, but that wasn't needed for this specific project.
Let's get painting!
Now for the fun part! Actually painting! I used the Wagner Control Pro 170 and friends, I'm never going back to any other sprayer ever again. This one was so easy to use. The best part? There's no paint holder to pour the paint into or clean up afterward. Which is the worst part of using a spray painter and everyone's least favorite job. Instead, it has a remote suction hose that you drop into your gallon of paint, prime the pump, and start spraying! Did I just blow your mind? Because gosh, that sure impressed me and made me much more likely to use it on other paint projects knowing that it's so dang easy to clean.

And the overspray of most sprayers? I'm swooning here because it was much less than with ones I've used in the past. As in, 55% less overspray on average. This means you're not wasting paint! I still put down and hung painter's canvas to protect the areas I wasn't painting, but I didn't have to get crazy with it.
So many benefits from this Wagner
The reach of the Wagner Control Pro 170! It had a long cord attached to the spray handle from the Wagner, so I only had to move the actual sprayer and gallon of paint twice.
And did I mention, on our 750sf porch we only used two gallons of stain? You heard that correctly. Two gallons. I did dilute it with a bit of water because it was a water-based stain and I liked the look of a lighter coat to see the wood grain through it. (Do not add water with an oil-based stain!)
Oh! And the tip on the nozzle also swiveled so you could easily spray vertical or horizontal. It was all these little things that added up to making this my favorite sprayer ever.
The Paint and Stain
Let's talk about the paint I used shall we? I have had some not so great experiences in the past with paint, and especially stain. Am I the only one that finds stain can sometimes be very confusing? Do you use a primer? What do you put over the top? Do you use one layer or two? Can you combine oil based and water? (As already discussed, no. I learned the hard way on that one. Mainly because I didn't read the can throughly enough.) And even when I have done everything right, the longevity of the stains seems to always be an issue.
Fall in love with Retique It
If you've experienced any or all of the same issues, I'd like to introduce you to my new favorite brand: Retique It. Not only is Retique It an amazing product, but their instructions, along with video tutorials (I'm a huge visual learner.) are amazing. They also have a helpline and are responsive to email questions. No matter how good the paint or stain is, incorrect application can ruin a project. Retique It makes sure that doesn't happen.

What I used:
Applicator for Columns & Floors: Wagner Control Pro 170 (Being 100% honest, it saved me at least a day of work!)
On the columns: Furniture & Cabinet Paint with a Chalk Finish in the color Snow
The doors: French Oak Door Kit with Retique It Brushes
On the porch floors: Wood N' Stain in color Barn Wood & Polytique It Exterior Topcoat in Satin
I decided to tackle the columns first, then the doors, and finish off with the floor because that seemed easiest and I wanted to get the harder projects done in the beginning.
Painting the columns
In the beginning, I thought the column and brick should be completely white. After I sprayed the first column though, I knew it was wrong. Some definition and contrast for the eye were needed. The brick basically disappeared and it felt like I was trying to hide it. Not what I wanted. Running inside, I grabbed an old rag, wetted it down, and used it to rub some of the paint off the bricks. Much better! Instead of looking like the brick was hiding, I now felt like it was highlighted!
Because I wanted a more whitewashed look on the brick I watered down the paint a touch until it was a consistency I felt went on well, covered good, but was easy to wash off on the bricks where needed. That's the great thing about Wagner and Retique It, you can play with the paint consistency, and the Wagner really gives you control of your coverage thickness and paint flow.
Tips for whitewashing the brick
I was working outside in the heat of summer, so the paint and stain dried fast. That was another reason for adding a bit of water to the paint. It made the paint take longer to dry, giving me a few more minutes to work.
I'd start by having my wet rags rinsed off and ready by my side. I'd then take the Wagner and spray down one to two sides of the brick columns at the most. Never more than two, you won't have enough time. I'd then set the Wagner down and cover the nozzle with a rag to prevent the paint drying and interfearing with the sprayers coverage. I'd take the other rag and wipe random bricks, no specific pattern, until I stood back and liked it. You can't do this part wrong, and it will all be based on personal preference. You might like more brick exposed or maybe less.
Another thing I loved about the Wagner was because of how even the coverage and how I could adjust the nozzle, I didn't need to go in for a second coat. On the floors or columns! I bet I saved at least two to three gallons of paint by using the Wagner. It basically paid for itself in one project!
And the crazy thing with the Retique It paint, was it dripped on the concrete and I thought, no biggie, I'll just power wash it off. Nope friends. After two days that paint was stuck! This goes to show that it really is high quality because anything else I sprayed with the power washer peeled off within seconds. Being outdoors, staying power is always appreciated! (I was able to scrub it off a bit with steel wool!)

Cleaning the Wagner
Once I had the columns painted, I took a break and cleaned up the Wagner, which is super easy. You simply remove the remote suction hose, insert it into a gallon bucket filled with water and spray until water runs clear. ( I changed out the water in the bucket a few times.) Remove spray head and soak in soapy water for a bit, and disassemble the hose, laying everything out to dry for a bit. So easy.
Painting the doors
The doors were the most daunting to me. I was slightly intimidated with the kit and steps. However, once I read through the materials that came with it, and watched one of the application videos, I was itching to get out there and attempt it.

What a fun process!
First, put on the Wood'n Primer that includes real wood particles in it. Real wood! Which means it feels and looks like genuine wood, whatever surface you use it on. We had real wood doors, and I still used and loved it! Once that's dry, it's time to put your artist's hat on and create wood design! Take the Barn Wood stain (the same stuff I used on the porch floor!) and in small sections, brush on a bit, then take your wood grain tool that comes with the kit, and gently pull it over the stain rocking back and forth. It's basically magic. Don't get super picky with how it looks. When you stand back, it will all come together. However, feel free to redo sections if you need by quickly re-brusing the area you just completed, and using the wood tool again. It dries fast!
After your done with that, take the Barn Wood color again, the one you just used, and paint over the entire door. This softens the wood grain, making it look even more natural.
Once this process is complete, if you're doing the french oak like myself, paint on the white wash in thin coats. Again, this is all personal preference on how you want it to look. You can whipe it off a bit for a less white washed look, or apply a little heavier. Want it a little darker or think you want contrast in a few spots? Feel free to apply the Barn Wood stain over the White Wash if needed. You can't mess this process up! Once the door looks exactly like you want, use Polytique It Exterior Topcoat to seal it all. The end.
Now stand back and admire your "new door"!
Finishing with the porch floor
Gosh doing the porch floor was easy. The Wagner made it feel like I was cheating or something. Moving the painters cloth was what took the longer. I had the porch complete in 30 minutes. Again, one coat covered perfectly. Once it was dry I went back in with the Exterior topcoat and done. It took me much longer to power wash the porch than it did to apply the stain and topcoat. The satin like finish was perfect and my porch is absolutely stunning. The Wagner applied such even coats to the columns and floors, it seriously looks professionally done. I couldn't be happier with how this project turned out.

The porch is finally loved again!
We're looking forward to lots of memories made in this beautiful space.


It looks great!