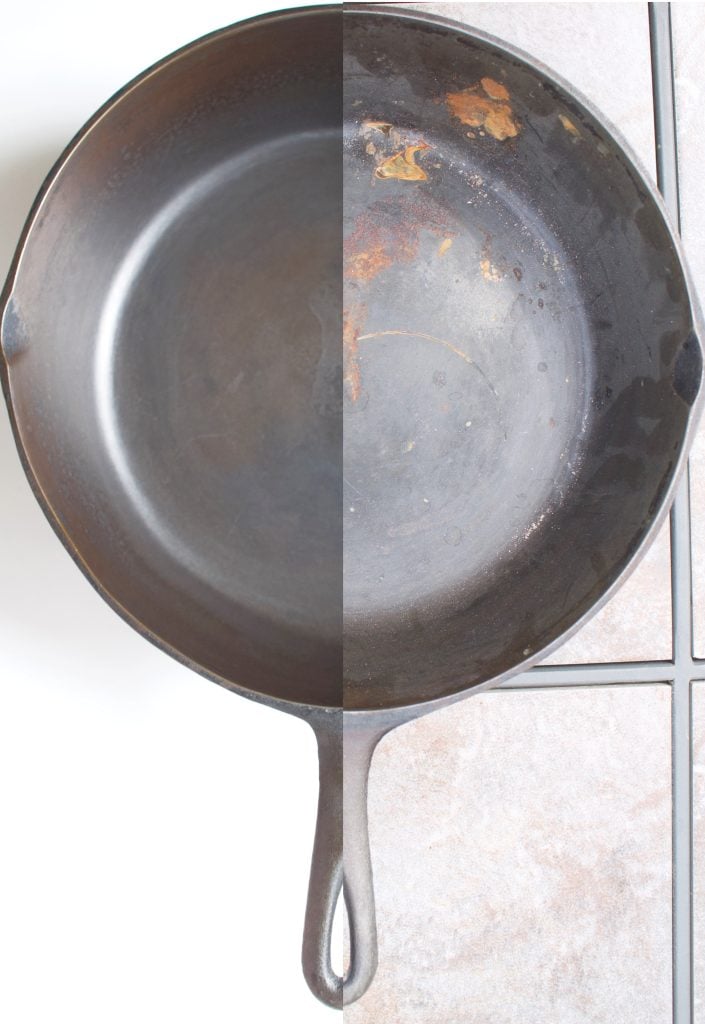
How To Season and Restore A New or Rusty Cast Iron Skillet
Learn how to easily season a cast iron skillet right in your own kitchen, whether you are breaking in a brand-new pan or restoring a rusty vintage find. For years, I let a sad, lonely, rusted skillet sit hidden in the bottom drawer of my kitchen because I was too intimidated to fix it. Once I finally pushed past the fear and mastered the simple science of seasoning, it completely transformed how I cook. Today, that exact same pan is my daily go-to for everything from perfectly flipped breakfast eggs to cozy family cobblers. When seasoned correctly, cast iron becomes a completely natural, chemical-free, non-stick workhorse that cooks evenly and lasts for generations. If you've been waiting for a sign to pull that rusty pan out of hiding or finally open that new box, this is it!

Farmhouse Pro-Tip: If you buy new or old cast iron skillets, the cooking surface can feel a bit rough. Before you begin the seasoning process below, take a piece of fine-grain sandpaper and lightly sand the bottom of the cooking surface until smooth. It gives it that coveted, "well-loved" texture right from the start!
Gathering input from seasoned farmhouse cooks who rely on vintage skillets every single day is how I perfected this foolproof restoration method!
Quick Look: Cast Iron Seasoning
- The Best Oil: High-smoke-point neutral oils are key. Grapeseed oil, canola oil, or organic flaxseed oil work best to create a durable bond.
- The Golden Rule: Mild soap and steel wool are only used during this initial restoration step to strip away rust. Never use soap for daily cleaning later!
- Bake Temp: 500°F (260°C) for exactly 1 hour. This pushes the oil past its smoking point so it completely bonds to the iron.
- The Result: A deep, glossy, non-stick black patina that protects the iron from moisture and prevents food from sticking. Something home cooks and even chefs in even high end restaurants appreciate.
- Weight: While modern pans chase the trend of being featherweight, cast iron isn't made to be lightweight. That heavy, substantial heat retention is exactly what makes it a lifetime powerhouse in the farmhouse kitchen. It also is part of the reason its durability is multi-generational.
Brands to be on the look out for:
- Lancaster Cast Iron: This is a fantastic modern American brand. Their cookware is cast, machined, and seasoned right in Lancaster County, Pennsylvania. They are famous for reviving the traditional style of making smooth, lightweight, high-end pans.
- Griswold: This is one of the most famous vintage American cast iron brands in history. Founded in 1865 in Erie, Pennsylvania, "vintage Griswold" pans are prized by collectors today for their incredibly smooth, glassy finish.
- Wagner (Wagner Ware): Another legendary vintage giant founded in 1891 in Sidney, Ohio. For nearly a century, Wagner dominated American kitchens alongside Griswold.
If you ever find a vintage Griswold or Wagner at a thrift store or estate sale, grab it immediately! They are the ultimate USA made candidates for the exact restoration process we're about to talk about!
Materials Needed for Restoration
Before you begin, gather these simple supplies. Remember, using the right high-heat oil is crucial for creating a protective, lasting barrier on the porous iron.
Aluminum Foil: Optional, to line the bottom rack of your oven and catch any accidental oil drips.
Steel Wool or Scouring Pad: Necessary for scrubbing away every trace of surface rust.
Mild Dish Soap: Used strictly for this initial deep-clean to strip factory residues or debris.
Canola, Grapeseed, or Flaxseed Oil: Neutral oils with high smoke points. (Flaxseed is fantastic but pricy; canola or grapeseed works beautifully for everyday kitchen budgets).
Lint-Free Paper Towels: For applying and wiping away the oil layers.
Step-by-Step: How to Season a Cast Iron Skillet
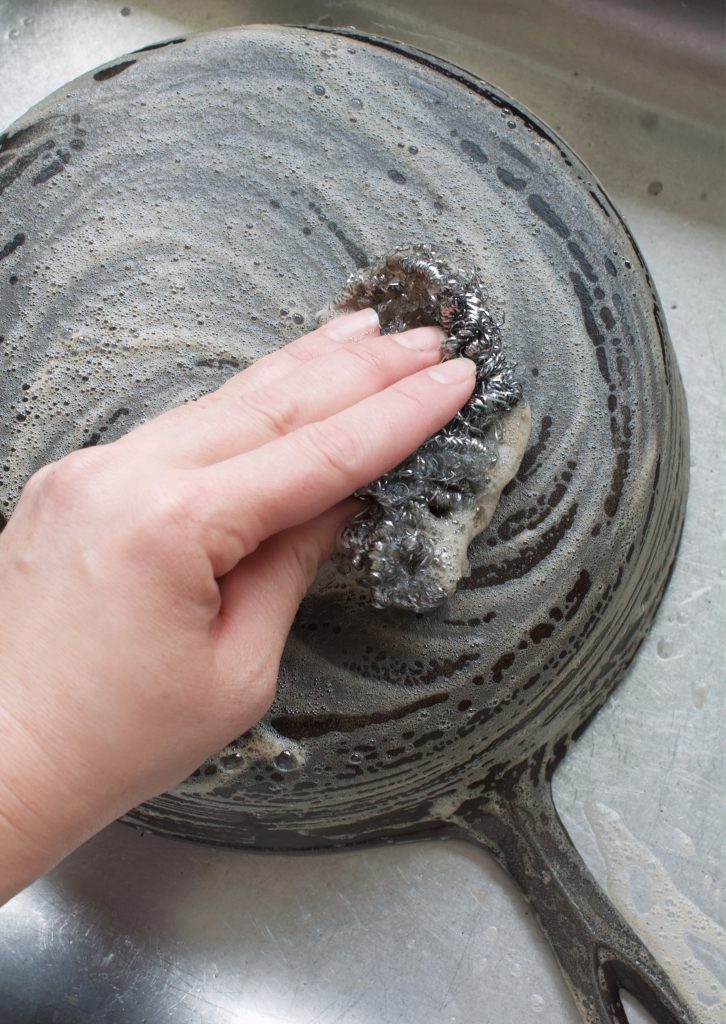
Step 1: The Initial Scrub
Take your new or rusty skillet to the sink and scrub it vigorously inside, out, and along the handle using hot water, mild dish soap, and your steel wool. Work extra hard on any visible rust spots until you are down to raw, clean iron.

Step 2: Bone-Dry Heating
Rinse the skillet completely to remove all soap residue. Wipe it down thoroughly with a paper towel, then place it directly onto a hot stovetop burner over medium heat for a few minutes. Never skip this step! Cast iron is highly porous, and heating it ensures every microscopic drop of water evaporates completely, preventing immediate flash-rusting.

Step 3: The Micro-Oil Layer
Once the pan is dry and cool enough to handle safely, pour about one teaspoon of your chosen oil into the center. Using a paper towel, rub the oil over every single inch of the skillet: inside, underneath the base, and all over the handle.

Next, take a completely clean paper towel and buff the pan until it looks dry. This is the biggest secret to success: if you leave a thick, visible layer of oil on the pan, it will bake into a sticky, gummy mess in your oven. You want to wipe away as much excess oil as humanly possible before baking.
Step 4: The High-Heat Bake
Preheat your oven to 500°F (260°C). Place your oiled skillet upside down on the top rack of the oven (you can place a sheet of aluminum foil on the bottom rack underneath it to catch any stray drips). Bake the skillet for exactly one hour. This intense heat forces the oil to break down and permanently bond to the raw iron-a process called polymerization.
Step 5: Cool in Place
After one hour, turn off the oven but leave the skillet inside with the door closed. Let it cool down completely in place for an hour or two. This slow cooling allows the initial layer of seasoning to fully set, leaving you with that gorgeous, classic black patina

Daily Maintenance & Cleaning Rules
Once your pan is beautifully seasoned, keeping it non-stick is incredibly easy if you follow a few basic farmhouse rules:
Clean While Warm: Don't let the pan sit in the sink overnight, or food will stick like glue. Clean it while it's still warm to the touch.
The Kosher Salt Scrub: For stubborn, stuck-on food bits, pour a few tablespoons of coarse kosher salt into the warm skillet and scrub with a pan scraper or a stiff brush. The salt acts as a natural, safe abrasive.
Rinse and Re-Dry: Rinse the salt out with warm water, wipe it down, and always place it back on a warm stovetop burner for a minute to evaporate any remaining moisture.
The Quick Top-Coat: Before storing your clean, dry pan in the cupboard, rub a tiny, microscopic drop of cooking oil over the cooking surface to protect the seasoning until your next meal. (I no longer do this often, but I've been using my pan for over seven years now. It's more important within the first year.)

Frequently Asked Questions:
Yes, but only when you are intentionally stripping down a rusty or brand-new pan to re-season it. For everyday cleaning after the pan is seasoned, you want to avoid dish soap because it can break down the beautiful, protective oil layers you built up. Stick to hot water, a stiff brush, or a coarse kosher salt scrub for daily cleaning!
If your pan feels sticky or gummy after baking, it means the layer of oil you applied was too thick. When too much oil pools on the iron, it can't polymerize and bond correctly in the oven. Don't worry, you don't have to start over! Just scrub the sticky spots down with steel wool, wipe it down until it feels completely dry, and bake it at 500°F (260°C) for another hour to set it.
Avoid highly acidic foods, like tomato sauces, vinegar-heavy glazes, or large amounts of citrus, until your skillet has a deeply established, dark patina (usually after a few months of frequent use). The acid can eat away at a fresh, young layer of seasoning and give your food a metallic taste. Stick to frying bacon, searing meats, and baking cornbread early on to build up that buttery base!

Foods I Make In My Cast Iron Skillet:


How to season a rusty cast iron skillet
Ingredients
- Canola or flax seed oil
- Steel wool
- Paper towels
- Mild soap
Instructions
- Take new or cast iron skillet that needs restored and using hot water and mild dish soap, scrub skillet throughouly, making sure to concentrate on the rusty spots. Scrub the entire skillet, inside and out.
- Rinse and remove all soap.
- Place on a warm stovetop to dry the water from the skillet thoroughly, otherwise it will rust.
- Once completly dry, take 1 tablespoon oil, either flax or canola. Flax is better to use but also pricy. Canola oil works fine too. Wipe oil over entire surface of skillet, inside and out.
- Wipe oil off completely. To thick of a layer of oil will cause the skillet to "bake" with a sticky residue.
- Once skilled is oiled, bake in oven at 500 degrees for 1 hour. You want to cook the oil past the smoking point, so oil breaks down and bonds with cast iron.
- Turn off oven and let cool in place.


I used to be completely intimidated by the thought of restoring rusty cast iron, but this simple, step-by-step method stripped the fear away completely. My pan is now buttery smooth, naturally non-stick, and used on my stovetop daily. If you have a sad skillet sitting in the back of your cupboard, this is your sign to restore it!