How to hang wallpaper: getting it perfect the first time.
Wallpaper can be a scary word. Some hear "wallpaper" uttered and instantly think one of three things:
1.) It means a lot of work if you're planning on tearing it down.
2.) It use to be a word most would hear and instantly think "dated home".
3.) If you're planning on putting it up, it can strike dread into your heart.
I'm here today to share that truly, in my experience at least, it's not as bad as most are lead to believe.
This is part one in a three part series on updating our hallway. To check out the other two parts to this series, click the links below:
1.Updating interior doors. Our hallway renovation.
3.Faux Wainscoting tutorial: Wainscoting look without the cost
Hallway renovation update
The hallway renovation is coming along and we officially have (most of) the wallpaper up! Woohoo! Guys, it's finally starting to look how I'd envisioned months ago.

I'm only wallpapering about two thirds down the wall because we're installing faux wainscoting.
TAKING WALLPAPER DOWN: WHAT I DID
I still remember the day we walked into our now home. Honestly, my husband and I thought there was no way we'd be able to swing it. We walked though dreaming and hoping, but trying not to get ourselves excited, only again to be let down. What immediately came to mind after the fact we didn't think it would actually happen, was "Gosh this house has so much dang potential". It made my DIY brain giddy.
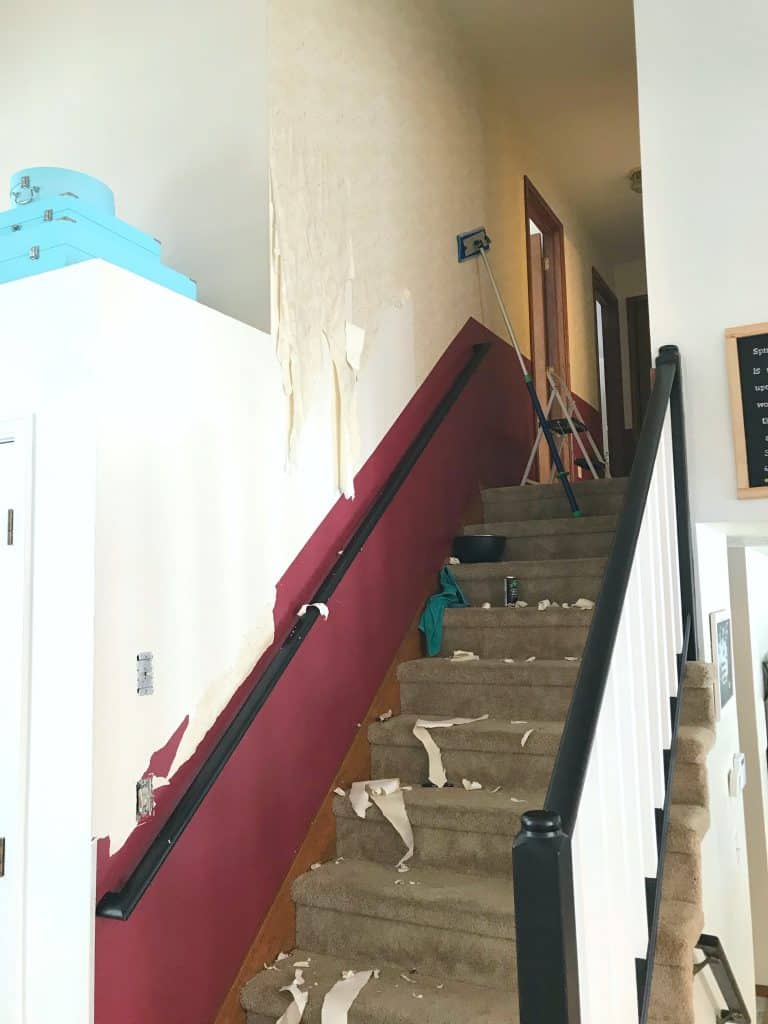
Fast forward a year and I'm still so happy about living here and all the potential projects on the horizon. This hallway was one that I couldn't put off much more than a year though. The gold flecked, off-white wallpaper and Burgundy red paint was about ready to drive me batty.

It reminded me of something out of a scene from a horror film. You know, a dark hallway with someone standing at the end with ominous eyes. . . Talk about walking up the stairs with that in mind each night as we headed to bed!

God bless whoever's soul took the time to wallpaper the outlet cover so it matched the wall. It's all in the details folks. (I write as I snort-laugh into my coffee)
Removing wallpaper
I honestly put this project off longer than I should of simply because people had told me so many awful stories about removing wallpaper. After my grandma passed though I needed a project. I cope with sadness and loss by cleaning. Hard. Core. Cleaning. After my house was clean I looked around for another mind numbing project. I didn't want to think, just do. Walking by the stairs a lightbulb went off. Duh, wallpaper. It was the perfect outlet to keep me busy. Wet it down and tear it off, over and over and over again.
There are a million and one ways recommended to remove wallpaper online. I went with a simple recipe of half hot water, half vinegar. Using a mop for the high places and a sponge for the rest, I simply soaked each area down for several minutes before gently finding a corner and pulling. Sometime it came off in bigger chunks, sometimes it was lots of tiny rips. Slowly, the wall underneath began to appear.
It took several days, working a few hours a day, to get it done completely. I probably could have done it in a weekend if I had absolutely no distractions and the dedication of a saint. I'm a mom though, so that didn't happen.
The red portion of the hallway - painted wallpaper
The bottom portion of the hallway was painted red over two sheets of wallpaper. Now, I've heard it's almost impossible to remove wallpaper that's been painted. There's no way to wet the paper to help loosen the glue. I wasn't going to attempt it, my DIYness has limits. We instead decided to wainscot the bottom and I figured, throw some wood over it and no one will know and it will save me some elbow grease. Plus, I've always wanted to have wainscoting in my home.
The problem: Wainscoting is expensive and I'm cheap
This is obvious another post for another time, but wainscoting is not cheap. Instead of covering the red wallpaper with wood like we originally planned, we instead mudded the wall to look smooth, covering up the textured wall and wallpaper, sanded down any lines or bubbles my non-skilled mudding hands made, and painted it white, only using boards to trim it out, making it appear as though we did a wainscoting look. I'll be sharing the whole tutorial in a post soon!

wallpaper application
You probably thought I'd never get to this part. Sorry about that. Anyhow, I purchased our wallpaper from Wayfair, and for some reason it took forever and a day to get here. About three weeks total. I LOVE Wayfair, and I'm assuming it was who they purchased it from that took so long to send. I got this exact wallpaper after seeing it on Instagram in multiple amazing farmhouse style homes.
What you'll need:
- A really sharp knife, blade, and/or scissors
- Something to smooth the paper to the wall
- A few tape measures for cutting straight.
- Pencil for marking cut lines on the wallpaper
Once the paper is wet it's hard to cut, and you'll need to cut a lot when it's wet, so make sure your blade is very sharp.

pre-pasted wallpaper: how to adhear
The wallpaper I bought was pre-pasted. That means to adhere it you submerged it in water (I used the upstairs bathtub) and that activates the glue. The instructions said to submerge it for five seconds. I quickly did that, lifted it up, let the water drip off a bit, and moved it to the wall it was pre-cut for and gently smoothed into place.
I LOVED this application method. It wasn't super messy and I had no problems with it sticking to the wall or coming off after it dried.
Make a plumb line
To make sure your wallpaper is straight, start with a plumb line for accuracy. Most homes have walls and ceilings that are a tad off, this happens when they settle and just because it's hard to make a perfect house. Before making the plumb line, decide where you want to start. I did the far corner of the hallway that I knew most people would never see.
Line up a carpenters level and draw a vertical line with a pencil. Easy peasy but a step that should be done before you begin. If you feel the need, make a new plumb line for each wall.
How To Apply
It should go without saying, but I'll say it anyhow: always read the instructions that come with your specific wallpaper. 😉
Make sure to cut four inches extra for overhang. Two at the top and two at the bottom for trimming. Walls are uneven and if you don't do this as you go you could wind up with a slow gap emerging at the top or bottom. I saw someone do this on Instagram recently with a mural wall and they had to add moulding to the top of the wall to cover the gap.
Use a sharp knit or blade to cut the wallpaper once it's in place. Run the blade along a hard edge as a guide. (I learned about this the hard way, don't look at the tops of mine too close.) 😉
Before cutting the next strip, make sure it matches the paper you just put up. Often times you'll have to remove a foot or more from the top to get it to line up to the paper you just adhered.

Tips when applying wallpaper
Always get an extra roll.
This is how the wallpaper companies get ya. You have to trim off so much to keep the pattern going, that you waist a ton. There's really no way around it. We measured using the Wayfair measurement helper to know how much to order, which would have worked if I hadn't waisted a good half a roll keeping the pattern going. Because each dye lot is different if you order more paper separately you need to email and make sure the dye lot is the same as your initial purchase, or the tint could be off slightly. Things to think about!
Overlap the paper just a tad
As the paper dries, it pulls away and "shrinks" a bit, enough to see a gap that could cause an awful space. I thank a sweet IG friend for her tip with this, as she dealt with the problem herself not very long ago!
If it doesn't stick to the wall when dry
On one piece of wallpaper, after I wet it down I had to remove and readjust, and there wasn't enough glue on the corner to keep it up and it kept flapping down a bit as it dried. To fix this I wet down an extra piece that was going to be thrown out, scraped off the glue from the back, painted it onto the spot on the wall the paper was having troubles sticking too, and wetted the paper down with a washrag and pressed it into the glue I just applied to the wall. That worked perfectly!
This is just a game of slow and steady, measure and cut, wet and apply, trim off excess. Make sure you have a soft brush or rag to smooth across each sheet after you apply the paper to remove any bubbles.

Why we did wallpaper before wainscoting
We didn't want to worry about a cut seam so close to where everyones eye's would visually be drawn to. So, I made sure the length of the wallpaper fit nicely behind the wood when it was nailed in place.

This section still needs another few coats of paint but you get the idea.
And that, my friends, is how I applied my wallpaper! I hope the information helped anyone out there curious of the process. Make sure to follow along on my IG for all the current projects I'm working on. And drop any question in the comments or message them to me over on IG!
Stay tuned for our final hallway reveal in a few weeks! Eeek! Can't wait!
If you want to see the wallpaper we've put in our new, 100 year old farmhouse. See even more of our farmhouse makeover here.
Meet Eryn
Eryn Whalen is a homestead blogger and recipe developer with a lifetime of hands-on experience in gardening, home canning, animal husbandry, and traditional kitchen skills. From preserving homegrown harvests to baking sourdough from scratch, she shares her family's journey of intentional living on their 100-acre Tennessee farmstead. Recently, Eryn has expanded her homesteading life to include caring for a family milk cow, sharing the learning process and daily joys of small-scale dairying. Read more about Eryn here


I love the hallway!
You kind of lost me with the carpenter level & the plumb line. But I think I know what you are saying. I am a visual person, a picture would have helped.
Karen
I'm sorry! My husband is the carpenter and sometimes it's hard to get him to explain it well enough for me to attempt to convey in a blog post. I'm super visual as well so I get that. It's also hard to talk measurements because each home and hallway is going to be so different with angles.