Easy Homemade Candy Caramel Recipe | No Corn Syrup
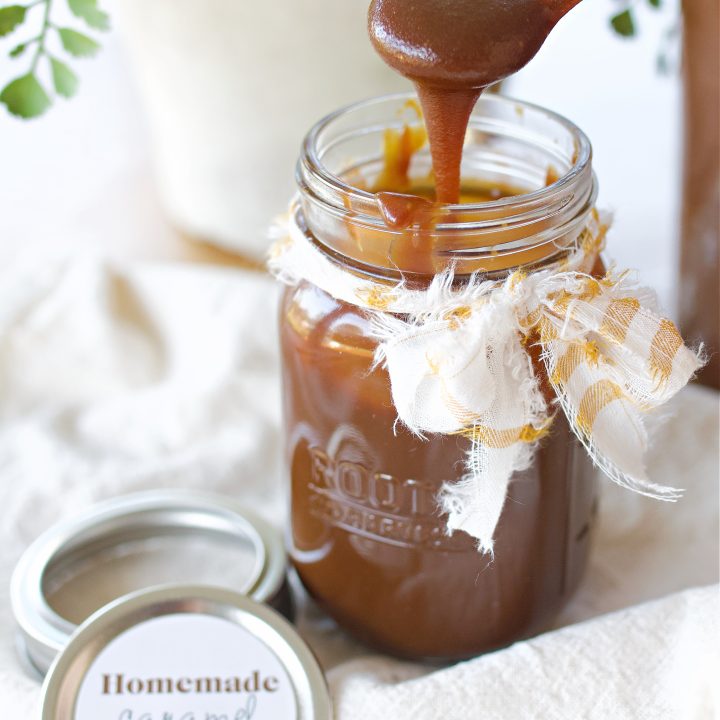
Caramel and chocolate are my love language. Every holiday season, my kitchen smells of melting sugar and butter, and I'm reminded why homemade candy is such a joy to make. This easy homemade candy caramel recipe has become a yearly tradition here on the farm: rich, buttery, and soft enough to melt in your mouth. It's similar to my Easy Homemade Caramel Sauce recipe.
If it's your first time making caramel, don't worry. I'll walk you through each step so your chewy caramels turn out smooth and perfect. You don't need corn syrup, brown sugar, or fancy tools, just simple ingredients and a little patience. The results? A pan of golden, creamy caramel chews that make store-bought candy look sad in comparison.
And if you love classic sweets like these, don't miss my homemade 5 ingredient chocolate syrup recipe or Great Grandma's Toffee Recipe. Both are timeless holiday staples that prove the best treats come right from your own kitchen.
Quick Look: Easy Homemade Candy Caramel (No Corn Syrup)
⏱️ Prep Time: 10 minutes
Cook Time: 20 minutes
Total Time: About 2½ hours (including cooling)
Yield: ~40 wrapped caramels
Main Ingredients: Sugar, butter, and heavy cream - that's it
No Corn Syrup: Made the old-fashioned way with pure ingredients
Skill Level: Intermediate - perfect for confident home cooks
Texture & Flavor: Buttery, rich, and chewy with deep caramel notes
Best For: Holiday gifting, dessert trays, or after-dinner treats
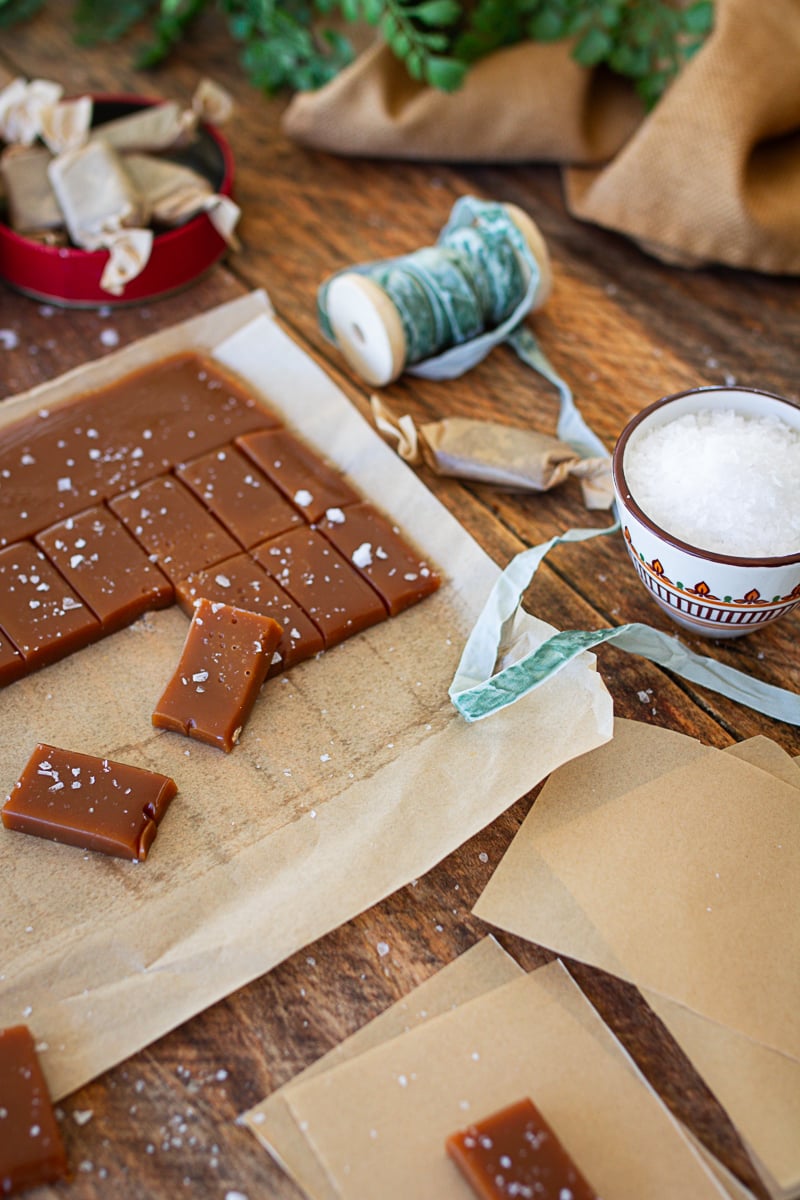
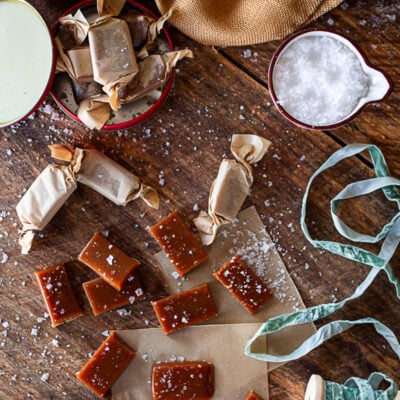
Pro Tip: Sprinkle sea salt before wrapping for a perfect sweet-salty finish and chill for 10 minutes before slicing for clean squares.
SUMMARIZE & SAVE THIS CONTENT ON
Why You'll Love These Chewy Caramels
- Made with simple ingredients: sugar, butter, and cream.
- No corn syrup or additives.
- Perfectly soft, chewy texture at the right temperature every time.
- A big hit for gifting during the holidays.
- Keeps beautifully in an airtight container for up to a month.
- Can be dipped in dark chocolate for a decadent twist.
SUMMARIZE & SAVE THIS CONTENT ON
Jump to:
- Quick Look: Easy Homemade Candy Caramel (No Corn Syrup)
- Why You'll Love These Chewy Caramels
- Making Caramel the Old-Fashioned Way: Without Corn Syrup
- Why I'm Confident in This Recipe
- The Importance of Quality Ingredients
- Avoiding Sugar Crystallization (and What I Learned the Hard Way)
- Candy Caramel Recipe Making Process:
- Tips for Success
- What I Do Now to Prevent Crystallization
- If You Still Get a Grainy Batch
- Optional Insurance
- My Kitchen Notes
- Pro Tip
- Sharing and Gifting Homemade Caramels
- Cutting and Wrapping Tip
- Homemade Candy Caramel FAQs
- Other Suggested Candy Recipes
- Chewy Caramel Candies Recipe Card
Making Caramel the Old-Fashioned Way: Without Corn Syrup
When I first started making caramel sauce and chewy caramels, nearly every recipe I found called for corn syrup. And while it certainly helps prevent crystallization, I couldn't shake the thought that there had to be a better, more traditional way. After all, people were making beautiful caramel long before corn syrup was invented.
Corn syrup was created in the 1800s as a cheaper sweetener and stabilizer, and today it's widely used in commercial candy and processed foods because it prevents sugar from crystallizing, keeps candy soft, and extends shelf life. But it's also highly processed, made by breaking down cornstarch with enzymes to create glucose syrup. While it has its place in large-scale candy production, it isn't something I want in my homemade sweets.
The truth is, caramel doesn't need it. With a steady hand and an understanding of how sugar melts, you can make caramel the way it was made for generations, using only real sugar, butter, and cream. It takes a bit of patience, but that's part of what makes it special. Skipping the corn syrup means your caramel has a cleaner flavor, a beautiful depth, and feels like a small return to simpler times in the kitchen.
Why I'm Confident in This Recipe
After years of stirring sugar syrup for caramel sauce, I've learned the only way to get the right texture is to watch and listen, not just rely on a candy thermometer. The caramel mixture tells you when it's ready. When it turns that deep amber color and pulls slightly from the sides of the pot, you've reached the soft ball stage, which gives these candies their perfect chewy texture.
The Importance of Quality Ingredients
When a recipe has only three ingredients, quality makes all the difference. Using a good quality butter (rich and creamy, not pale or watery), real organic cane sugar if possible, and heavy cream from a trusted source creates caramel that tastes deep, smooth, and pure.
On the homestead, I've learned that the simplest recipes often depend the most on ingredient quality. The better your butter, the more golden your caramel will taste. The fresher your cream, the silkier the texture. These small choices are what turn "good" caramel into "the best homemade caramel candy recipe."
This larger batch was designed for gifting, but truly, making a smaller one just doesn't make sense. These caramels go a long way, and since they keep beautifully for up to two weeks at room temperature, a small batch feels like a waste of time. With real ingredients, a rich buttery flavor, and that smooth texture that's been loved for generations, this recipe is one you'll come back to every holiday season.
Avoiding Sugar Crystallization (and What I Learned the Hard Way)
I'll be honest - when I first started making caramel, I couldn't figure out why it sometimes turned out silky smooth and other times had that grainy, almost sandy texture. Even when I strained it, there would still be those tiny sugar crystals hiding in the batch. It wasn't until I learned how sugar behaves that everything finally clicked.
Sugar naturally wants to go back to its solid form. When unmelted bits or sugar stuck to the sides of the pan get stirred back in, they can "seed" the whole pot, making the mixture seize and turn gritty instead of glossy. Once I realized that and stopped stirring so much, my caramel turned out perfectly smooth every time.
Candy Caramel Recipe Making Process:
Tips for Success
- Use a small saucepan with a heavy bottom so the sugar melts evenly.
- Keep your butter mixture and cream mixture at room temperature to avoid seizing.
- Watch the bottom of the pot closely, once sugar melts, it can go from golden to burnt fast.
- The best way to check doneness is to drop a little caramel into cold water, if it forms a soft, flexible ball, it's ready.
- Pour the finished caramel onto a piece of parchment paper or into a prepared loaf pan for easy cutting later.
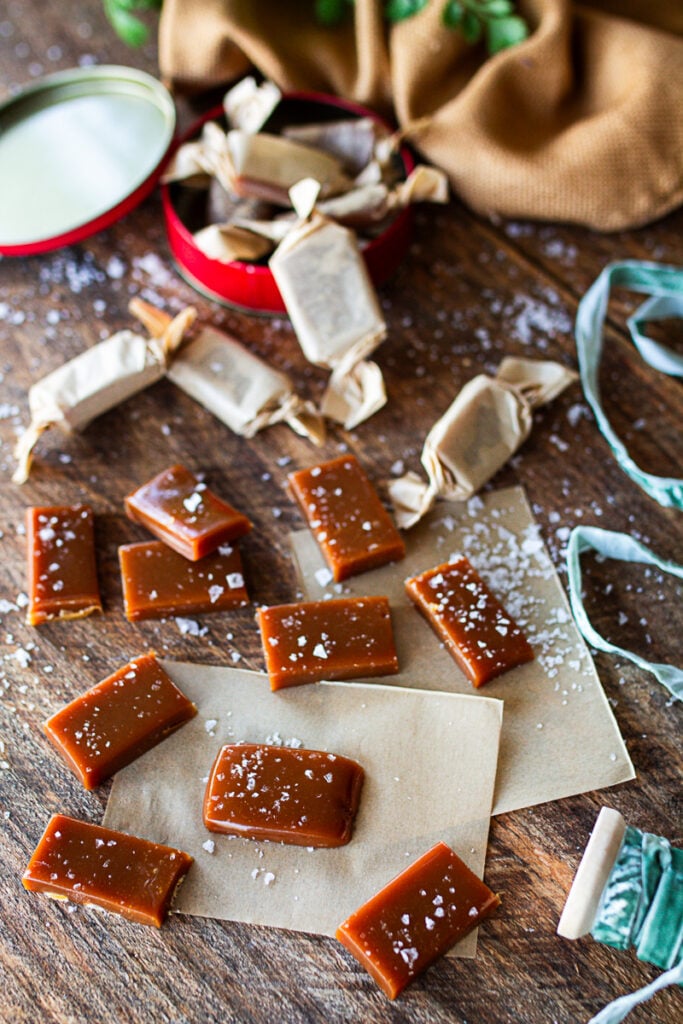
- Cut with a sharp knife and wrap each piece in wax paper for gifting.
What I Do Now to Prevent Crystallization
- Melt the sugar slowly: I let the sugar on the bottom start to liquefy before stirring. Early stirring was one of my biggest mistakes, it almost guarantees sugar crystals.
- Use room-temperature ingredients: I make sure the butter and cream mixture are completely room temperature before adding them in. Cold ingredients can shock the hot sugar syrup and start crystal formation.
- Let it cool naturally: I don't rush cooling. If you chill caramel too fast, it can crystallize while setting. Letting it rest at room temperature makes a smoother texture.
If You Still Get a Grainy Batch
Don't throw it away, it can be fixed! Just add a few tablespoons of warm water back to the pan and set it over medium heat. Stir gently until the sugar melts again and the mixture turns smooth. You can then keep cooking as usual.
Optional Insurance
If it's your first time making caramel (or you're just having flashbacks of gritty batches like I used to), add 1 teaspoon of corn syrup or a drop of lemon juice to your sugar before heating. Both help stop sugar crystals from forming and won't change the flavor of your chewy caramels.
My Kitchen Notes
Once I understood that controlling the sugar was key, my caramel started turning out consistently smooth. It's one of those small lessons learned through trial and error, and now, it's something I never skip when teaching others how to make candy.
Pro Tip
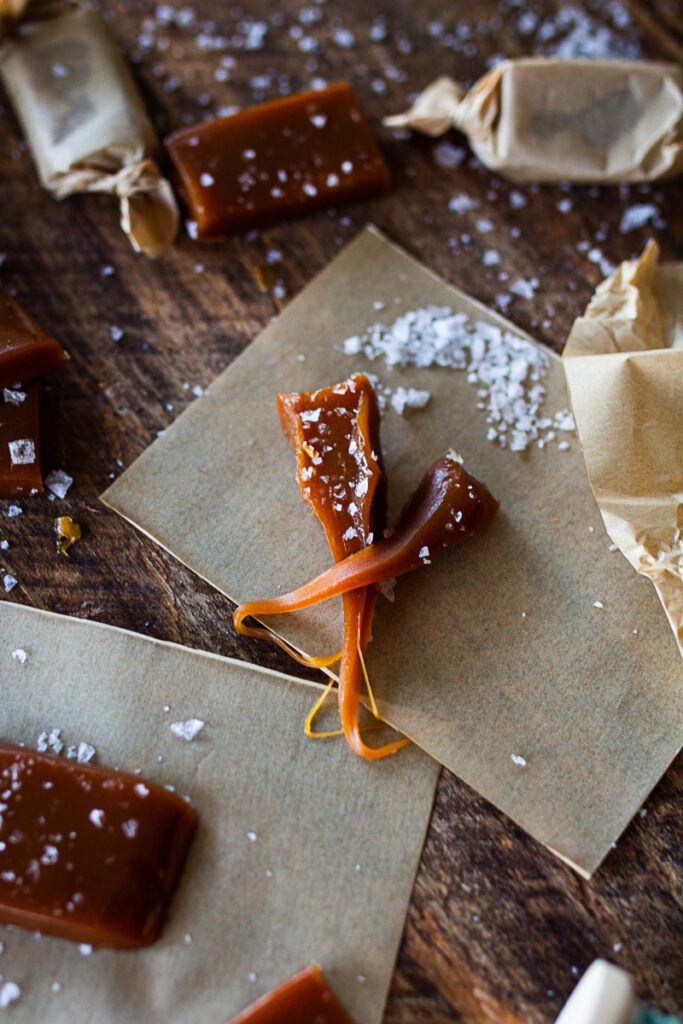
Before wrapping, sprinkle each caramel with a touch of flaky sea salt. It adds the perfect balance of sweet and salty and makes every bite irresistible.
Sharing and Gifting Homemade Caramels
Part of the joy of making the candy caramel recipe at home is sharing it. These chewy caramels make the sweetest little holiday gifts. Simple, heartfelt, and full of old-fashioned charm. I like to wrap each piece in wax paper and tuck them into small glass jars, parchment-lined tins, or kraft paper boxes tied with twine and a sprig of rosemary or pine. You can add a handwritten tag or note for a personal touch. It's a small, thoughtful way to share something made by hand, and the kind of gift that feels right at home in any cozy kitchen during the holidays.
Cutting and Wrapping Tip
Once your caramels have fully cooled and set, pop the pan into the freezer for about 10 minutes before cutting. Chilling them just slightly firms the texture, making it easier to slice clean squares without stretching or sticking. They'll hold their shape beautifully, and wrapping goes much faster when the caramel isn't tacky. Just don't leave them in too long - you want them chilled, not frozen solid.
Homemade Candy Caramel FAQs
It's helpful but not required. You can test by dropping a little caramel into cold water: if it forms a soft, bendy ball, it's ready. If you were using a thermometer, you'd be looking for it to get to about 240F.
Yes! Try a sprinkle of espresso powder for a coffee twist, or dip cooled squares in dark chocolate once they've set.
This happens when sugar crystals form on the sides of the pan. See full section above recipe on dealing with this issue.
Keep wrapped pieces in an airtight container. You can refrigerate them, but it's not necessary. They stay good at room them for up to two weeks. If you refrigerate them, bring to room temperature before serving for the best texture.

Chewy Caramel Candies Recipe Card
Ingredients
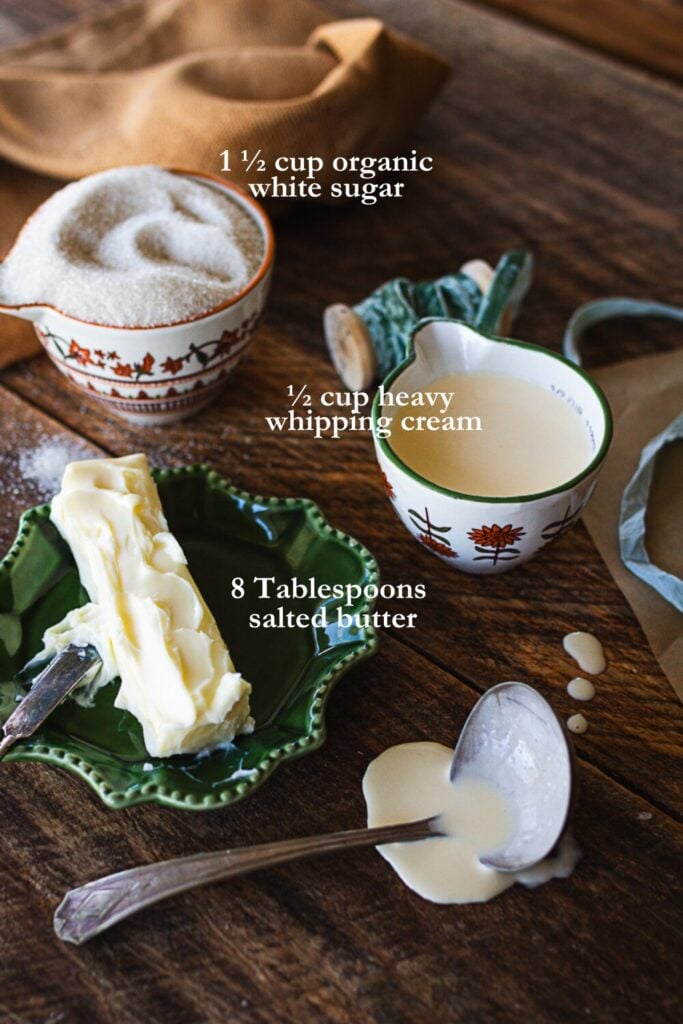
- 1 ½ cups white or cane sugar 300 g
- 8 tablespoons salted butter, room temperature 113 g
- ½ cup heavy whipping cream, room temperature 120 ml
Instructions
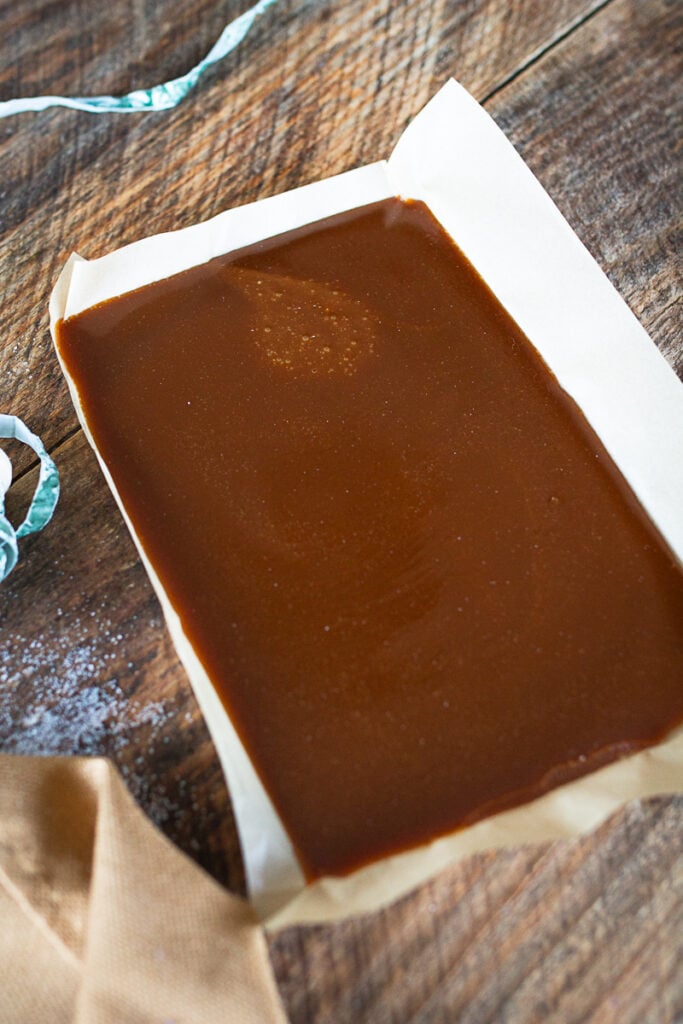
- Prepare your pan: Line an 8x8-inch (20x20 cm) baking pan with parchment paper, leaving extra on the sides to lift the caramel later. Lightly butter or spray the parchment.
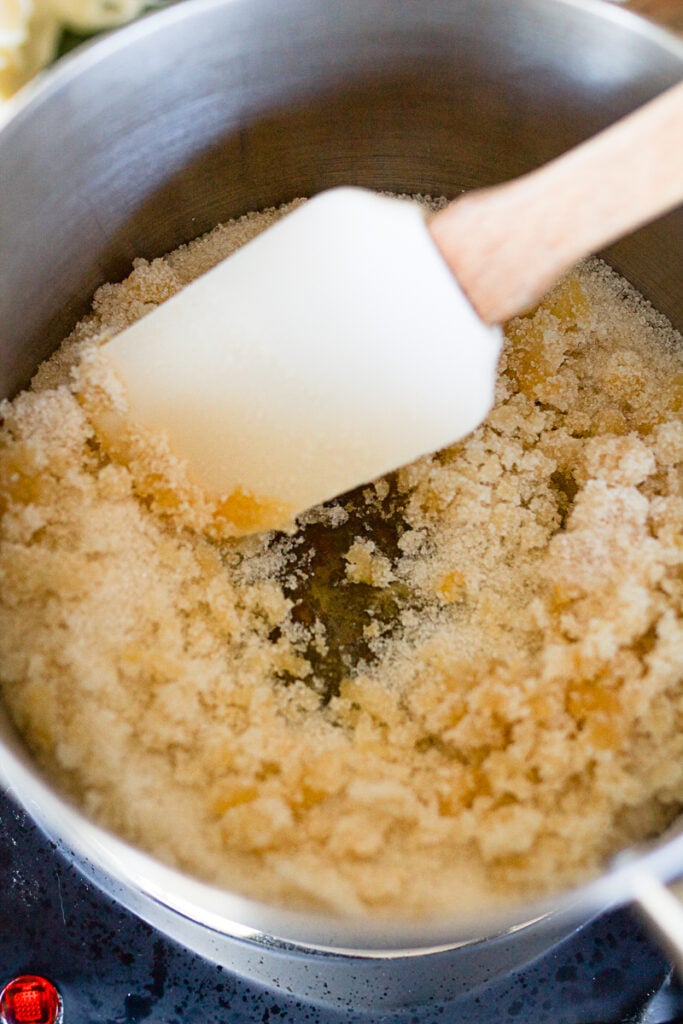
- Melt the sugar. Add the sugar to a medium saucepan (heavy-bottomed works best) and set over medium heat.
- Wait until the sugar at the bottom begins melting before stirring.
- Once melting starts, stir gently or swirl the pan until all the sugar dissolves and turns into a clear, amber-colored syrup.
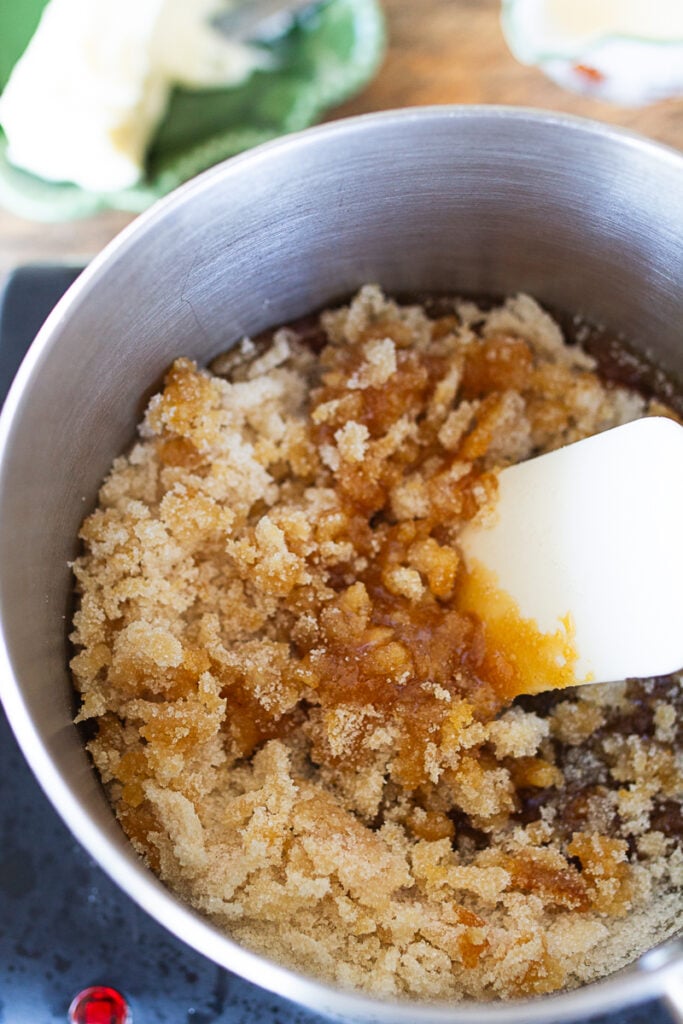
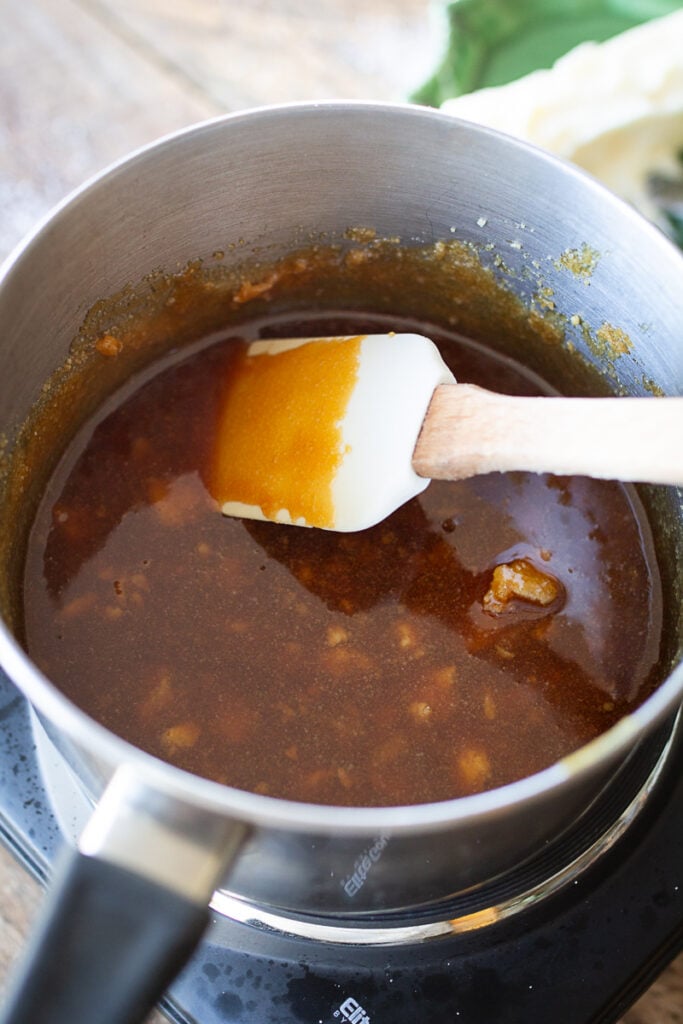
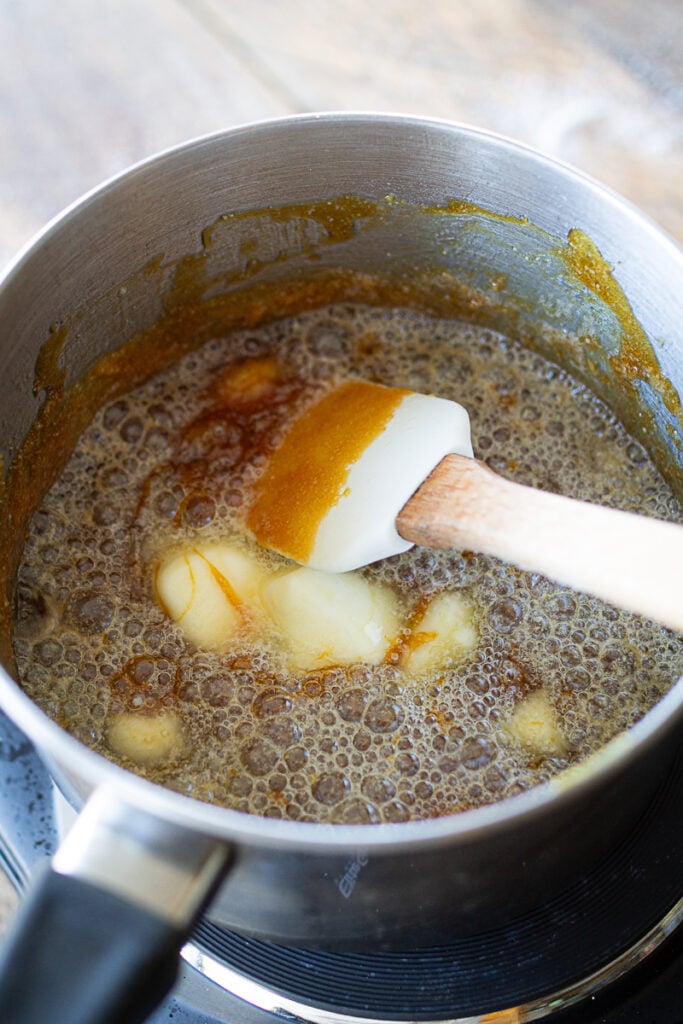
- Add the butter: Carefully add the room-temperature butter. The mixture will bubble and steam, stir until fully combined and smooth.
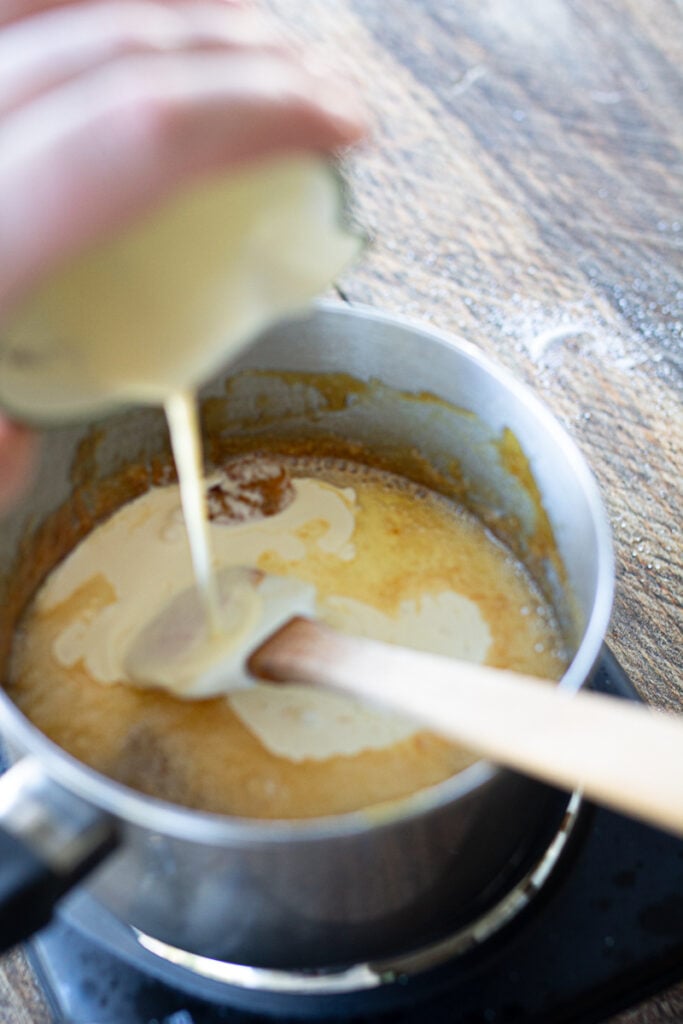
- Add the cream: Slowly pour in the heavy cream, a few tablespoons at a time, stirring constantly. Add the rest gradually to avoid overflow. Continue stirring until the mixture is smooth.
- Cook to firm-ball stage: Return to medium heat and cook the caramel until it reaches 245-248°F (118-120°C) on a candy thermometer.
- If you don't have one, drop a little into cold water - it should form a ball that holds its shape but still bends when pressed.
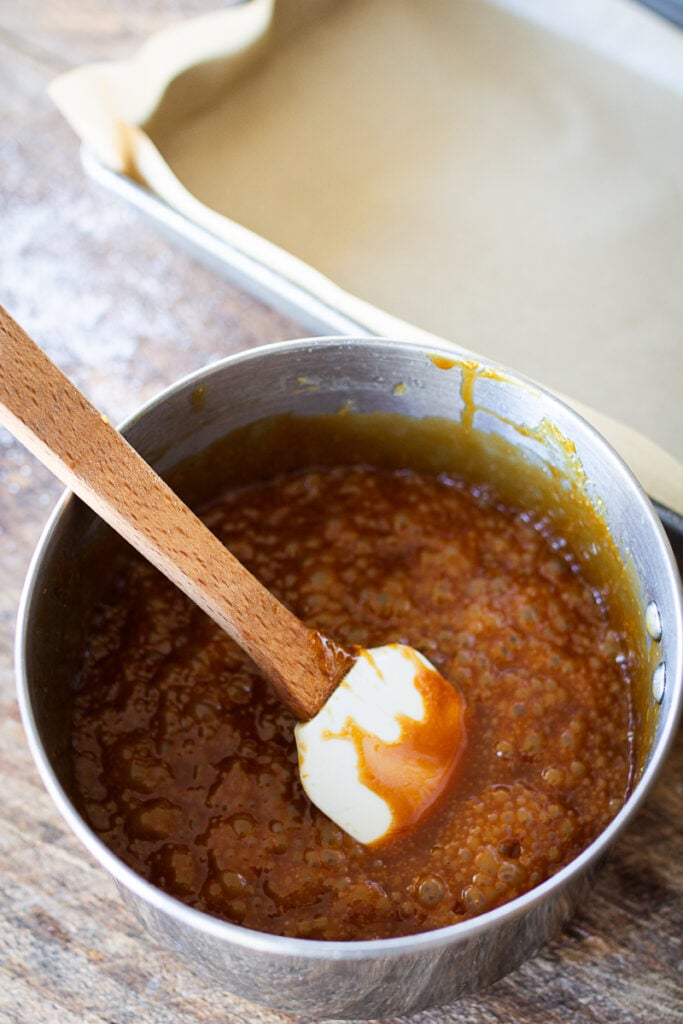
- Pour and cool: Carefully pour the hot caramel into the prepared pan, avoiding scraping the sides. Let cool completely at room temperature for about 1-2 hours.
- Cut and wrap: Lift the caramel slab out using the parchment and place it on a cutting board.
- Use a sharp knife to cut into small squares, then wrap each in wax paper.
- Store: Keep wrapped caramels in an airtight container at room temperature for up to 2 weeks, or refrigerate for a month.
Notes
- For softer caramels, cook only to 242°F (117°C).
- For chewier, firmer caramels, go closer to 248°F (120°C).
- This recipe doubles easily, just use a larger saucepan and increase cook time slightly.


This was my first time ever trying to make chewy caramels. I am surprised I succeeded. My butter didnt want to combine, but I proceeded. I thought its either going to be a fail or it could be good. I stirred in a smidge of vanilla at the end and poured. They turned out better than the ones I got at the store!!!! Thanks for sharing your recipe and the tips.
Why won’t my butter combine with sugar?! I’ve been mixing forever
This usually means the sugar has cooked a bit too far. At that point, the butter won’t re-emulsify, no matter how long you stir, so it looks separated. Caramel is all about hitting the right temperature window, not mixing longer. Next time, try slightly lower heat and add the butter as soon as the sugar melts and turns amber. You were close, caramel just has a narrow sweet spot.
I am dairy free so I made this with full fat oat milk and dairy-free butter alternative. They turned out very good. If you do make it dairy free, I recommend boiling it to the higher temp so it’s thicker and chewier bc mine wasn’t a bit to soft at the lower temp.
Could I let them sit it room temp overnight before cutting them?
That would be completely fine! Enjoy! Eryn 🙂
I read your entire post, watched your video and then made these. They turned out perfectly on the first try!
Thank you, Jill! I’m so glad they turned out well for you on the first try. That’s exactly what I hope for when I share a recipe. Thanks for taking the time to come back and say so! xoxo - Eryn 🙂
I’ve made this recipe more times than I can count while testing and tweaking every detail, and I can honestly say these are the best caramels I’ve ever had. They’re buttery, rich, and chewy, exactly what homemade caramel should be. I love that they’re made the traditional way, without corn syrup, and they hold their shape beautifully for gifting. If you’ve never made caramel before, don’t be intimidated. Follow the steps and you’ll end up with a batch that tastes like it came straight out of a farmhouse kitchen.