A Book Wall tutorial. How to construct a beautiful wall of books
A book wall may seem crazy, but I think you're probably crazy with me since you're here, wanting more.
Books have always been a huge part of my life, for as far back as I can remember. Can you relate? If so, then a book wall is only logical. 😉

Growing up, the library was a wonderful treasure my mother would take us to weekly. I love the smell, the feel, and what a book represented: adventure & knowledge. Both of which I couldn't get enough of. Lost in their pages time and time again, I'd often be up until early in the morning, always telling myself "just one more chapter".
And that wasn't just new books, if it was special enough, I'd re-read a good book over again and again. Each time, it's as if I'd returned home to visit my favorite characters after a long while away. You can only imagine then, that when I first saw book wall art I knew it had to be recreated it in my own home.
Our entryway when we moved in:

Our entryway After the book wall and a year of slowly remodeling:

If you'd like to know how we made the entryway wooden coat-wall, check out that post here.
What kind of book wall is for you?
There are several different ways to make book wall art. Use your imagination! Some use the books as a canvas and paint sayings or pictures on top of them. Shannon from Living With Lady did that, check out her wall here!
For myself, I wanted a strong quote in the middle and books on each side. I wanted it to be as if a spring wind was sweeping them up and away.
Book Wall Tutorial
What you'll need:
- books - lots of them
- large poster quote of your choice
- magnetic poster strips for changing out quote
- nail-gun (You could also use a hammer and nails, but you'll make a lot of larger holes in your wall. Just a small warning. 😉 )
- hot-glue gun
- squirt bottle and coffee for aging

Aging the books
Aging is important if you want all the books to have a similar look. I was able to find some old treasures, but others were newer and needed a little yellowing. Open the books to mid-center, and really bend them backward. I had to place rocks and logs on them overnight help them lay open where I chose. The next day I placed a cup of cold brewed coffee and half a cup of water in a small spray bottle, misted over the pages and sides, and let dry. I redid this around three or four times, letting them dry in-between, for that wrinkled, aged look.
The picture below is when I went in and touched a few up after I had laid them out how I wanted them to go up. I did not spray them on the carpet originally, but rather had them all on top of a bunch of spread out garbage bags.

Aging the quote poster
For the focal point, I chose to age a poster that I had printed at Office Depot on white poster paper. You can use anything for the middle though! I wanted to have the ability to change it out seasonally, because I know me, and I'll get board with the same quote for years. Thats also why I used the magnetic poster strips. So I could change out the saying and simply rehang whenever inspiration hit.

If you'd rather have something more permanent, you can find a hanging sign with a quote, or even a beautiful picture. The sky is the limit when deciding what goes in the center! Etsy has some great finds for unique posters, even ones you can custom order with your specific quote!
Like mentioned above, I used Office Depot to print my poster. They had tons of different options, like printing on canvas or thicker paper. I went with the least expensive poster option because I was cutting costs, and knew I'd only have it on the wall for a few months, so I didn't want to invest in the more expensive options.

To age the poster, I laid it down and gently kneaded it with my hands, giving it lots of good character building wrinkles and folds. From there I sprayed the coffee mixture on, being very careful to only do a little on the words themselves, as the ink will run! Do it again and again until you get your desired look.
Note* Don't let your daughter spill fishy crackers on said poster and not notice, they'll leave grease stains you'll have to try and cover. Don't ask me how I know this. . .
Arranging them
I started by measuring the space on the floor out to how large the section of the wall was I had to work with. Then with the poster in the center, I worked outwards from it on both sides, creating a pattern I liked.
Lots of book ripping happened, which I felt oddly guilty of at first. But honestly, these suckers are getting nailed to the wall, there's no coming back from that and finding their way back to the local library. Don't be afraid to create the look you want by doing what you need to to the books!

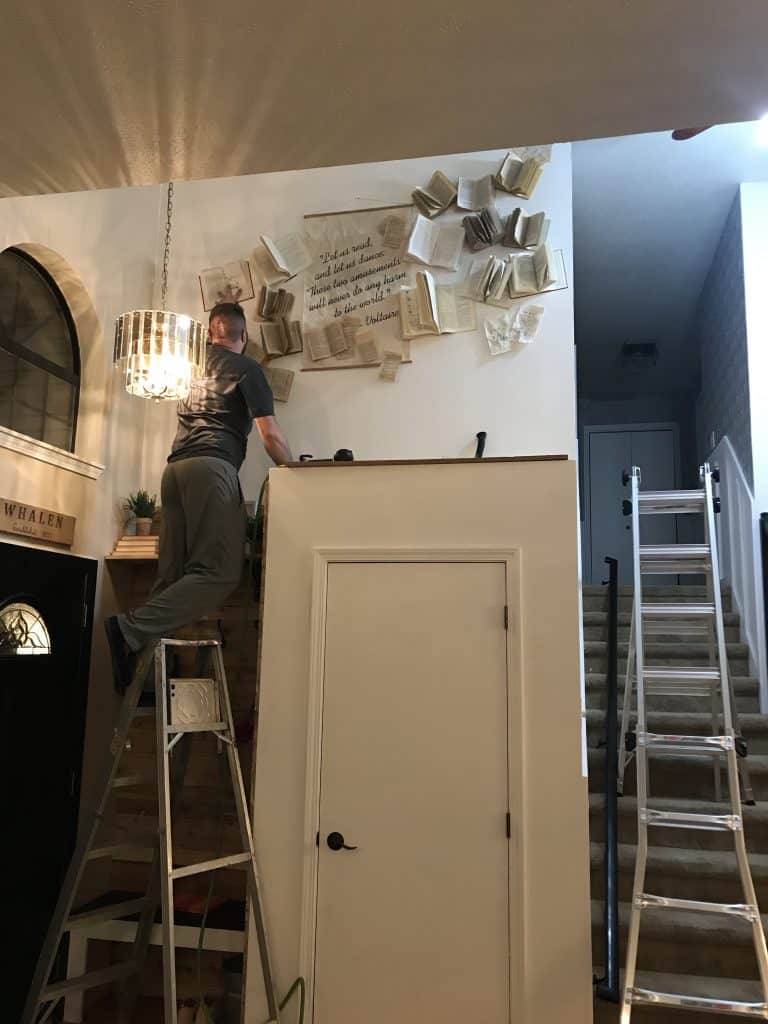
How to hang books on a wall
We attached the poster first, since it was the base we would be working out from on either side. I went ahead and glued a quarter of a book to the bottom left hand side of the poster, and pages flying out from it. This helped to soften the big poster into all the books.
Because this area is so dang high in our home, I needed my husband Travis to help tag team this. I took a photo of the books all laid out on the floor for reference, and would grab one book from the pattern at a time, bring it to him, show him with the photo where it saw suppose to be attached. He'd then hold it up to the spot and I'd say, twist it right more, down a little, and so on until it was perfect. Then he'd attach it.

When nailing them to the wall, we had to turn down the nail gun because the nails were going right through the books and not grabbing anything, especially those that were not hard cover. Once we found our sweet spot, it went fairly quickly. Travis would grab about a quarter of the pages on each side of the book, using those and the covers to nail them to the wall. This left about half the pages loose, which I then went though and glued and tacked how I wanted, so it had a very natural feel to them.
Adding a few items to the top of the coat closet
The top of the coat closet felt so bare with all the books there. I didn't want to clutter the area, but I also felt I needed something to go there to help tie in the book theme.

I decided on a basket with a blanket draping out the side, and a stack of books beside it. Does't it just make you want to grab the blanket, pick a book, and snuggle up to do some light reading? I think so.

Shop the post:

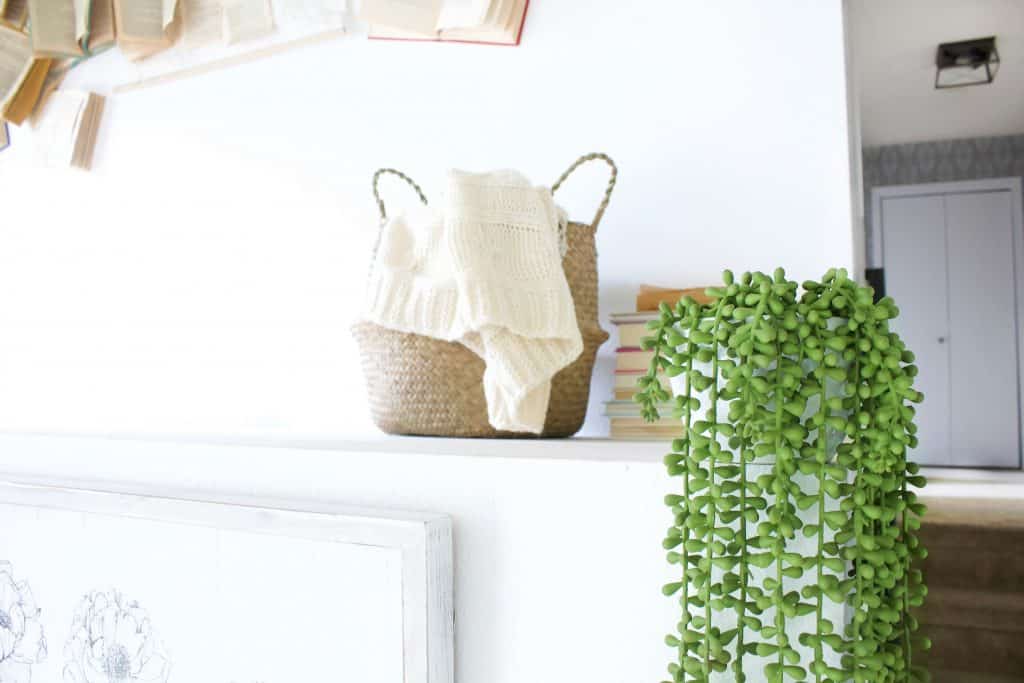
I also added the draping succulents on the corner to help soften the area. Those little guys were not going to stay in place, so I ended up super-gluing the planter to the top of the closet, after I had glued the succulents inside!
Overall I'm super happy with how it all turned out! It's so warm and inviting, which is exactly what I want my guests to feel walking into our home. Like they are welcome to sit down, relax, and enjoy a nice chat over a cup of coffee.

Would you make book wall art like this in your own home? Share with me if you feel inspired and make sure to the hashtag #homewithEryn on instagram if you attempt it. Also, I'd love to answer any more questions you have, so let me know!
Edited to add: The biggest question I get asked about the book wall is how to dust it! All you need is compressed canned air. Stand a few feet back, slowly spray over books, let dust settle on floor, and vacuum or mop up! Easy peasy!
You may also enjoy:
Entryway makeover in a weekend
IKEA FINTORP hanging system. Kitchen decor
Meet Eryn
Eryn Whalen is a homestead blogger and recipe developer with a lifetime of hands-on experience in gardening, home canning, animal husbandry, and traditional kitchen skills. From preserving homegrown harvests to baking sourdough from scratch, she shares her family's journey of intentional living on their 100-acre Tennessee farmstead. Recently, Eryn has expanded her homesteading life to include caring for a family milk cow, sharing the learning process and daily joys of small-scale dairying. Read more about Eryn here