Delicious Pickled Red Onions Recipe for Canning
I'm an onion girl through and through. Red, white, yellow, it doesn't matter. They end up in almost every meal around here, tucked into soups like my creamy spicy potato soup, stirred into scrambled eggs, or slow-cooked down for caramelized onion jam. But this pickled red onions recipe for canning is a little different. It's quick, vibrant, and one of the easiest ways to stock the pantry with something that feels a little fancy but takes barely any time at all.
Every summer, as onions start to pile up on the counter, I make a few batches of these to get ahead of the waste. Red onions don't hold up as long in cold storage as yellow ones, so canning them is a smart way to make the most of the harvest. If you've already got hot pepper jelly and spicy pickled beans lined up in your pantry, this is the next thing to add.

A Quick Look at the Recipe
Pickled Red Onions
Ready In: 25 minutes
Yields: 4 pint jars
Calories: 73 per ¼ cup serving
Dietary Info: Vegan, Gluten-Free
Main Ingredients: Red onions, apple cider vinegar, sugar, salt, garlic
Why You'll Love It: Bright, tangy flavor with pantry staples and simple canning method
SUMMARIZE & SAVE THIS CONTENT ON
Jump to:
Why You'll Love This Pickled Red Onions Recipe For Canning
Uses basic ingredients from your pantry
Adds sweet-tangy zip to your favorite summer dishes
A beautiful way to preserve onions from your garden or CSA
Safe for water bath canning
Looks as good as it tastes, those pink rings are real showstoppers
Ingredients You'll Need
Here's what goes into this pickled red onions recipe for canning. Simple, pantry-ready, and easy to prep in one afternoon.
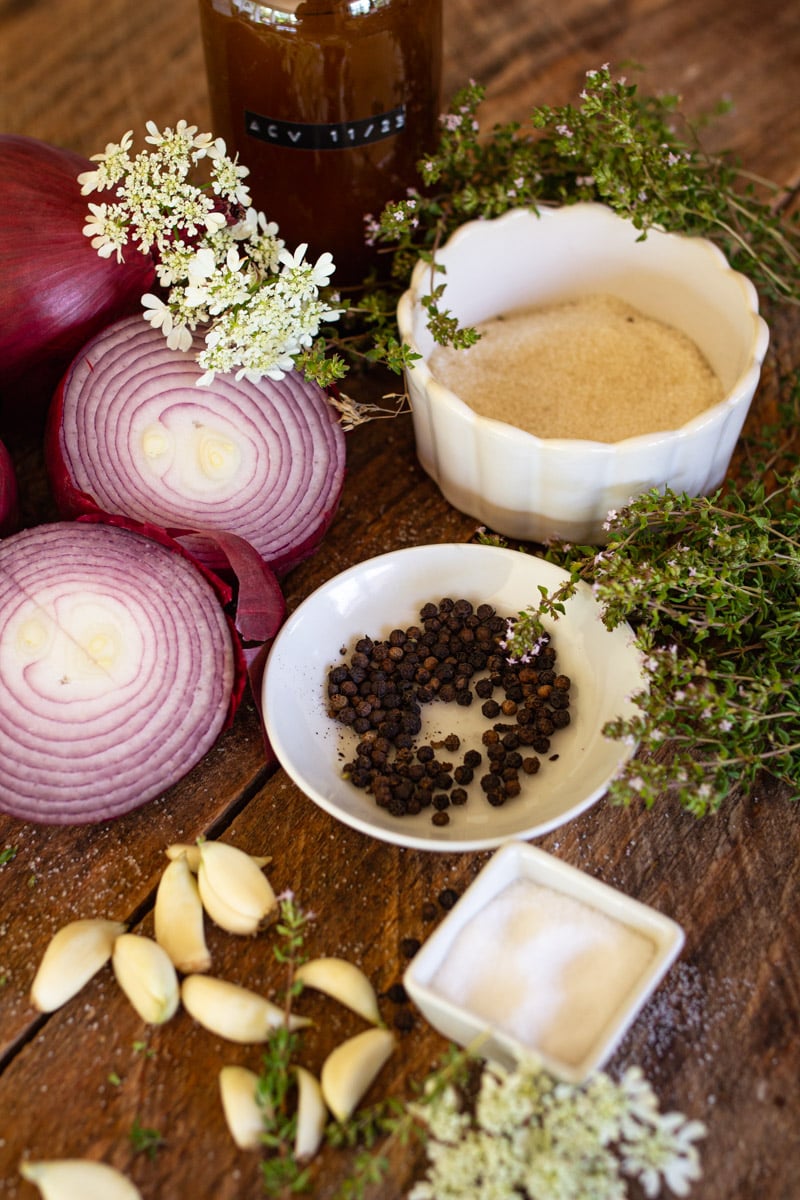
- Red onions - Their vibrant color and mellow bite are the stars here. They soften just enough during pickling to stay crisp but lose that harsh raw flavor. I always reach for the freshest onions I can-firm, tight skins, and deep color make the prettiest jars.
- Apple cider vinegar - Adds depth and natural sweetness. It gives a rounder flavor than plain white vinegar and brings out the richness of the onions without overpowering them. Just make sure it's 5% acidity if you're water bath canning. This is my go to apple cider vinegar recipe.
- Granulated sugar - Balances the tang. A little sweetness cuts through the vinegar's sharpness. I use standard white sugar, but you can reduce it slightly for a more tang-forward batch.
- Kosher salt - Essential for flavor and proper preservation. Avoid iodized salt, which can cloud the brine. Kosher or pickling salt keeps things clear and gives the brine a clean, bright flavor.
- Garlic cloves - Optional, but add a lovely subtle bite. One clove per jar is plenty. It's not overwhelming, just a little depth that makes these pickled onions good enough to eat straight from the jar.
- Whole spices - I like mustard seed and black peppercorns. These give the brine a gentle spice that plays well with the sweetness. Don't go overboard, just a few in each jar adds complexity without stealing the show.
- Pint jars with lids - Wide-mouth jars make packing easier. You'll be stacking in raw onions, and wide-mouth jars give you more room to work. I sterilize mine right before packing so they're warm and ready for the hot brine.
Need supplies? I use these Ball canning jars and this non-reactive canning funnel for easier, mess-free pouring.
Easy Substitutions & Variations
- Swap the vinegar: White vinegar works just fine if it's what you have on hand.
- Sweetener alternatives: Try honey or maple syrup for a more mellow, earthy flavor.
- Change the onions: Yellow or white onions will work, though they won't give that signature pink color.
- Spice it up: Add a slice of jalapeño or a pinch of red pepper flakes for a spicy twist.
- Herbal touch: Tuck in a sprig of fresh thyme or rosemary for added fragrance.
Expert Tips
- Slice evenly: A mandoline gives you consistent ⅛-inch slices, which helps the onions pack better and pickle evenly.
- Warm the jars: Pre-warm your jars before pouring in the hot brine to prevent cracking.
- Use a non-reactive pan: Stainless steel or enameled cookware works best when heating your vinegar brine.
- Don't skip headspace: Leave ½-inch at the top of each jar for proper sealing during the water bath process.
- Double-check seals: Let jars rest undisturbed for 12-24 hours. Lids should not flex when pressed in the center.
Frequently Asked Questions
Yes, if you plan to eat them within 2-3 weeks. But if you want them to be shelf-stable, water bath canning is the way to go.
Properly sealed jars can last up to a year in a cool, dark cabinet.
Absolutely. Just make sure your brine stays at the proper ratio and your jars still have enough headspace.
Overprocessing or using old onions can cause that. For the brightest results, use fresh red onions and avoid over-boiling the jars.
Troubleshooting Guide
Onions are floating in the jar: Try packing them a little tighter next time, they shrink slightly when the brine hits them.
Cloudy brine: This can happen if the salt wasn't pure canning or kosher salt. It's safe but not ideal.
Lids didn't seal: Store those jars in the fridge and enjoy them first.

Storage Tips
- Unopened jars: Store in a cool, dark pantry for up to 12 months.
- After opening: Refrigerate and use within 2-3 weeks.
- Serving tip: No need to reheat, these are best cold or at room temperature, straight from the jar onto your plate.


Pickled Red Onions Canning Recipe
Ingredients
- 4 large red onions thinly sliced
- 2 cups apple cider vinegar
- 1 cup water
- ⅓ cup granulated sugar
- 1 tablespoon kosher salt
- 4 cloves garlic peeled
- 4 sprigs sprigs fresh thyme
- 2 teaspoon whole black peppercorns
- 2 teaspoon yellow mustard seeds
Instructions
- Prepare the onions: Peel and thinly slice the red onions into rings, about ⅛-inch thick. A mandoline works well for uniform slices, but a sharp knife does the job too.
- Sterilize the jars: Wash pint jars, lids, and bands in hot, soapy water. Rinse well. Place jars in simmering water or run them through the dishwasher on a hot cycle to sterilize. Keep jars warm until ready to fill.
- Make the brine: In a medium saucepan, combine the vinegar, water, sugar, and salt. Bring the mixture to a boil over medium-high heat, stirring until the sugar and salt are completely dissolved. Reduce heat to low and keep the brine hot while you prepare the jars.
- Pack the jars: Working with one jar at a time, place 1 clove of garlic, 1 sprig of thyme, ½ teaspoon mustard seeds, and ½ teaspoon peppercorns into the bottom of each sterilized jar. Tightly pack the sliced onions on top, pressing them down gently to reduce air pockets and make room for more onions. Leave about ½-inch headspace at the top of the jar.
- Add the brine: Carefully ladle the hot brine over the onions and spices in each jar, making sure all the onions are fully submerged. Maintain ½-inch headspace.
- Remove air bubbles: Run a bubble remover or butter knife along the inside edges of the jar to release trapped air. Add more brine if needed to maintain proper headspace.
- Seal the jars: Wipe jar rims clean with a damp cloth to ensure a good seal. Place lids on top and screw bands down until fingertip tight.
- Water bath process: Place filled jars into a prepared boiling water canner, ensuring jars are covered by at least 1 inch of water. Return to a boil and process for 10 minutes (adjust for altitude if necessary).
- Cool and store: Carefully remove jars from the canner and set on a towel-lined surface. Let them cool undisturbed for 12-24 hours. Check seals before storing. Any unsealed jars should be refrigerated and eaten first.
Notes
-
Can I reuse the brine for another batch?
It's best not to reuse brine from previously canned jars since the vinegar concentration can change after processing. For safety and consistent flavor, make a fresh batch of brine each time. -
Why did my pickled onions lose their bright pink color?
Color fading can happen if you use older onions, overprocess the jars, or expose them to too much light. Store sealed jars in a cool, dark place to help preserve that beautiful pink hue. -
Do I need to peel the onions first?
Yes-peeling ensures even color and prevents any bitterness from the papery outer skin. A quick soak in warm water before slicing makes peeling much easier.


These pickled red onions are incredible. Crisp, tangy, and full of flavor! I love how they brighten up everything from burgers to salads, and they look beautiful on the pantry shelf. Definitely a staple I’ll be canning every summer!
Ready to make your pickled onion recipe but it is incomplete. I'm going to assume that the garlic & thyme & spices go into the brine but do they go into the jars? If I don't hear back I will take out the thyme but slice my garlic so some goes into each jar. Thanks! I've been canning forever but this is a first. Lynn
Hi Lynn, thank you so much for pointing that out. You’re absolutely right, the instructions weren’t as clear as they should have been. I’ve gone back and updated the recipe to show exactly where the garlic, thyme, and spices go so there’s no confusion for future readers.
To answer your question: yes, the garlic, thyme, peppercorns, and mustard seed all go directly into each jar along with the onions before pouring the brine over. That way each jar has balanced flavor and a pretty little sprig tucked inside.
I really appreciate you taking the time to comment and let me know, your feedback helps make the recipes better for everyone. Happy canning, and I hope you enjoy those onions!
When do you add the salt and spices? To the jar with onions or in the brine??
Either will work, but in the brine allows the flavors to release better! I'll fix that in the recipe. Thanks for reaching out. Enjoy! 🙂