How To Make & Pressure Cook Chicken Bone Broth
Making bone broth from chickens is a very resourceful way to utilize every part of the bird. Here on our homestead, we strive to minimize waste and maximize the benefits of our hard work. Bone broth not only enriches our meals but also provides numerous health benefits, making it a staple in our kitchen. Learn how to make this healthy, nutrient-dense Chicken Stock! You can make chicken bone broth in an instant pot, slow cooker, or on the stovetop.

Because we're using the bones leftover from piecing apart our butcher chickens, and from the chickens we cook whole each week, as well as veggie parts and pieces and leftovers, it costs pennies to make in comparison to the ones at the stores that sell for $8+ a container.
The History of Bone Broth
Chicken broth has been a part of traditional diets for centuries. People worldwide have relied on bone broth for its healing properties and nutritional value. From the Chinese using it as a medicinal tonic to Europeans incorporating it into their daily meals, bone broth has stood the test of time as a nourishing and versatile food.
Bone Broth vs. Stock
While bone broth and stock may seem similar, there are key differences between the two. Stock is typically made by simmering bones with meat, vegetables, and aromatics for a shorter period, usually 2-4 hours. It results in a flavorful liquid used primarily as a base for soups and sauces. Bone broth, on the other hand, is simmered for a much longer time, often 12-24 hours, allowing the bones to release more collagen, minerals, and amino acids. This extended cooking time gives bone broth its characteristic richness and gelatinous texture.

Nutritional Benefits of Bone Broth
Bone broth is packed with a variety of nutrients:
- Collagen: Supports joint health, skin elasticity, and gut lining.
- Gelatin: Aids in digestion and gut health by restoring the gut lining.
- Minerals: Provides calcium, magnesium, phosphorus, and other essential minerals that are easily absorbed by the body.
- Amino Acids: Contains glycine, proline, and glutamine, which are vital for muscle repair, joint health, and overall wellness.
Why Incorporate Bone Broth into Your Diet
Incorporating bone broth into your diet can offer numerous health benefits:
- Joint Health: The collagen in bone broth supports joint integrity and may help alleviate symptoms of arthritis.
- Gut Health: Gelatin and amino acids help repair and maintain the gut lining, promoting better digestion and reducing inflammation.
- Immune System Support: The minerals and nutrients in bone broth support overall immune function.
- Skin Health: Collagen improves skin elasticity, reducing the appearance of wrinkles and promoting a youthful appearance.
- Hydration: Bone broth is hydrating and can replenish electrolytes, making it an excellent choice for staying hydrated.
Know where your chickens come from
While any chicken will work for broth, there are a few things that make it even better.
1: Know where your chicken came from. If you can find a local grower raising free-range chicken, all the better. Support local and your community as much as possible.
2: Grow and butcher your own chickens. One way to know you're enjoying truly organic chicken bone broth is to begin with baby chicks and see it through to the end. That's what we do on our farm. We have a whole series and post on how to butcher your own chickens. Spoiler: It's not as hard as you'd think! Bonus, keep the chicken feet for extra goodness and nutrition! Or, ask to purchase the feet from your local grower.
If you have to purchase from a grocery store, it's okay! I've been there and had to do that before too! You'll still get amazing benefits from the animal bones sold at the stores.
Preparing the Bones
When butchering our Cornish Cross chickens, we kept some to freeze whole, and others we pieced apart into breasts, thighs, wings, and drumsticks. We then gathered the backs from those for the broth. But, you can cook a whole chicken, remove the chicken meat and what you want to eat, then refreeze the leftover chicken carcass in a freezer bag, and wait until you have two or three to make bone broth.
BONUS TIP: For an extra depth of flavor, you can roast the bones at 400°F for 30-45 minutes, before adding the bones to the water and other ingredients, though this step is optional.
Making Bone Broth
Ingredients Needed:
- Chicken bones (backs or pieces, 2-3 chickens at a time usually)
- Vegetables (carrots, celery, onions)
- Herbs (parsley, thyme, bay leaves)
- Spices (peppercorns, salt)
- Water (I like to use filtered water if possible)
- Splash of organic apple cider vinegar (Learn how to easily make your own here!)
- Many recipes say not to add the sea salt until you're ready to cook with or drink it, but I like to throw some in just to be spicy. (I use Redmonds Real Salt)
Bone broth flavors will vary slightly depending on what you use and what you like in your broth. Get creative! There's truly no right and wrong ingredients! Mine vary with the season and with what veggies are available from my garden when canning the broth.
I use organic vegetables and garden grown as much as possible, but do what you can with what you have. Sip broth periodically after hour 12 and add what you feel it's lacking until your taste buds are happy!

Tools and Equipment:
- Large stockpot
- Strainer or cheesecloth
- Ladle
- Quart jars
- Pressure canner
Step-by-Step Broth Recipe:
- Adding Ingredients: Place the chicken pieces, vegetables, herbs, spices and vinegar into a big pot on the stove top.
- Simmering Process: Cover the ingredients with water and bring to a boil. Once boiling, reduce the heat and let it simmer for 12-24 hours. I like to start in the evening just before beginning dinner, let it simmer over night, and strain it the next day.
- Straining the Broth: After simmering, strain the broth through a fine-mesh strainer or cheesecloth to remove the bones and vegetables. This will leave you with a clear, nutrient-dense broth.
This is one of my favorite recipes because it truly can't get any easier and it's so nutrient dense.
Storing and Using Bone Broth
Storage Tips:
- Refrigeration: Store your bone broth in airtight containers in the refrigerator, where it will keep for up to a week.
- Freezing: For longer storage, pour the broth into ice cube trays or freezer-safe containers. It will keep in the freezer for up to six months.
- Freeze Dry: If you have a freeze dryer this is also an amazing way to keep broth!
- Pressure cooker: Use a pressure canner to keep the broth shelf stable and usable for up to a year!
Creative Uses for Bone Broth:
- As a flavorful base for Soups and stews
- Cooking grains like rice or quinoa
- As a base for sauces and gravies
- Sipping as a warm, nourishing drink
- Chicken noodle soup for when someone is under the weather
Health Benefits: Bone broth is packed with collagen, minerals, and amino acids, which support joint health, connective tissue, digestion, and overall wellness. It's a powerful addition to any diet.
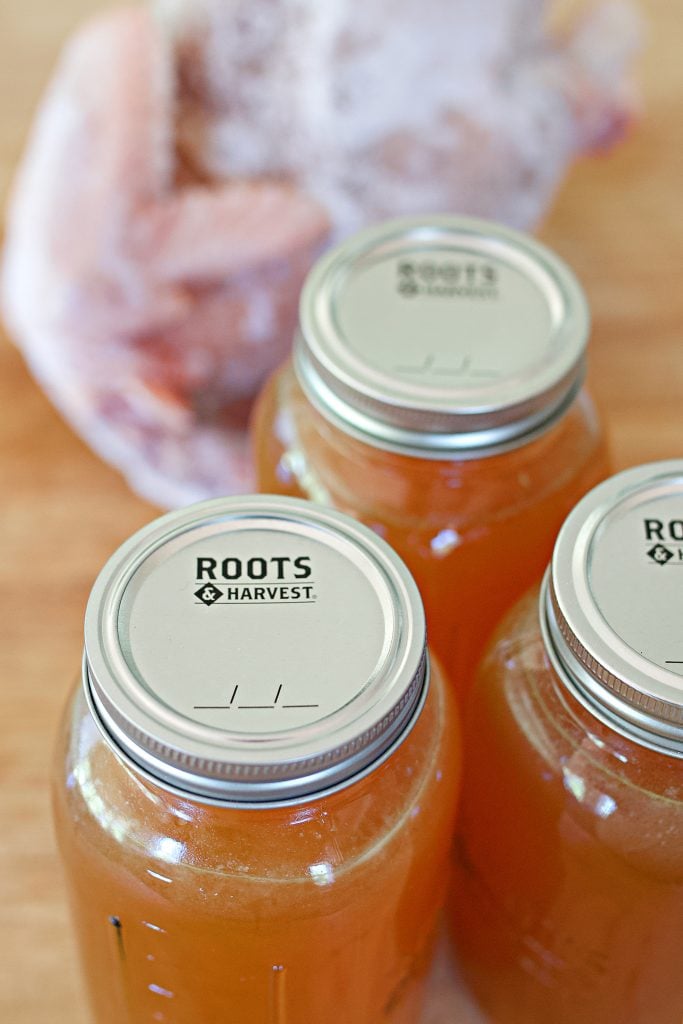
Pressure Canning Bone Broth
Why Pressure Can?: Pressure canning your bone broth allows you to store it for longer periods without the need for refrigeration or freezing. It's a great way to have shelf-stable broth ready for use anytime.
How to Pressure Can Bone Broth:
Before pressure canning, cool the broth in the fridge for several hours to a day to let the fat rise and harden, then remove the fat, reheat the broth, and proceed with pressure canning for long-term storage and convenience.
- Prepare Your Equipment: Ensure you have a pressure canner, canning jars, lids, and rings. (I love these from Roots and Harvest!)
- Fill the Jars: Ladle the hot broth into the jars, leaving about an inch of headspace at the top.
- Seal the Jars: Wipe the rims of the jars clean, place the lids on top, and screw on the rings until they are fingertip-tight.
- Process in Pressure Canner: Place the jars in the pressure canner and follow the manufacturer's instructions. Typically, process at 10-15 pounds of pressure for 20-25 minutes, depending on your altitude.
- Cool and Store: Allow the canner to cool and depressurize naturally. Once cooled, remove the jars and set on top of a towel and covered with a towel until room temp. Check to make sure lids have sealed. Store in a cool, dark place.
Note: Pressure canning might make the broth less jiggly due to the high heat breaking down the collagen. However, it still holds its nutritional value and remains a highly beneficial addition to your pantry.
Our goal is zero waist when raising meat birds
Making bone broth ensures that no part of the chicken goes to waste. Any remaining scraps from the broth-making process can be composted, enriching your garden soil and continuing the cycle of sustainability. By integrating broth-making into your routine, you can ensure a constant supply of this nutritious staple all year long.
Making chicken bone broth is a simple yet powerful way to make the most of your resources
It's an excellent practice that ties into the health-conscious lifestyle of homesteading. We encourage you to try making your own bone broth and share your experiences.
For more tips and ideas on homesteading, subscribe to our blog, follow us on social media, or join our podcast. Let's continue to grow and learn together on this homesteading journey!

Chicken Bone Broth Recipe
Ingredients
- 2 whole bird Chicken bones backs, 2-3 at a time
- 2 whole carrots chopped
- 2 whole celery stalks chopped
- 1 whole onion quartered
- 1 cup Fresh herbs parsley, thyme, 2 bay leaves
- 3 tablespoon Splash of organic apple cider vinegar
- 1 tablespoon peppercorns
- 1 teaspoon salt
- 4 cups Water
Instructions
- Add Ingredients to Stockpot: Place chicken backs, carrots, celery, onion, herbs, peppercorns, and salt in a large stockpot. Cover with water.
- Simmering: Bring to a boil, then reduce heat and simmer for 12-24 hours. Skim off any foam or impurities that rise to the surface.Strain the Broth: After simmering, strain the broth through a fine-mesh strainer or cheesecloth to remove bones and vegetables.Cool and Store: Allow broth to cool. Store in airtight containers in the refrigerator for up to a week, or freeze for up to six months.
- Pressure Canning Instructions: Prepare Equipment: Have your pressure canner, jars, lids, and rings ready.
- Fill the Jars: Ladle hot broth into jars, leaving 1 inch of headspace.Seal the Jars: Wipe rims clean, apply lids, and screw on rings until fingertip-tight.
- Process in Pressure Canner: Place jars in pressure canner. Process at 10-15 pounds of pressure for 20-25 minutes (adjust for altitude).Cool and Store: Allow canner to cool and depressurize naturally. Check seals, then store in a cool, dark place.


I have been making this chicken bone broth for years, and it remains one of the most useful staples in my kitchen. It’s rich, deeply flavorful, and full of goodness pulled right from real pasture-raised chickens. On our farm we work hard to use every part of the animal, and this recipe makes that possible in the easiest daily way. I sip it warm on cold mornings, use it to cook rice and soups, and always keep jars pressure-canned and ready on the pantry shelf. Once you start making your own broth, you’ll never want store-bought again, this is comfort, nourishment, and homestead practicality all in one pot.