Farmhouse Bathroom Transformation
Friends, have I got just about the best before and after for you today! Our guest bathroom was in desperate need of a refresh. The 90's look had to go! farmhouse bathroom was my vision, and gosh WHAT A DIFFERENCE!
A farmhouse bathroom is just cozy, bright, and so clean looking. To complete our bath refresh I wanted to do an accent wall. After seeing sooooo many friends attempt wallpaper, only to have it peel and fall off because of steam from showers and bathing, I decided to go with a stencil from Stencil Revolution. I'd never used a stencil before and was excited to try one out.
Take a gander at this farmhouse bathroom transformation!
We went from this:

To this:


Disclosure: this post is in partnership with Stencil Revolution, all opinions are my own.
Wow right!? I was a little nervous to attempt the stencil, since it was new to me and the wall had a bit of texture. But fear not friends, it was so darn easy! During the process I gleaned a few tips I'm going to share to make sure your stencil project goes without a hitch!
How to stencil a wall
Picking a stencil
The first issue I had was actually picking a stencil from the huge selection that Stencil Revolution had! They were all just so good friends! It was a really hard choice between the Fern pattern stencil and the Bees stencil. Ultimately I went with Bees because they were so darn cute. They reminded me of the honey bees on my grandparents old farm. Another thing I loved about stencil versus wallpaper is that the stencil is so much less expensive, and you can reuse it! All bonuses in my book!
Clean your surface
Make sure to clean the wall you'll be stenciling before applying. I love a good cup of vinegar in a bucket of warm water! For this wall, I had just applied a coat of fresh paint (and had cleaned the wall prior to applying that) so we were ready to go!
Where to start
I started at the side of the wall and worked from there. You can also start in the center of the wall, creating a main focal point. I did this because of the size of my wall, and not wanting the Bees to end on a corner. (That didn't fully work as you'll see in a minute.)

What to use for painting your stencil
I tried several different ways to apply the paint to the stencil, and this is what I came up with.
First I tried a small roller, which I rolled as much of the paint off as possible, and then patted dry. Still, there was too much paint on the roller to work well, and I got very blurry bees.


A great tip to get paint off a wall (and stencil) is a baby wipe! Keep a bag of them close by and if you paint too heavy and have bleeding, wipe that section of the pattern clean off, and try again!
After the failed roller attempt I tried a larger sponge. Again, patting it dry with a towel before applying, but had the same results. The sponge had such large holes throughout that it keep paint trapped which resulted in too much excess and more bleeding. Also, having such a large sponge on a smaller stencil design was difficult to work with.

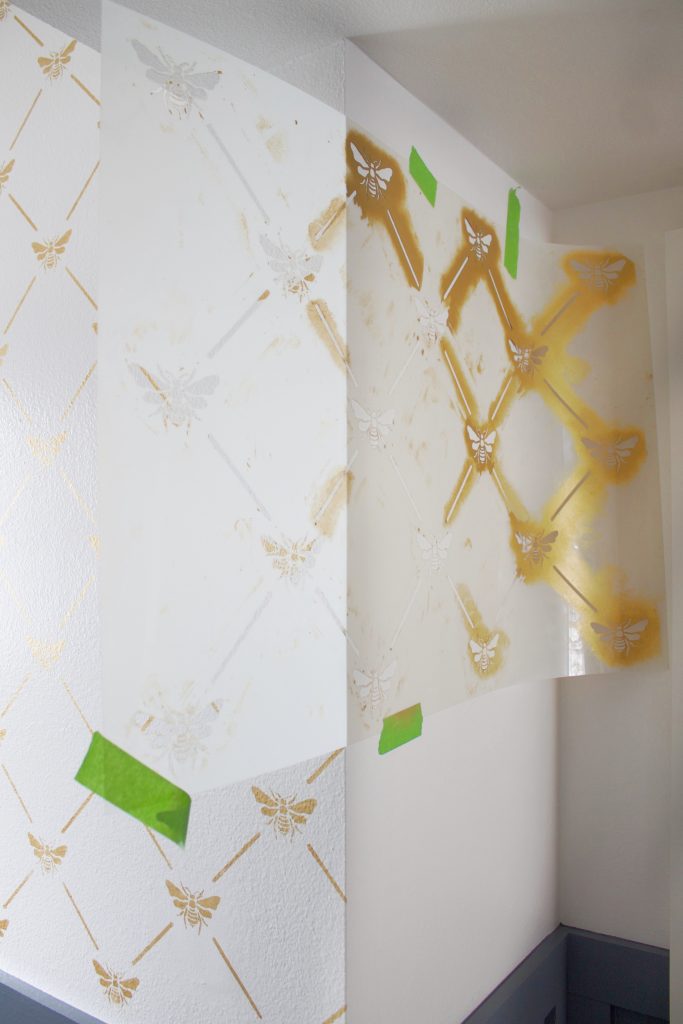
The third try was a success! (I feel like Goldilocks telling this story!) I used a small, dense sponge and it was perfect! Always pat out as much paint as you can, leaving the sponge fairly dry. You'll be surprised how much paint still comes out onto the stencil and surface. I did two coats for each bee. This went really fast. The coats are so thin they dry within about five minutes. If you start at one side of the stencil and work towards the other, by the time you reach the end you simply start at the beginning again and apply the second coat.

Another tip is to push down the stencil as close as you can to the wall with the hand not doing the sponging. Because my wall had a little texture this helped to seal the stencil to the wall, further preventing bleeding.


Once I found the system that worked best I put on my favorite podcast and got busy! Maybe I'm alone in this, but I found stenciling very soothing, and was actually sad when it was over! Ever now and again I'd get a bee or line that bled a bit, and I'd simply wipe the paint off with the baby wipe and sponge that spot again. Stenciling is very forgiving, which I'll add to the bonus category of using a stencil list.

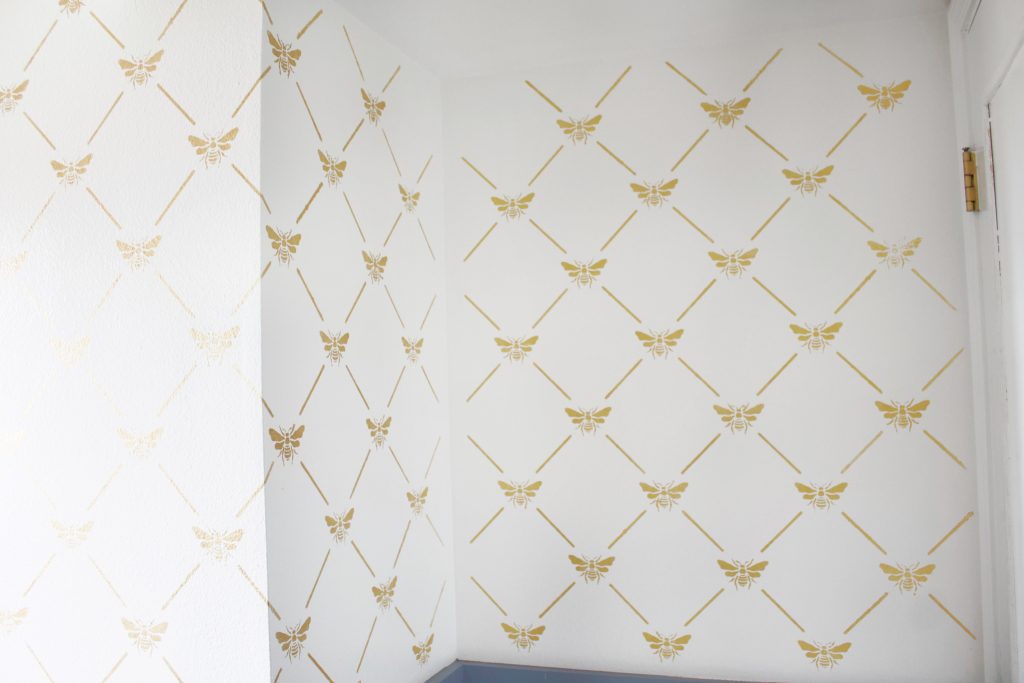
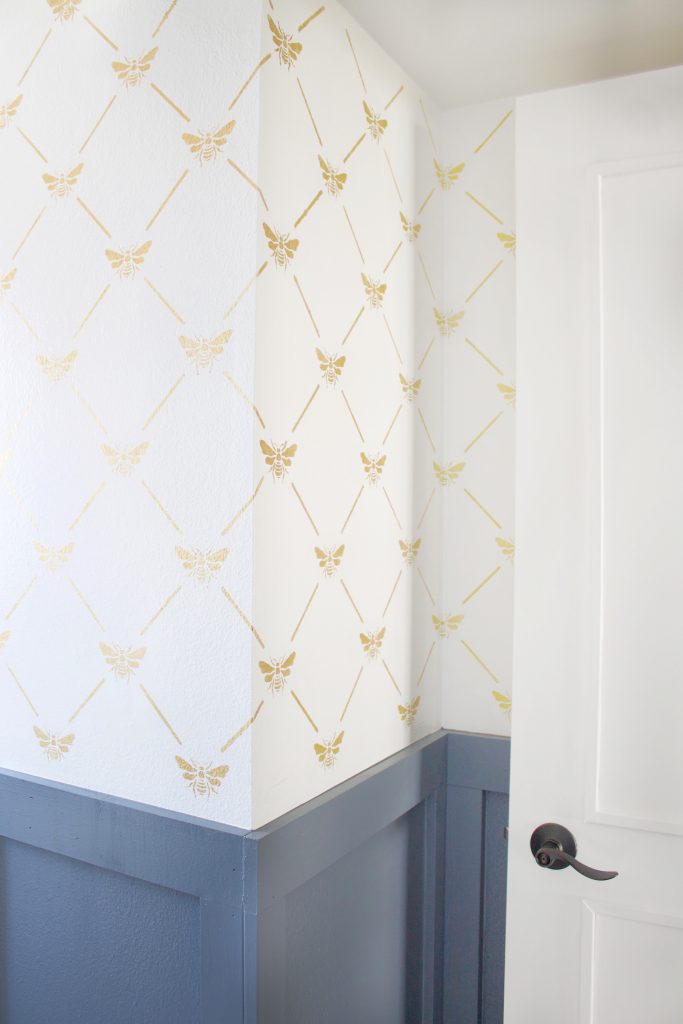
Outer corners truly aren't that hard to do, you simple match up the patter on the other wall, and keep going.
How to stencil a wall corner
Inner corners on the other hand proved to be a bit of a challenge for me. And just my luck, trying to avoid bees in a corner didn't work out as well as I had hoped. But it's okay, because I figured it out, and you can too!
I went ahead and stenciled around the corner, knowing after I'd used the full stencil as much as possible, I'd cut off a bee and line, fold it, and match it up to the corner and sponge that. The stencil bent really well when trying to get close to the ceiling, but after trying the corner I just couldn't make it work and knew for me at least, I would have to cut a section off.

Once all the other portions of the wall were complete, I cut a bee and line out of the larger stencil, and used it to sponge the corner bees. I still had to go over the very corner with a paintbrush and connect the bee fully, which was very easy.

Overall friends, I couldn't be more in love with how this farmhouse bathroom turned out! The wainscoting, which you can find a tutorial for here, along with some fresh paint, a few new fixtures, plus the perfect stencil and my bathroom looks like a million bucks, or something out of a farmhouse magazine dream.

Have you tried using a stencil before? It's now my new favorite way to make a big change quickly and easily. Check out the selection that Stencil Revolution offers! You'll probably end up like me, spending more time trying to figure out what stencil to pick than actually using it to transform your wall!