How To Make Butter The Way Great Grandma Did From Cream
Imagine standing in your kitchen, sunlight filtering through the windows, and the faint smell of fresh cream in the air. A cozy farmhouse, a churn in your hands, and the satisfaction of turning something so simple into something extraordinary-this is butter making.

There's something timeless about the process. It connects us to the rhythm of the seasons, and the joy of creating food with our own hands. It's one of those kitchen rituals that required you to slow down, and savor the process.
Here on our homestead, my Jersey cow, Lilac, isn't currently in milk. But, in just two short weeks we'll welcome another sweet girl to the farm. The anticipation is palpable. In the meantime, I've been blessed with fresh raw milk from a neighbor's cow-a gift that brings me so much joy as I turn that liquid gold into fresh, homemade butter.
Today, I want to share with you not just the how of butter making, but the why. Maybe you're dreaming of someday having your own cow, or perhaps you simply want to experience the magic of turning cream into butter in your kitchen. Whatever your reason, this guide will inspire you to slow down, embrace the beauty of the process, and rediscover the soul-nourishing simplicity of making something from scratch.
Imagine for a moment you're in my kitchen with me. Put on your apron, roll up those sleeves, and let's make butter together.

Butter Basics: What You Need to Know
Butter is made by separating the fat molecules in cream from the liquid buttermilk. With a little effort (and sometimes some special equipment), you'll turn a quart of cream into a golden block of fresh butter-perfect for spreading, baking, or cooking.

The Role of Cream
For the best results, start with room temperature, high-quality cream. Fresh, unpasteurized raw cream from a dairy farm or your own cow yields the richest flavor. If you don't have access to raw cream, heavy whipping cream from the grocery store works beautifully. Just make sure it has a high-fat content-at least 36%.

Seasonal Cream Lines
The cream line on milk (the layer of cream that rises to the top in a jar) varies with the season. Cows grazing on spring and summer grass produce cream that's abundant and vibrantly yellow. During fall and winter, when they switch to hay, cream becomes paler and less plentiful.
Fun fact: I remember reading to the kids last winter in Little House on the Prairie, how Ma Ingalls would slice carrots into cream to tint her winter butter golden.

Tools You'll Need
Here's the special equipment and basic tools for making butter:
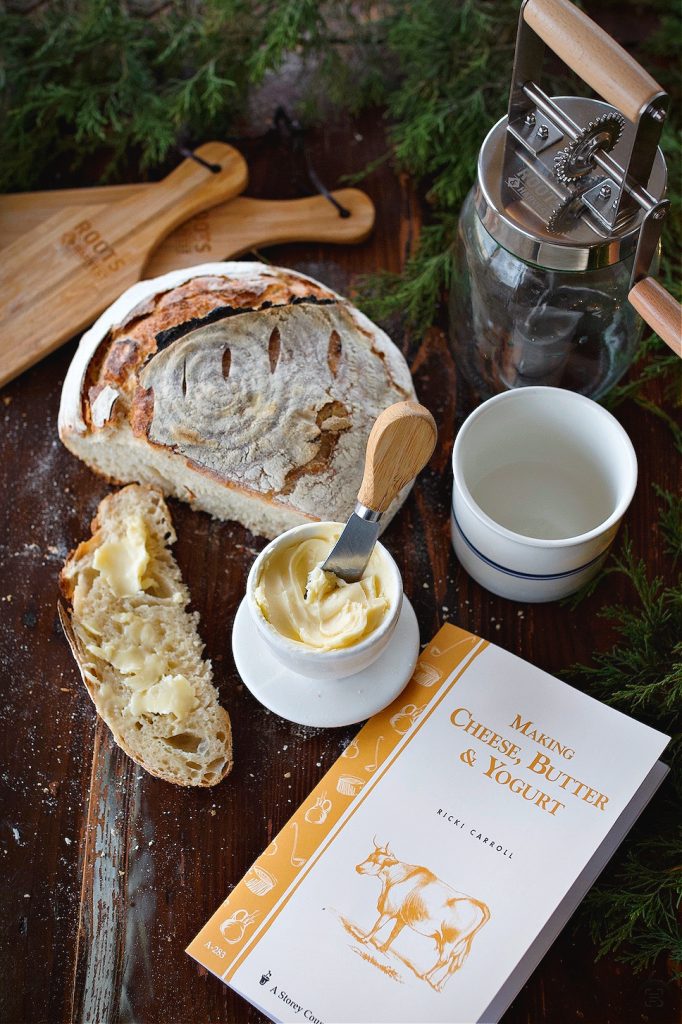
- Roots & Harvest Butter Churn Kit: Includes a butter churn, wooden paddles, and a stoneware butter bell.
- Quart jar: To collect the excess buttermilk. (You can never have too much buttermilk, it's great in pancakes!)
- Flat beater: If using a stand mixer.
- Fine mesh sieve: To strain the butter. (Or just pull it out with your hands. That works fine too!)
- Dish towel or kitchen towel: For cleanup and spills
- Wooden spoon or butter paddles for kneading, and squeezing out the remaining liquid and shaping.
- Tight-fitting lid: For your jar if using the mason jar method.
- Iced water: To wash your butter. Or run it under water.
The Cost-Effectiveness of Homemade Butter
Making butter is a wonderful skill, but is it economical?
When It's Worth It
If you have a small farm or access to fresh milk on a regular basis, making butter is incredibly cost-effective. A half gallon of cream from your own cow can yield several batches of butter at virtually no cost beyond the cow's upkeep.
When It's a Splurge
If you're buying cream, the math changes. For example, a quart of heavy cream can cost $6-$8, while a pound of storebought butter might only cost $4-$5. While it may not save money, it's still a fun, hands-on experience-perfect for kids or anyone wanting to connect with traditional kitchen skills.
Butter Tips for Success
- Start with fresh cream: The fresher, the better.
- Don't overfill your bowl: Cream expands as it churns, so leave space in your large bowl.
- Use Ice Water to clean butter: Very cold water is essential to removing all the buttermilk from the butter, helping extend it's shelf life.
- Cool place for storage: Store butter in a butter bell or an airtight container to keep it fresh.
- Cultured butter: Add a tablespoon of yogurt or lactic acid to your cream before churning for a tangy flavor.
- Clean hands: Essential for kneading butter effectively.
Storing and Using Your Butter
Homemade butter is best stored in a cool place like the fridge. Wrap it in parchment paper or plastic wrap for longer storage. Use it for:
- Baking (like in these yummy sugar cookies)
- Cooking
- Spreading on bread (this is my favorite yeast sandwich bread!)
- Whipping into flavored butters
Historical Butter Trivia
Did you know that during hard winters, families would mix butter with white butter from goat's milk or even stretch it with other fats? Butter making is full of stories, from Ma Ingalls' carrot trick to modern homesteaders experimenting with good bacteria for flavor.
The Whole Process: How to Make Butter

How To Make Butter
Ingredients
- Enough cream: A pint of heavy cream or more start with 2-4 cups of heavy cream
- A little bit of Redmond Real Salt to taste.
Instructions
- Step 1: Room Temperature Cream
The first thing to remember is that your cream should be at room temperature. This step helps the fat molecules break down and churn faster. - Step 2: Choose a method
- You have a variety of tools to choose from:
Butter Churn: This traditional method takes more time but is deeply satisfying.
Stand Mixer: Use a flat beater on medium speed for quick results. But you'll need to cover with a cloth because liquid is sure to splash out!
Hand Mixer: Perfect for small batches.
Mason Jar: A fun, hands-on option for kids. Pour cream into the jar, secure the tight-fitting lid, and shake until butter forms. (Fun fact: this was the first way we ever made butter!) - Step 3: Churn the Butter
- As the cream churns, it goes through stages:
Whipped cream stage: The cream thickens to stiff peaks.
Next step: The cream begins to clump, and the fat separates from the liquid. This is your butter and buttermilk. - Step 4: Strain the Butter
Pour the mixture into a fine mesh sieve over a bowl to catch the excess buttermilk. Save the buttermilk-it's now homemade buttermilk and can be used for baking or pancakes. - Step 5: Wash and Knead the Butter
Transfer the butter to a large mixing bowl and wash it with cold running water or iced water to remove milk solids. Knead the butter with clean hands or a wooden spoon until the water runs clear. This extra step extends the butter's shelf life. - Step 6: Season and Shape
You know have sweet, unsalted butter! Sprinkle a little Redmond Real Salt over your butter and mix it in. Shape the butter into a block or roll it in parchment paper for storage. You can also create compound butter by adding herbs, garlic, or even honey.
Notes
Nutrition
Making butter is more than a recipe-it's an experience.
Whether you're using a hand mixer like great grandma, a stand mixer, or just a mason jar, the journey is as rewarding as the final product. It's about slowing down, savoring the process, and connecting with something bigger than yourself.
Give it a try! And if you have any questions or tips, I'd love to hear from you. Let's keep this tradition alive and thriving. Tag me over on Instagram if you whip up a batch, and to hear more about our homesteading journey, check out my About Me page.


I make butter regularly, especially now that we have fresh cream from the cows. There’s nothing that compares to spreading homemade butter on warm bread. It’s rich, flavorful, and somehow just tastes like home. Once you start making your own, the store-bought stuff doesn’t stand a chance.