Sweet and Easy Cherry hand pies recipe
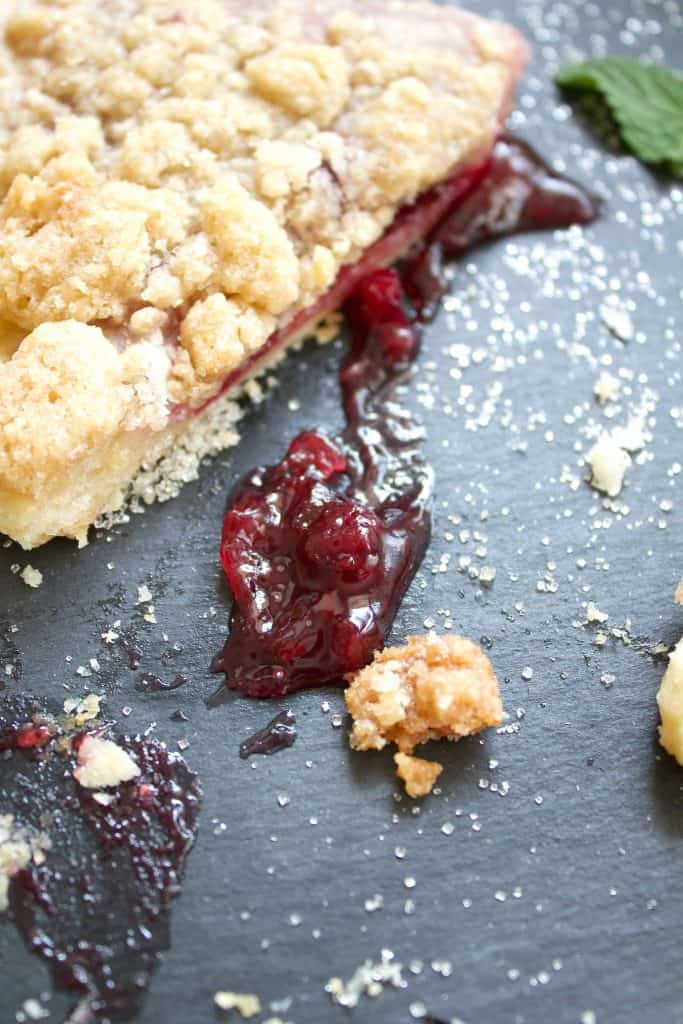
There is something so charming about sweet little cherry hand pies cooling on the counter, the flaky crust turning golden brown as the juicy filling bubbles at the edges. These sweet cherry hand pies are made with fresh cherries, real butter, and a homemade pie crust that bakes up beautifully crisp and tender. They're a perfect addition to a backyard bbq, a summer picnic, or packed into an airtight container for a road trip treat.

I look forward to cherry season every year and almost always make a double batch. Sometimes I use sweet cherries and sometimes tart cherries, depending on what I can pick or find at the market. Either way, they turn into the most delicious portable pies, kind of like a big pie in mini form. The filling cooks down on medium heat in a large saucepan, and then it's tucked inside circles of pie dough before baking to a deep golden color.

If you've never made a hand pie recipe before, you're going to have so much fun with these. They're simple, cozy, and make the kitchen smell like a bakery on a summer morning.
Jump to:
Why You'll Love This Recipe
- Flaky crust: Made with cold butter, ice water, and a simple flour mixture - the perfect base for that tender, buttery crust we all love.
- Fresh cherry flavor: Using sweet cherries gives a juicy filling that tastes like summertime. Sour cherries or a mix work beautifully too.
- Simple, basic ingredients: Nothing complicated here. Flour, butter, sugar, lemon juice, and cherries. Pantry staples at their best.
- Perfect for gatherings: These mini cherry hand pies are easy to transport on a half sheet pan, ideal for Memorial Day, backyard cookouts, and summer celebrations.
Kid-friendly and freezer-friendly
Pop any extras in a plastic freezer bag, press out as much air as you can, seal bag, and freeze in a single layer. Warm later in the oven - not the microwave - to keep that flaky pie crust crisp.
Ingredients & Tools You'll Need
- Fresh sweet cherries (use a cherry pitter if you have one)
- Lemon juice and almond extract (or vanilla extract)
- All-purpose flour
- Cold butter, cubed
- Ice water
- Brown sugar + coarse sugar or turbinado sugar
- Pastry brush
- Rolling pin or bench scraper
- Plastic wrap
- Parchment paper
- Baking sheet or half sheet pan
- Sharp knife or round cutter/cookie cutter
- Large saucepan
Optional: Puff pastry works in a pinch, though I always recommend homemade pie dough for the best result.
Tips for the Flakiest Crust
- Start with very cold butter. Frozen works even better.
- Handle the pieces of dough lightly. Over-mixing melts the butter.
- Keep dough cold. Wrap in plastic wrap and chill completely.
- Roll on a lightly floured surface and use a sharp knife or cookie cutter to cut clean circle shapes.
- If making a double batch, keep the second half chilled while you work.
Pro tip: transfer dough to the fridge anytime it starts to soften. A warm crust equals a tough crust, and we want that tender, buttery crust.
How to Assemble
Once the dough has chilled and the filling has cooled, roll the dough out gently with a rolling pin. Cut your circle shapes, add one to two tablespoons of the cherry filling to each, then fold and crimp the edges of the dough with the tines of a fork. Brush the top of each pie with egg wash using a pastry brush, sprinkle coarse sugar on top of each hand pie, and bake on parchment paper until golden brown.
Let them cool so the juicy filling sets, then serve warm with ice cream. It takes them to the next level.
How to Store
Store leftovers in an airtight container in the fridge for up to 5 days. To reheat, place on a baking sheet lined with aluminum foil or parchment paper and warm in the oven so the crust stays crisp. Avoid the microwave, it softens that beautiful flaky crust.
To freeze, place pies in a heavy-duty zipper-lock bag or plastic freezer bag, press out as much air as possible, and shake bag to settle them in a single layer. Freeze up to 3 months.

FAQ
Yes, puff pastry or pre-made dough works, but homemade pie crust gives the best texture and flavor.
Absolutely. Sour cherries make a lovely classic bakery-style filling. Increase sugar slightly if you prefer sweetness.
Seal edges well and crimp firmly with the tines of a fork. Chill before baking if dough feels too soft.
Yes, you can use vanilla or almond extract. Almond gives that classic cherry pie bakery flavor.
Let it cook and thicken fully, then cool before filling. Warm filling melts the dough and can leak.

Cherry Hand Pies
Ingredients
Pie Dough
- ½ cup frozen butter
- 1 ½ cup all-purpose flour
- ½ teaspoon salt
- ½ cup ice water
Cherry Filling
- 6 cups fresh cherries pitted
- 3 tablespoons lemon juice
- 2 ½ cups sugar
- 8 tablespoons cornstarch or arrowroot
- 1 teaspoon almond extract optional but delicious
Streusel Topping
- ½ cup brown sugar
- ½ cup granulated sugar
- ½ cup flour
- ⅛ teaspoon salt
- ¼ cup butter room temp
To Finish
- 1 egg beaten for egg wash
Instructions
- For the crust: Start by taking your frozen butter and chopping or grating it into small pieces. In a bowl, stir together the flour and salt, then gently toss in the butter so each piece is coated. Slowly add cold water and mix just until the dough comes together. You should still see bits of butter throughout - that's what makes it flaky. Press into a disk, wrap it, and let it rest in the fridge for at least four hours so it chills fully.
- While the dough is resting, make the filling: Add the cherries to a saucepan and let them warm over medium heat until they begin to release their juices. Stir in the lemon juice and sugar, then gently mash a few cherries to help everything come together. Scoop out half a cup of the warm cherry liquid into a small bowl, whisk in the cornstarch until smooth, and pour it back into the pot. Keep stirring as it thickens and becomes glossy. Once it reaches a jam-like consistency, remove from the heat and stir in the almond extract. Let it cool completely so it doesn't melt the pastry.
- For the streusel: Stir the sugars, flour, and salt together in a small bowl. Add the soft butter and use a fork to work it in until you have soft crumbs. Set aside.
- When you're ready to bake, warm your oven to 350°F and line a baking sheet with parchment. Roll out the chilled dough on a lightly floured surface and cut it into six circles, about six inches each. Spoon some cherry filling onto one side of each circle, fold over, and crimp the edges with a fork. Brush the tops with egg wash, then generously sprinkle on the streusel.
- Bake the hand pies until the pastry is golden and the filling is just bubbling at the edges, about 35 to 40 minutes. Let them cool a little before serving. The centers are very hot right out of the oven. They're best warm, and a little scoop of vanilla ice cream never hurts.
Notes
Nutrition
A Note From My Homestead Kitchen
I've been making cherry hand pies for years, and they never last long around here. They remind me of summer nights, kids running in and out of the house, and the whirlwind of cherry season. There's something special about baking with fruit you picked with your own hands, stirring it into homemade cherry pie filling, and then wrapping it in buttery pastry.
If you make this cherry hand pies recipe, be sure to leave a star rating and review, it helps so much. And if you share on social media, tag me so I can see your sweet little cherry hand pies cooling on the counter too.
Happy baking from my farmhouse kitchen to yours.

You may also enjoy:
Traditional cherry pie filling
Strawberry jam water-bath canning tutorial
Meet Eryn
Eryn Whalen is a homestead blogger and recipe developer with decades of hands-on experience in gardening, home canning, animal husbandry, and traditional kitchen skills.On her family's 100-acre Tennessee farmstead, she shares the daily beauty of homestead life: from milking cows at sunrise to filling the pantry with homegrown food and baking from scratch in her farmhouse kitchen. Read more about Eryn here


I have made these sweet little cherry hand pies more times than I can count now, and they always turn out golden and flaky with the best juicy filling. They remind me of classic bakery pies but better since they’re homemade. If you’re in cherry season, make a double batch and freeze a few for later, they warm up beautifully in the oven. So fun to bake and so worth it. Enjoy!