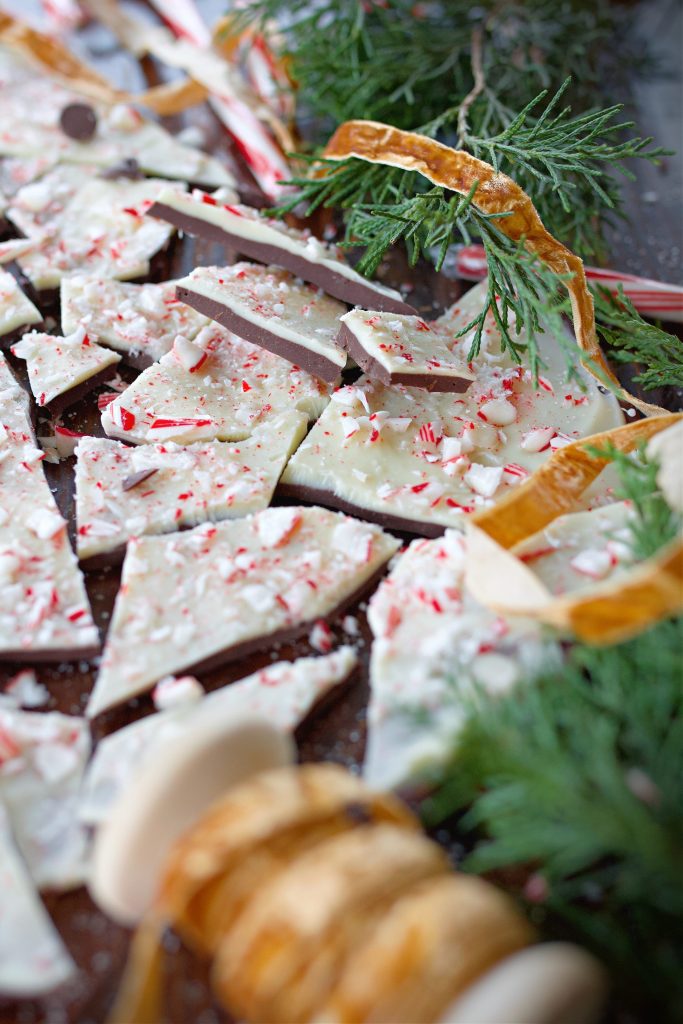
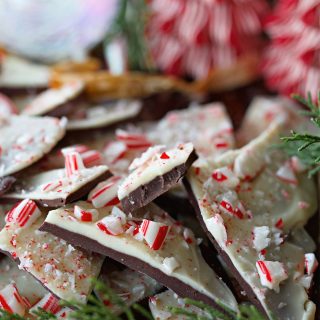
3 Ingredient Homemade Peppermint Bark Recipe | Great Gift!
The holidays on the homestead are never quiet, but they do carry their own kind of peace. You'll often find me in the kitchen with a dish towel over my shoulder, a pot of chocolate melting on the stove, and peppermint in the air. There's something timeless about making old-fashioned candy in your own home, with kids around the table helping crush candy canes and sneak tastes when they think I'm not looking.
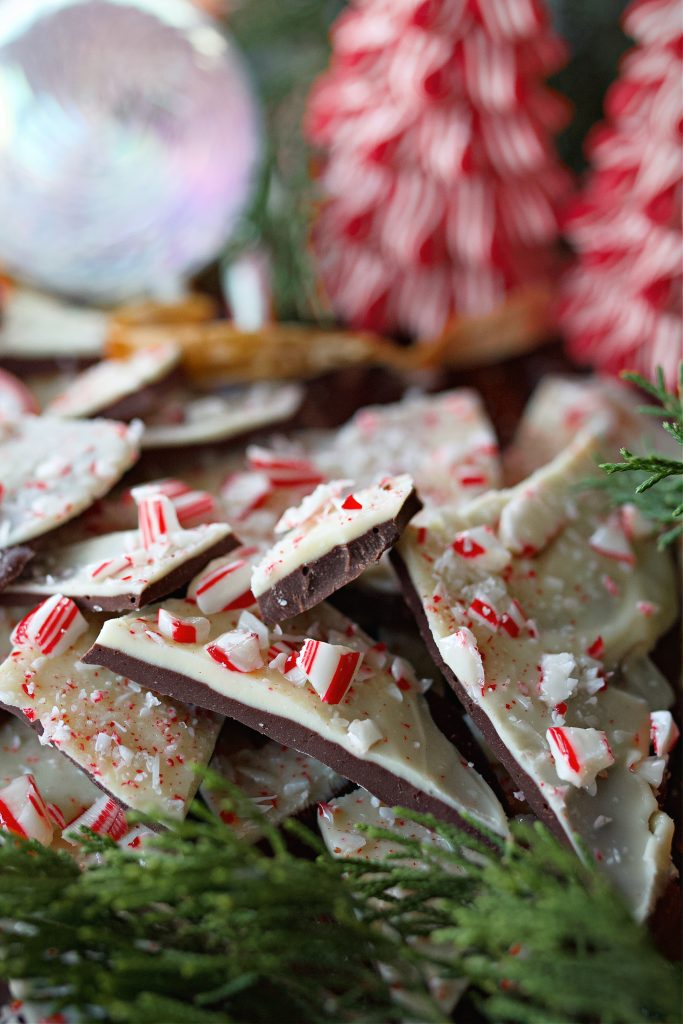
This easy peppermint bark recipe is one I make every single year. It's a tradition just as much as cutting the tree or hanging stockings. With only three ingredients and no baking, it's the kind of recipe you can make on a snowy afternoon, wrap up in parchment and ribbon, and hand out to neighbors or slip into stockings. If you love simple, homemade treats like this, you'll also enjoy my English Toffee recipe or cozy Homemade Hot Cocoa Mix for gifting.

A Quick Look at This Easy Peppermint Bark Recipe
✅ Recipe Name: 3 Ingredient Peppermint Bark
? Ready In: About 1 hour 15 minutes (includes cooling)
? Serves: Makes approx. 20 pieces, 2 pieces per serving
? Calories: 181 per piece
? Main Ingredients: Dark or semi-sweet chocolate, white chocolate chips, crushed candy canes
? Dietary Info: Gluten-free, vegetarian
⭐ Why You'll Love It: Easy no-bake recipe, great for gifting, festive and fun to make with kids
SUMMARIZE & SAVE THIS CONTENT ON
Jump to:
Why You'll Love This Recipe
- Takes less than 20 minutes of hands-on time
- Festive layered look with crunchy peppermint on top
- No special equipment, just a sheet pan and a spoon
- Perfect for making ahead and freezing
- Ideal holiday gift for neighbors, teachers, or stocking stuffers
- Kids love helping (and tasting!)
Ingredients You'll Need

- 12 oz dark or semi-sweet chocolate - Use high-quality chocolate baking bars or chips for the smoothest melt and rich flavor. Chocolate chips can work in a pinch, but bars melt more evenly and have a cleaner taste.
- 12 oz white chocolate chips - Look for real white chocolate (made with cocoa butter) instead of white baking chips, which often include palm oil and waxy fillers. It's a splurge, but this Belgian Callebaut White Chocolate is one of the best.
- ½ cup crushed candy canes - These give the bark its signature peppermint crunch and festive look. I'm careful about what comes into my kitchen. We avoid artificial food dyes when possible, specially in treats I'm making for kids or gifting to others. Thankfully, there are wonderful natural candy canes made with plant-based colors and real peppermint oil. They're just as beautiful and taste even better.
The History of Peppermint Bark
Peppermint bark is a holiday treat with modern roots, originally made popular by brands like Williams-Sonoma. Combining chocolate layers with the fresh, natural peppermint flavor of candy canes, it's a dessert that has become synonymous with Christmas celebrations.
While peppermint and chocolate have been paired in desserts for centuries, this particular recipe showcases a simple layering technique that anyone can master. Plus, using quality ingredients like higher end chocolate, and candy canes that use natural dyes, ensures the treat stays wholesome and delicious.
Expert Tips
- Don't overheat the chocolate. Low and slow is the secret to smooth bark.
- Let the base layer set at room temperature. Cooling it too fast (like in the fridge) can make the layers separate.
- Use good chocolate. Chocolate chips are okay, but bars melt smoother.
- Crush candy canes in a zip-top bag. Keeps things tidy and avoids sticky messes.
- Line your pan with parchment. It makes lifting and breaking up the bark simple.
Frequently Asked Questions About This Peppermint Bark Recipe
The best chocolate for peppermint bark depends on your taste. Dark chocolate and semi-sweet chocolate provide a rich base layer, while white chocolate chips make the top layer visually stunning and creamy.
To create clean, distinct layers of chocolate:
- Melt your bottom layer of dark chocolate or milk chocolate in the double boiler. (You could use a microwave, but we don't have one in our house and when I did try it, I found it burned so easily.)
- Spread it evenly on a baking sheet lined with parchment paper using an offset spatula, then allow it to cool to room temperature before adding the top layer of melted white chocolate.
Absolutely! You can use peppermint extract or natural peppermint flavor for a burst of freshness. For a unique twist, sprinkle in crushed potato chips, organic cashews, or even vegetable concentrate for color.
To store peppermint bark in perfect condition, use a glass airtight container. Keep it at room temperature for up to two weeks or freeze in the freezer to preserve freshness for longer periods. Avoid using products with high moisture content, like corn syrup, which can cause the candy to soften.
To freeze it successfully:
Layer the bark pieces between parchment in an airtight container.
When you're ready to enjoy or gift it, let it thaw inside the sealed container at room temperature. This helps the temperature gradually adjust without drawing condensation to the surface of the chocolate.
Avoid opening the container while it thaws, this traps moisture outside, not in.
Done right, it'll still look beautiful and taste just as fresh.
Troubleshooting Guide
My chocolate seized or got grainy:
This usually means it got too hot or some water got in. Always melt chocolate slowly and keep it dry.
Candy cane bits melted into the top layer:
This can happen if the bark is still too warm. Let the white chocolate cool just slightly before topping.
Layers are cracking apart:
Let the first layer come fully to room temp before adding the second, and press gently to adhere.
Storage Tips
- Containers I Use: Glass snap-top containers or holiday cookie tins
- Room Temp: Keep in an airtight container for up to 2 weeks
- Freezer: Freeze between parchment layers for longer storage
- Gift Wrapping Tip: Layer pieces in a tin or mason jar with parchment or wax paper


Peppermint Bark Recipe
Ingredients
- 12 oz dark or semi-sweet chocolate 340 g
- 12 oz white chocolate chips 340 g
- ½ cup crushed candy cane pieces 60 g
Instructions
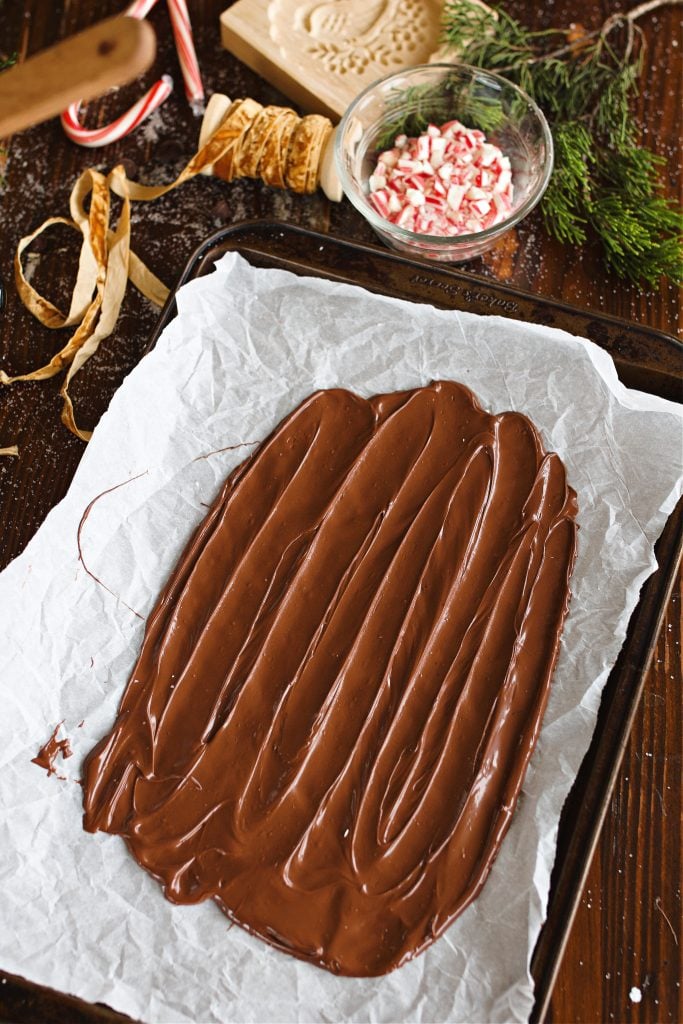
- Line your pan with parchment paper: Before melting chocolate, prep your pan. A parchment-lined baking sheet (or quarter sheet pan) will make it easy to lift and break the bark later. I like to let the parchment hang over the edges slightly for easy lifting once it sets.
- Tip: If your parchment keeps curling, crumple it lightly, then smooth it flat, it'll stay in place better.
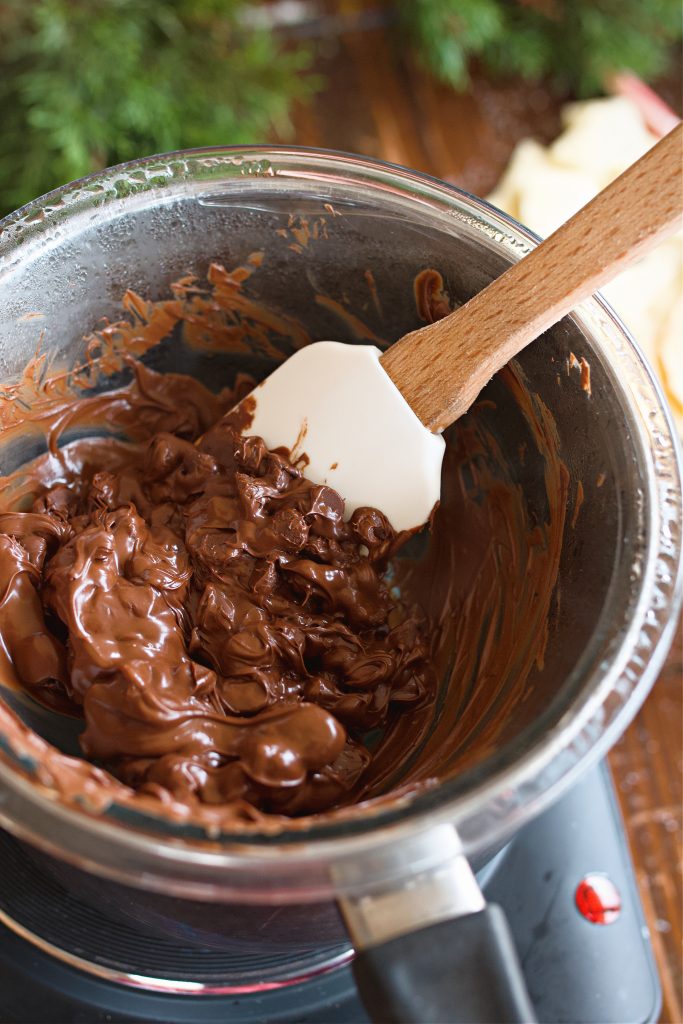
- Melt the dark chocolate slowly and gently: You can melt chocolate two main ways: in a double boiler or in the microwave. Both work, but the key is low, gentle heat and avoiding water contact (even a drop can cause it to seize).
- Double boiler method (preferred): Fill a small saucepan with an inch or two of water and bring it to a simmer. Place a heatproof bowl over the pan, the bowl should not touch the water. Add chopped chocolate or chocolate bars to the bowl. Stir constantly with a rubber spatula as it melts.
- Microwave method (works in a pinch): Place chocolate in a glass bowl. Microwave in 20-30 second bursts, stirring in between. Stop when there are still a few unmelted bits, residual heat will finish the job.
- Once smooth, pour the chocolate onto your parchment-lined sheet and spread into an even layer, about ¼ inch thick. Let it set at room temperature, not in the fridge, to avoid layer separation later.
- Repeat the process with white chocolate: White chocolate is more temperamental, it can overheat and seize more easily, so take your time. Use the same method as above, but stir constantly and keep the heat low.
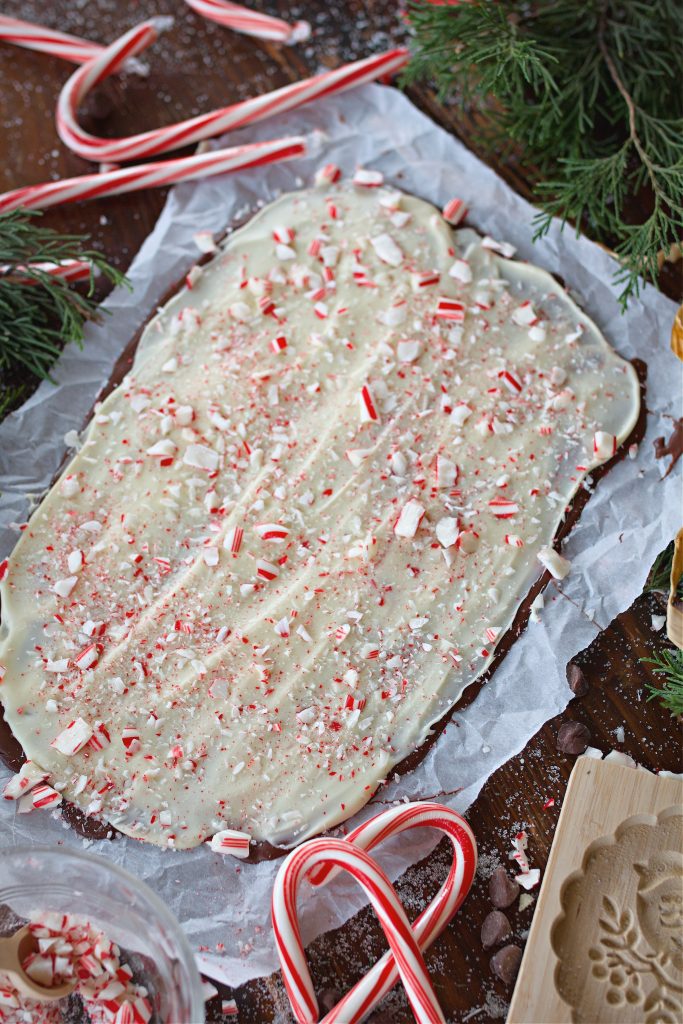
- Once smooth, gently pour over the cooled dark chocolate layer. Use an offset spatula or the back of a spoon to spread it evenly. Work quickly but don't press too hard. You don't want to disturb the layer underneath.
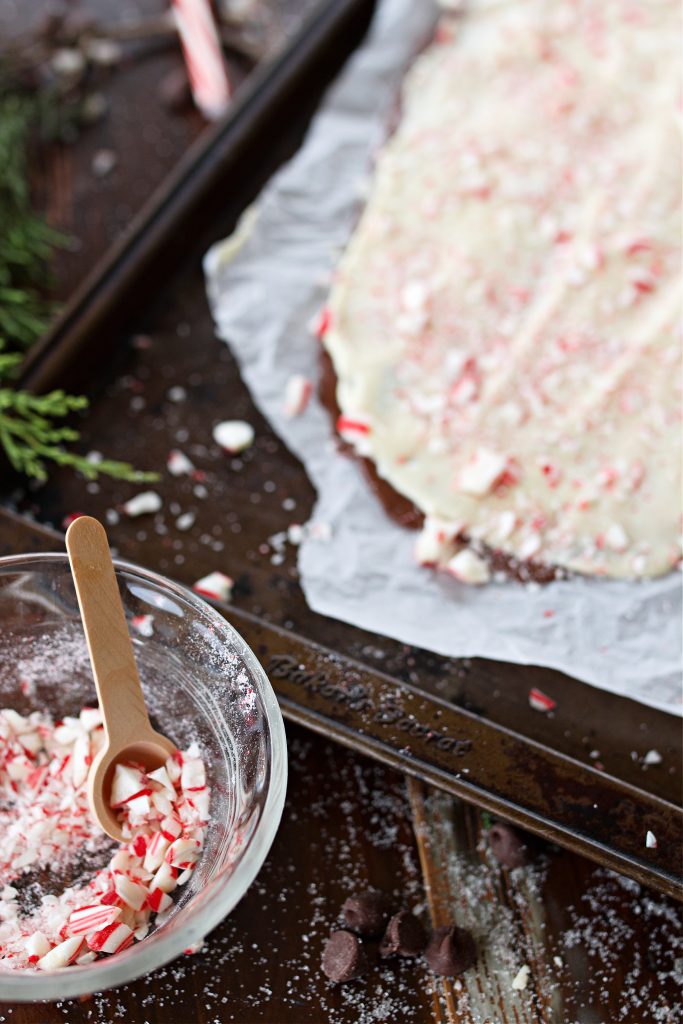
- Sprinkle crushed candy canes immediately: While the white chocolate is still warm and glossy, sprinkle the crushed candy cane pieces over the top. Press lightly with clean hands or the back of a spoon to make sure they adhere well.
- Let it set fully before breaking: Let the bark sit at room temperature for at least 1 hour, or overnight if you're not in a rush. If you refrigerate it too early, you risk moisture forming between the layers (which can lead to cracking or separation when you cut it).
- Once fully set, lift the parchment and break the bark into rustic pieces with your hands or a sharp knife.
Notes
Nutrition
Holiday Gifting Tips
Peppermint bark pairs beautifully with other classic American desserts, like fudge or Christmas cookies. Wrap the bark in festive parchment paper or tuck it into mason jars for a cozy presentation.
This peppermint bark recipe is more than just a dessert, it's a piece of holiday joy you can share with those you love. Make it for your family or including it in a holiday gift basket. This recipe is sure to bring a smile to everyone's face.


I’ve been making this peppermint bark every Christmas for years, and it never lasts long around here! I usually make a few batches, one for gifting and one to keep on the counter for when friends stop by. The mix of creamy white chocolate and that crisp peppermint crunch just tastes like the holidays to me. It’s simple, nostalgic, and always a hit with anyone who tries it.