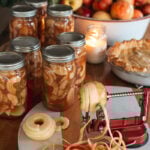
Canned Apple Pie Filling
Get ready to savor the delightful flavors of freshly baked apple pie any time of the year with this Homemade Canned Apple Pie Filling! This recipe captures the crisp, sweet apples, blended with warm cinnamon and nutmeg, making a filling that's bursting with autumn flavors you can enjoy any time of the year.
Servings: 6 quarts
Calories: 1026kcal
Cost: $20
Equipment
- 1 Water bath canner or large canning pot
- 6 quart-size canning jars (or pint jars) with new jar lids and bands
- 1 Funnel + bubble remover or thin spatula
- 1 bowl of cold water with lemon juice
- 1 Large pot or stockpot for syrup
- 1 Apple peeler/corer/slicer
Ingredients
- 6 lb 2.7 kg peeled, cored, sliced apples (½-inch wedges)
- 4½ cups 900 g granulated sugar
- ½ cup 100 g brown sugar
- ¾ cup 85 g cook-type Clear Jel (not cornstarch)
- 1 tablespoon 8 g cinnamon
- 1 teaspoon 2 g apple pie spice
- ½ teaspoon 1 g nutmeg
- 1 teaspoon 6 g salt
- ½ cup 120 ml bottled lemon juice
- 7 cups 1.65 L water or apple juice
Instructions
- Prepare the Apples: Peel, core, and slice the apples into even ½ inch wedges. You will need about 6 pounds of sliced apples. As you slice, place them in a large bowl of cold water with a splash of lemon juice to prevent browning.
- Make the Syrup: In a large stockpot, whisk together all dry ingredients: granulated sugar, brown sugar, Clear Jel, cinnamon, apple pie spice, nutmeg, and salt. Slowly add in the water or apple juice and bottled lemon juice, whisking constantly to prevent lumps.
- Place the pot over medium high heat, stirring often until the mixture thickens and turns glossy, similar to a loose pudding that coats the back of a spoon. Once thickened, remove the pot from heat.
- Add the Apples: Immediately stir the drained apple slices into the thickened syrup, coating them evenly. The heat of the syrup is enough to warm the apples slightly without cooking them, keeping their texture firm for baking later.
- Fill the Jars: Using a funnel, ladle the hot apple filling into sterilized jars, leaving ½ inch of headspace. Run a bubble remover or thin spatula along the inside of each jar to release any trapped air and help the syrup settle around the apples. Wipe rims clean with a damp cloth, then place lids and rings on finger tight.
- Process the Jars: Lower the filled jars into a boiling water bath canner, making sure they are covered by at least 1 to 2 inches of water. Once the water returns to a rolling boil, process for 20 minutes. Adjust for altitude if needed.
- Cool and Store: After processing, remove jars carefully and place them on a towel lined counter. Cover lightly with another towel and let cool undisturbed for 12 hours. You will hear the lids seal as they cool.
- Usage: Once cooled, check seals by pressing the center of each lid. It should be firm and not flex. Label jars with the date and store in a cool, dark place for up to 2 years.
- This method keeps your apples crisp and flavorful while giving you a ready to use filling that is perfect for pies, crisps, or spooned warm over ice cream.
Notes
Get the syrup right: If it’s still thin, keep it over medium-high heat until it coats the spoon.
Prevent siphoning: After processing, let jars rest 5 minutes in the canner before removing.
Mix apple types: Combine tart apples like Granny Smith with sweeter ones for balanced flavor and texture.
Avoid seal issues: Tighten lids only fingertip-tight and let jars cool undisturbed to room temperature.
Nutrition
Serving: 1quart jar | Calories: 1026kcal | Carbohydrates: 265g | Protein: 2g | Fat: 2g | Saturated Fat: 0.3g | Polyunsaturated Fat: 0.4g | Monounsaturated Fat: 0.1g | Sodium: 411mg | Potassium: 835mg | Fiber: 12g | Sugar: 243g | Vitamin A: 254IU | Vitamin C: 31mg | Calcium: 84mg | Iron: 1mg
