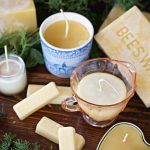
How to Make Beeswax Candles: Step-by-Step
Learn how to make your own beeswax candles with this simple step-by-step guide! Perfect for gifting, these candles are made with pure beeswax, cotton wicks, and thrifted containers like jars and vintage tins. Add a personal touch with essential oils or keep them classic—either way, you’ll create beautiful, heartfelt gifts your loved ones will treasure!
Servings: 2 candles
Cost: 10
Equipment
- 1 Double Boiler or Saucepan: For gently heating the wax.
- 1 Quart Jar: To use as a melting pot for the wax.
- 1 Small cloth: To place in the saucepan to protect the quart jar.
Ingredients
- 1 pound Pure Beeswax: Beeswax pellets a block of raw beeswax, or yellow beeswax (about 1 pound per batch).
- 2 wicks Cotton Wicks: Select the right wick size for your container.
- 2 wick stickers To secure the wick to the bottom of the jar or mold.
- 2 Containers Containers: Mason jars thrifted tins, vintage ceramic pieces, or glass jars.
- 1 teaspoon Coconut Oil Optional: A cup of coconut oil to soften the wax and improve the burn.
- 4 drops Essential Oils Optional: Lavender, pine, eucalyptus, or other oils for a light fragrance.
Instructions
- Prepare Your Workspace: Cover your work area with paper towels to catch any drips.Attach the wick to the bottom of the jar with wick stickers or a glue gun.
- Melt the Wax: Add a pound of beeswax to your quart jar and place it in a saucepan with a small cloth at the bottom. Melt the wax over low heat.Stir in 1–2 tablespoons of coconut oil for a smoother, longer-lasting burn.
- Optional: Add Fragrance:Once the wax has slightly cooled, add essential oils (20–30 drops per pound of wax).
- Pour the Wax: Carefully pour the melted beeswax into your containers, leaving about ½ inch of space at the top of the jar.
- Secure the Wick: Use a bamboo skewer and rubber bands to keep the wick centered.
- Cool and Trim: Let the wax cool completely at room temperature. Once fully hardened, trim the wick to ¼ inch.
- Decorate and Gift: Add a ribbon, handwritten label, or sprig of greenery for a personalized touch.
Notes
Wax Cleanup: Once you use a container or tool for melting wax, it’s best to dedicate it to candle making. Cleaning wax out completely is nearly impossible.
First Burn Tip: When lighting the candle for the first time, let it burn long enough to create a full melt pool across the surface. This prevents tunneling and ensures an even burn.
Safety Reminder: Always supervise burning candles and keep them away from flammable materials, children, and pets.
Customization Ideas: Experiment with different container shapes, beeswax pellets, or essential oils to create personalized gifts.
Next Time Tip: Save any leftover wax for your next batch of candles—it can easily be remelted and reused.
